NetCIL Online User
Guide
Applies
to: NetCIL Online
Updated: 9/4/2020
Quick Links: Changing your online Windows password
Changing your personal database password
Changing your web site password
Changing domain name for login
NetCIL Online email configuration
The following instructions detail the methods that should be used to access your virtual cloud server for use with NetCIL Online. These instructions apply to cloud services provided by ed2c; if you run NetCIL as a cloud service on your own equipment, some procedures may vary. Many of the steps listed in this section must only be done once, as they apply to security setup and configuration.
The
implementation of good security practices is essential when using
internet-accessible applications. The world is unfortunately full of bad guys,
and they use
robots to try to steal your data – all day, every day. It’s vitally important
that we do everything that we can to prevent them from succeeding.
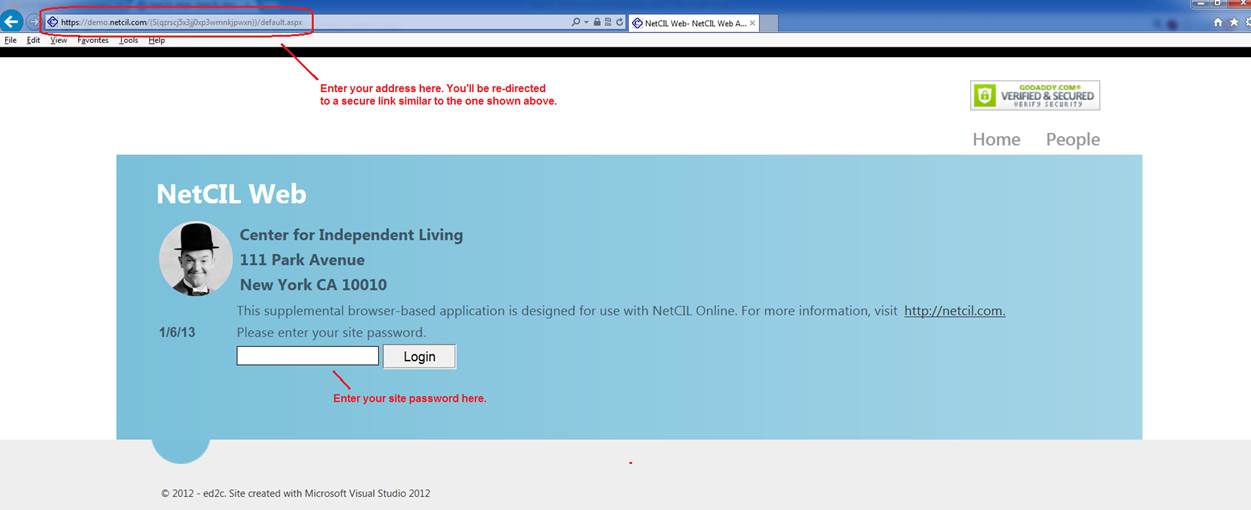
Step 1: Open the web browser of your choice (Internet Explorer, Google Chrome, Mozilla Firefox, and Apple Safari have all been tested with NetCIL applications). Enter the address of your website, which will look like {something}.netcil.com, where {something} will normally be the city where your office is located. For example, if you work at a center in Louisville, Kentucky, your address would probably be louisville.netcil.com. Web addresses are not case-sensitive. If you don’t know your web address, call us.
Step 2: You will be routed to a secure web session (part of our effort to thwart the bad guys). In the example below, Internet Explorer 10 has been used to open a secure session to demo.netcil.com, which you are free to use as a practice site anytime.
Step 3: Enter your site password. You cannot proceed without a site password; Information about setting and changing passwords can be found here.
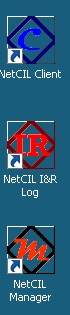
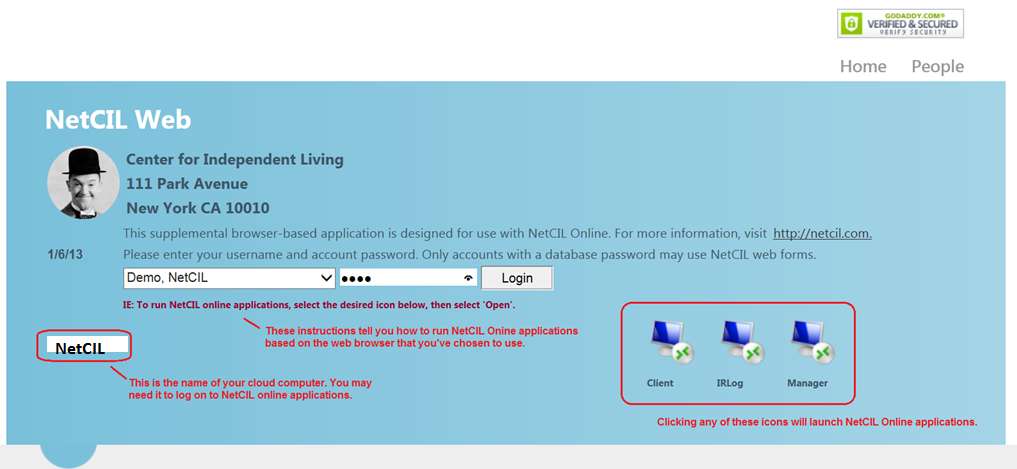
Step 4: If you only want to run NetCIL Online applications, simply select the appropriate icon for the application that you wish to use as shown below. The shortcut keys are ALT-c for NetCIL Client, ALT-l for IRLog and ALT-m for Manager. Depending on the browser that you use, you will be asked if you want to run, save, or download after selection. The web page will give you a hint as to your easiest option based on the browser that you use. In the example shown below, Internet Explorer 10 allows you to run (open) the applications without downloading. Firefox and Safari also allow you to run directly from the website, but these browsers will also download the access file regardless of the option that you select. Google Chrome requires that you save the access file before opening it. Once downloaded to a Windows-based device, you can of course use the files to access NetCIL online applications without opening a web browser. For convenience, it’s recommended that you save the files to your desktop. If you choose to use this method, it’s a good idea to occasionally update the files from your NetCIL website.
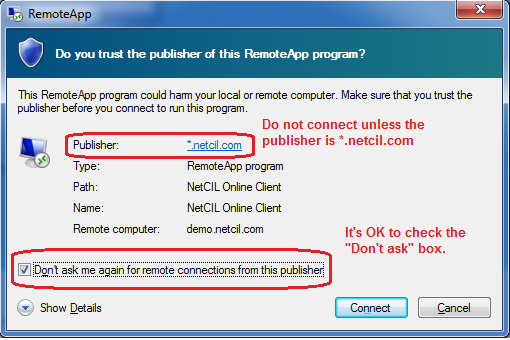
Step 5: When you open a NetCIL Online application, you may receive a prompt like the one shown below. Verify that the publisher is *.netcil.com, and then check the “Don’t ask me again for remote connections from this publisher” box if you wish. Select “Connect”.
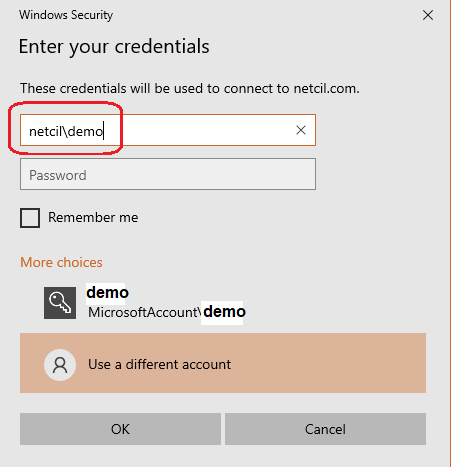
Step 6: Enter your Windows username and password when prompted as shown below. If you use remote desktop for other applications, you may have to enter the name of the cloud computer along with your password when you first log on. If you’re unable to logon with your username, select “Use another account” as shown below, then enter {your computer name}\{user name} as show in in the example.
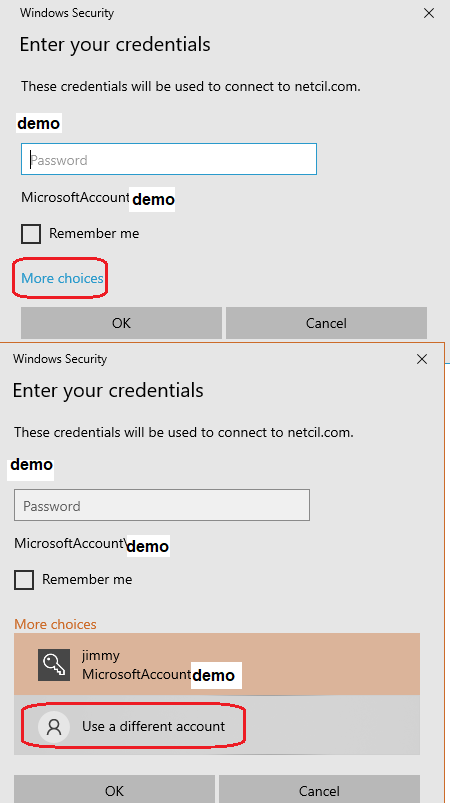
Your cloud computer name is NetCIL (not case-sensitive).
If you wish, you can choose to
select “Remember my credentials”. Please keep in mind
that doing so will allow anyone with physical access to your device to log on
to your NetCIL Online account.
Step 7: After your first successful logon, the following one-time-only messages may appear:
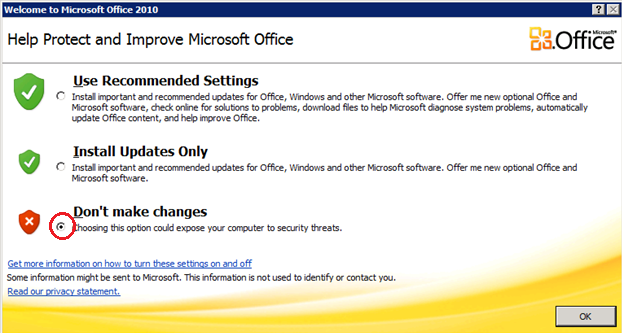
Select “Don’t make changes” – All NetCIL Online software is automatically updated and managed for you.
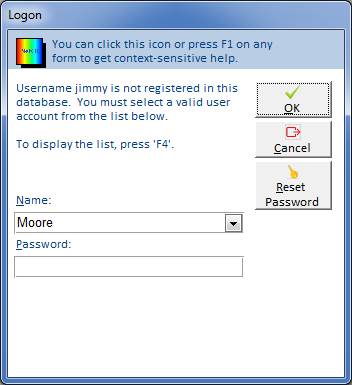
Depending on your security configuration, you may receive a second logon prompt as shown below. If you do, select your NetCIL username from the dropdown list. If a password has been applied to your account, you must enter it before proceeding. A password is required in order to use NetCIL Web Forms. You can also choose to reset your NetCIL password from the logon prompt or from the NetCIL Client Main menu. For more information, see the NetCIL Manager and NetCIL Client User Guides.
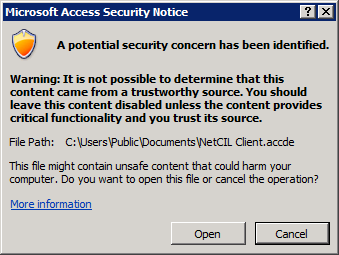
When first run, NetCIL Client will issue the following security message. Select “Open”; the message should not reappear.
One or more user accounts with system administrator privileges will be pre-configured for you. It is strongly recommended that you immediately change your temporary password as described below. The default security policy for NetCIL Online requires that users change passwords every 90 days. Windows passwords must be at least six characters in length, and they must contain a mix of upper and lower case letters along with at least one non-alpha character (such as a number or the “?” character). You can modify your system’s security policy as described in the “NetCIL Online System Administrator’s Guide.”
NetCIL Web Forms can be accessed from Apple computers, Android tablets, iPads, iPhones, Google Chrome Books, and Linux computers by simply opening a web browser. NetCIL Online applications require a Microsoft Windows operating system, but many of the devices mentioned here support Remote Desktop applications that allow access to your Windows cloud server. Useful links to these applications can be found in the downloads section of netcil.com: http://netcil.com/downloads.aspx.
There are three kinds of passwords that are required in order to run all NetCIL applications:
Site Password: The first password that is required when you open your *.netcil.com web page. There must be a dummy record in your Database Users table called “web”, and the record must have a non-blank password. System administrators can configure the password by running NetCIL Manager…Config…Database Users. At present there are no restrictions on the length or complexity of Site Passwords, but they cannot be blank.
Personal Database User Password: Required in order to use NetCIL Web Forms. Depending on your security configuration, you may also need to enter your database password in order to run NetCIL Online applications. More information can be found in the NetCIL Online System Administrator’s Guide. In order to use NetCIL Web Forms, Personal Database User Passwords must meet the following complexity requirements: At least six characters in length, with a mix of upper- and lower-case letters, and at least one non-alpha character.
Windows Password: Required in order to access NetCIL Online
Applications. This password must be at least six characters in length, it must
contain a mix of upper- and lower-case letters and at least one
non-alphanumeric character. Windows passwords are set to expire every 90 days.
Your system administrator can change this security policy if you wish. Your
Windows and Database User passwords are physically stored in different places.
You cannot use your Windows account to access NetCIL Web Forms, because there
is no way to secure the communications channel that is needed for Windows
logon. You can use the same password in both places if you wish.
To modify your NetCIL Online Windows access password, run any NetCIL Online application, and after a successful logon, simultaneously press the “ctrl-alt-end” keys on your keyboard. The following prompt will appear:
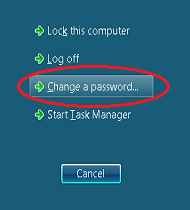
Select “Change a password…” as shown above.
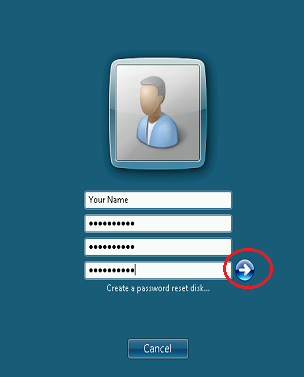
Enter your old and new password and then press the arrow button as shown above.
Changing your web site password:
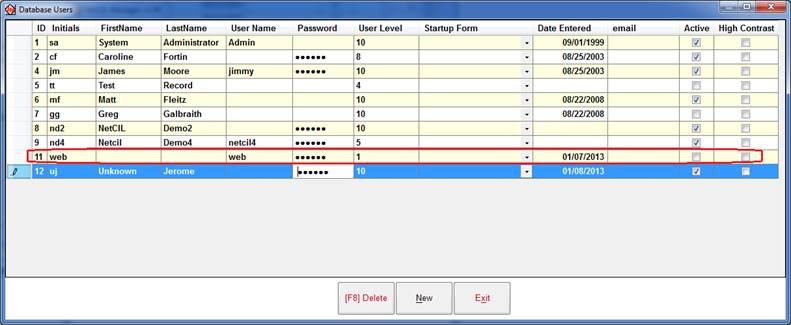
Step 1: Run NetCIL Online Manager, and select Config…Database Users:
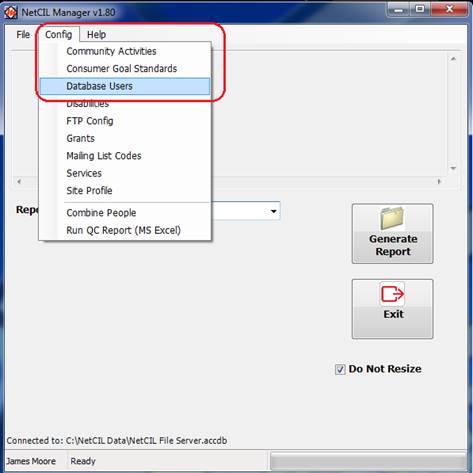
Step 2: Find the record with User Name = “web” as shown below – If there isn’t a web record, create it. Set the “Initials” column to “web”, “User Level” to 1, and uncheck the “Active” box. Set the “Password” as desired. At present there are no restrictions on password length or complexity, but it is strongly advised that you use strong passwords – A minimum of six characters, a mix of upper- and lower-case letters, and at least one non-alpha character. When used in web forms, passwords are case sensitive. When used with NetCIL Online applications, passwords are not case-sensitive. The NetCIL Manager Database Users screen can of course be used to set or reset the personal database password of any user.
Changing your personal database password:
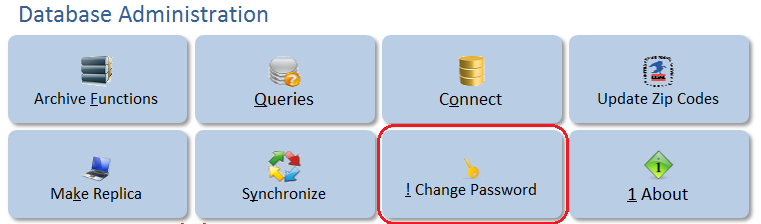
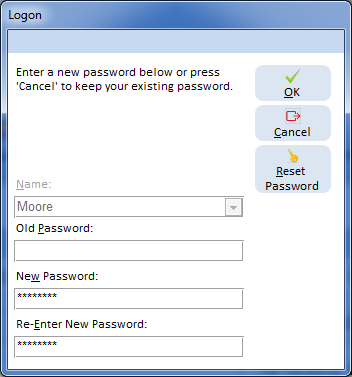
Step 1: Run NetCIL Online Client, and select “Change Password” (ALT- exclamation point) from the Database Administration section of the Main screen:
Step 2: Enter your old password (if needed) and your new password as shown below. In order to use NetCIL Web Forms, Personal Database User Passwords must meet the following complexity requirements: At least six characters in length, with a mix of upper- and lower-case letters, and at least one non-alpha character. Because a Windows password is required when using NetCIL Online applications, there are no password complexity requirements for the use of NetCIL Online applications, and a password is not required, although its use is recommended. If a Personal Database Password is not recorded, other users may “masquerade” as you after a successful Windows logon, unless your Windows username is recorded in your database. For more information, please see the NetCIL Manager User Guide. When used in web forms, passwords are case sensitive. When used with NetCIL Online applications, passwords are not case-sensitive.
As indicated above, NetCIL Manager can also be used to set or reset the personal database password of any user.
Using NetCIL Online with an iPad or a Mac
You can of course use the Safari web browser on an iPad or Mac computer to access NetCIL Web Forms, just as you would on a Windows device. Apple products, however, do require add-in components in order to run NetCIL Online (Remote Desktop) applications as described in Step 4 of these instructions. There are two free applications that are free, easy to install, and to use:
For Mac computers, download and install the Remote Desktop Connection Client for Mac. A download link and instructions for use can be found here. Once installed, simply enter the address {your site}.netcil.com and your Windows username and password as described in Step 6 of these instructions.
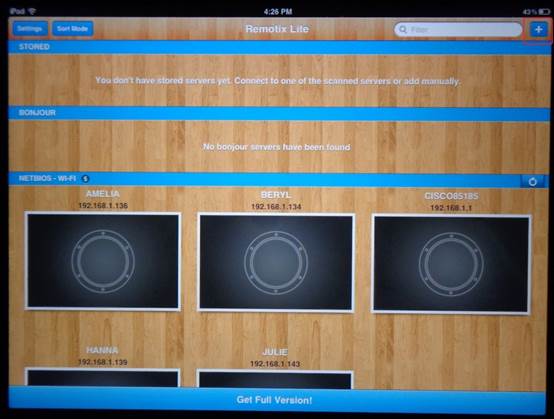
For iPads, we recommend a simple program called Remotix. A free version called Remotix Lite, which works quite well with NetCIL applications, can be downloaded from the iTunes Store by following this link. Once installed, follow these setup instructions:
Step1: Click the “+” (plus sign) icon in the upper right corner as shown below.
Step 2: Select RDP.

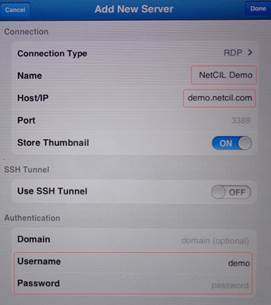
Step 3: Enter a name for your connection, which can be anything
meaningful to you. “NetCIL Demo” is used in the example below. Enter {your site
name}.netcil.com in the “Host/IP” section. If you wish, you can also store your
username and password, though doing so is not recommended for security reasons.
As is the case
with Windows systems, storing your username and password will allow anyone with
physical access to your device to log on to your NetCIL Online account.
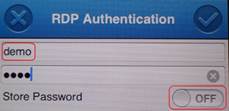
Step 4: If you followed our advice in Step 3, enter your username and password as shown below.
Step 5: Once you’ve successfully connected, you can run any NetCIL application from the desktop icons that will appear on your screen: