NetCIL Client User Guide
Applies to: Versions 2.1 and above, NetCIL Online
Revision
Date: 3/20/2020
This document is always in
the process of being updated.
Introduction
NetCIL Help Main Menu
Features, Functions, and Configuration
|
Login |
Mailing Lists |
||
|
|
|
|
|
|
Queries |
Remote Assistance |
Reports |
|
|
Schedule Meetings |
Time Sheets & Payroll |
Transfer Referrals |
Input Forms
|
Add Caregiver (P2P) |
|||
|
Bug Report |
Case Notes Group Entry |
Community Activities |
Consumer Goals |
|
Disabilities |
Documents |
Domestic Status History |
Education History |
|
Employment History |
Events |
Grants and Programs |
Housing History |
|
Inventory |
ILP Checklist |
Income History |
|
|
Insurance History |
Login |
||
|
Outreach |
Parent To Parent Form |
||
|
Relationships |
Send Letter (Info) |
||
|
Transportation |
Volunteer |
VR/DFB History |
Week Log |
|
Work Site |
|
|
Throughout this document, the names of input forms, reports, and controls are italicized wherever referenced. For example, the Notes button on the People form will be written as shown here.
Introduction
If I the author were
you the reader, I’d skip this introduction and head straight for the User Guide, which is considerably more
useful than these paragraphs, if a bit less entertaining. This
introduction contains the usual self-congratulatory remarks about how
great our software is, along with the obligatory disclaimer that
says, in effect, that if you screw things up it isn't our fault.
The NetCIL Client Database System was created by the staff
of Engineering Data Corp. (ed2c) in Louisville, Kentucky. The application
is designed to manage most of the data elements that pertain to the operation
of Independent Living Centers or other similar agencies that are charged with
basic case management operations. NetCIL Client is capable of
automatically generating a variety of agency reports such as the RSA 704, HUD
Section 8, Shelter Plus Care, California CILR, and New York State ACCES-VR, and
it can interface with a variety of external data systems. NetCIL Client
supports remote data collection so that information can be generated almost
anywhere and then transmitted to a central repository. At
present the application is in operational use by over 100 agencies
throughout the United States.
Acknowledgments
The CFAL-NetCIL database system represents the
culmination of over 14,000 hours of development work by a number of
dedicated people. The staff of ed2c is particularly grateful for the
valuable assistance that professionals at a number of centers have
provided. Their contributions have played a major role in making the
NetCIL Client database system a valuable community asset.
This on-line documentation is designed to serve as a basic guide to the
NetCIL Client Database System. In the course of its use, you will find
that you need to make a number of policy decisions regarding the collection and
interpretation of the data that you will store in your
site-specific database. As you gain insight into the system and its
role within your organization, you may develop procedures that could be of
benefit to other users. The staff of ed2c welcomes your input in order to make
this guide and the application more useful. Feel free to forward your
comments to us anytime.
Engineering Data Corp.
Box 5636
Louisville Kentucky 40255-0636
(502) 412-4000
(888) 678-0683 (toll-free in North America)
techsupport@ed2c.com
Product Disclaimer and Licensing
Statement
Most lawyers claim that Shakespeare was taken out of context when in Henry VI
he said, “The first thing we do, let’s kill all the lawyers.” But,
engineers will tell you that Shakespeare was very much in context when in
Hamlet he wrote, “For ’tis the sport to have the engineer hoisted with his own
petard.” To prevent ourselves from being hoisted (particularly by our
petards), we respectfully request that you read and acknowledge the following
statements:
• When you purchase a
NetCIL Client license for your agency, ed2c grants you unlimited rights to
install the NetCIL Client application at your site or on NetCIL Online,
regardless of the number of people who use it. However, use of this
software requires at least one properly installed copy of Microsoft Access for
which, as you might have guessed, Microsoft owns the copyright. “Properly
Installed” means, in legalese, that you must have purchased at least one
licensed copy of Microsoft Access. If you have many users, then you must
also have an Access license for each of those users, or a multi-user licensing
agreement with Microsoft, or the run-time version of Access, which ed2c can
provide to you royalty-free. If you fail to follow these guidelines,
Billy Gates may send his minions in the middle of the night to steal all of
your hubcaps. Or worse yet, he may make you listen to a Steve Ballmer
speech.
• ed2c retains full rights to the NetCIL Client software and
database designs. The software code and databases in NetCIL Client- took
us an incredibly long time to develop, and because we put so much effort into
it we decided to go to the extra trouble of copyrighting it. ed2c owns
the copyright to NetCIL Client, meaning that we’re the only ones who can use
its source code and database designs for commercial purposes. In order to
be granted a license to use NetCIL Client, you must pay a license fee to
ed2c. As a licensed user, you agree to use NetCIL Client for your own
internal business purposes, and you agree that you will not redistribute NetCIL
Client software or databases to any other organization without the express
written consent of ed2c. You also agree that any derivative applications
that you develop, if they are based on NetCIL Client database designs, will be
used only for your own internal business purposes and not for commercial
distribution to outside parties. By agreeing to these terms, you’re helping us
all stay in business for a little while longer.
• You assume all of the risk involved in the use of this
software. If you suffer data loss, financial loss, hair loss, or any kind
of loss as the result of using this system, well blame Murphy, not us.
The good folks at ed2c will do their level best to help you with any trouble
that you might run into, but by using this software you acknowledge that Murphy
is out there, lurking, and that if you’re not careful, he’ll get you.
General Notes on Windows Application
Interfaces
NetCIL Client, NetCIL
Manager, and NetCIL IRLog are Microsoft Windows-based applications;
therefore all standard features of the Windows user interface apply to the
control of this software. Windows applications provide a more
sophisticated data entry capability than do web page data entry forms, and they
work well with standard accessibility software such as JAWS and Dragon
Naturally Speaking.
Most data entry, editing, and statistical analysis functions
can be accomplished through the use of input forms. Data entry fields and
buttons are designed for access by either the keyboard or the mouse. All
controls can be accessed by simultaneously pressing the "Alt" key and
the appropriate underlined "accelerator" key. In the case of
data entry fields, use of the accelerator key will also highlight the currently
displayed data for that field. If a user types any character in a
highlighted field, the highlighted information will be automatically deleted,
and replaced by the new entry. Pressing the “F2” key toggles the
highlighting of a field. Some controls may share accelerator keys;
therefore it may be necessary to type the appropriate key twice in order to
activate the function.
The “Enter” and “Tab” keys have the same effect on all input
forms. Pressing either of these keys will move the cursor to the next input
field in a form’s sequence. For hyperlink fields, the user must press the
"Tab" key to move to the next field, or the hyperlink will be
activated. Most dropdown lists are designed to "drop"
automatically when the cursor is placed in their fields. Pressing the
“F4” function key can toggle the dropdown state of a list.
For most forms with record navigators, pressing the “F5”
function key will move the cursor into the record navigator window, where a
specific record number can be typed. Pressing "Shift-F9" will
initiate a re-query of a form's data set. For more information on the use
of “Hot” keys, please refer to the NetCIL
Client Hot Key List.
Once data is typed into any record in the database, it is
automatically stored unless you press the “Esc” (escape) key. If you make
a mistake while typing data within an individual field, simply retype the
correct information while the cursor is still in that field. If you make
a more serious mistake such as editing the wrong record, press “Esc.”
Normally, you will be able to undo all of the changes that you have made to the
record.
NetCIL Client input forms are designed to display
full-screen at a resolution of 1024 x 768 pixels. At lower or higher
resolutions, input forms will shrink or expand to utilize all of the viewable
screen area. Users with vision impairment who use a screen resolution of
640x480 may find that some controls are difficult to read. In such cases,
we recommend the use of the Windows screen magnifier that is integrated into
the NetCIL Client application. Some monitors may
not display correctly due to incompatibilities with their graphics
interfaces. Selecting "Do Not Resize" on the NetCIL Client Main
form may prevent display problems from occurring. As explained later in
this guide, users can customize the screen and font sizes from anywhere within
the NetCIL Client application by simultaneously pressing the “Alt” key and
either an arrow key, the plus (+) key, or the minus (-) key.
By double-clicking
any of the first few fields, most forms can be toggled between form and
datasheet views. Datasheet view allows
many records to be displayed at once; form view will display a single record,
usually with more detail than is available in datasheet view.
NetCIL Client is equipped with a form for reporting problems
or recording general comments regarding its use. Selecting the “File a
Bug Report” entry from the NetCIL Client Reports form will activate the Bug Report
form. If your installation is properly equipped, you can e-mail your
comments directly to ed2c by clicking the form's blue hyperlink.
NetCIL Client users are divided into two main groups:
“Standard” users, and “Power” users. Normally, standard users will have
an input form such as the “People or “Phone Referral” form assigned to them by
the system administrator. If a form is assigned, it will open
automatically when the application is launched. When the form is closed,
so will the application. “Power” users have access to the Main form,
which acts as a control panel for database configuration, reporting, and output
to external data systems.
To enhance the accessibility of the application, NetCIL
Client utilizes a number of shortcut or “hot” keys. A shortcut is a
combination of keys that when pressed together accomplish the same task as a
mouse click. For example, by pressing F1 instead of clicking “Help”, the
NetCIL Client help file will appear.
Shortcut keys are identified with an underlined letter on
controls. By simultaneously pressing the ALT key plus the key that corresponds
to the underlined character, your input will have the same effect as if you
clicked the control with the mouse.
On the Main form you can use the left and right arrows, the
tab key, and the enter key to navigate from one button to another. Once the
cursor focus is set on the desired button, you can press Enter to open the form
that the button controls. Alternately, you can use shortcut keys to open the
form. Because of space limitations some keystroke combinations will open
more than one form. For example, both the Organization and Community Goal
forms can be accessed by pressing ALT + G. If the form that opens is not
the one that you want, press ALT + X to close it and then press the original
key combination again.
Data Collection Overview
Before you begin to enter
data, you should make a few policy decisions regarding the manner in which personal
records will be handled. During initial contact with an individual, every
effort should be made to collect enough information so that the individual can
be uniquely identified. Only you can decide what constitutes “enough
information,” but a good minimum criterion is a name and a phone number.
For the inevitable cases where callers wish to remain anonymous, the NetCIL
Client software automatically creates an entry with a first name of “Contact”
and a last name of “Anonymous”. It’s recommended that you record a note
for each interaction with anonymous callers in this record. NetCIL IRLog
provides you with a simple facility to do so. By following this method,
proper “credit” will be given on agency reports when calculating statistics
regarding activity.
The People form
represents the core of the NetCIL Client application’s consumer database.
All information regarding consumers, collateral contacts, intakes and
referrals, and agency contacts can be entered and edited from the People
form.
Often “collateral”
contacts will call on behalf of a consumer. You must also decide how to
handle such circumstances. Ideally, a record will be written for both the
collateral contact and the consumer, and each can be classified according to
contact type. Practically, direct interactions with consumers or
with collateral contacts may be combined into a single record for the sake of
expedience. In such cases it’s best – if possible – to record the
consumer’s own name, and to reference the collateral contact in the notes field
for that consumer.
Another subject for
consideration is the issue of privacy. The NetCIL Client database is
designed with security features that will – to a point – prevent unauthorized
disclosure or alteration of consumer information. It is NOT, however,
designed to thwart malicious attack, and therefore great care should be
exercised when recording very sensitive information. It’s recommended
that extremely sensitive information NOT be recorded in the database, but in an
external document that can be physically secured. Then, in the notes
field for the individual you can simply write, “see file.”
The NetCIL Client
database contains a number of list tables that are used to categorize consumers
and your interactions with them. These lists are designed to provide
standard information for statistical reporting systems such as the Department
of Labor 704. By design, these lists cannot be modified in the People
form. This restriction helps to ensure that demographic information is
categorized in a logical way. In many cases the system administrator can
modify these lists, but care should be taken in order to ensure that the
accuracy of these reporting systems is maintained.
In any event, it’s best
to form a consensus with your colleagues about information policy before
beginning data entry. Consistency in data entry will improve the accuracy
and utility of the statistics that you will gather from your database.
When recording data, it
will be helpful to consider the following definitions:
- Definition
of a “Consumer”
People
in the NetCIL Client database are categorized by their “Contact Type”.
Contact type can be set on the People form, the Parent-to-Parent Form
(if enabled), or the NetCIL- IRLog application. When you first begin to interact
with someone, it’s usually because they are seeking information and referral
assistance; therefore when a new person is entered into the database,
their contact type defaults to “Information and Referral.” When you begin
to provide services to or set goals for someone, they then become a “Consumer,”
and you should set their contact type accordingly. But in order to change
their contact type to “Consumer”, a minimum amount of information must be
provided to comply with RSA/ 704 requirements.
The mandatory fields are: First Name, Last Name, Date of Birth, Gender,
County, Disability, Race, ILP or Waiver Info.
If any of these fields are not provided, the staff will not be able to
change the contact type and will be prompted with a list of missing fields.
Once set, the database will never automatically change a person’s contact
type. If you stop providing services to a consumer, you may wish to set
the consumer’s status to “Inactive”.
- Definition
of “Transactions”
Every
case note, work log entry, provision of service, or goal is considered by the
NetCIL Client database to be a transaction. Each transaction has an
associated date, which normally will be written automatically as the current
date and time when a record is entered. You can always edit the dates of
any of your records. In order for statistics regarding these
transactions to be included in a report, the transaction dates must fall within
the reporting period as described in the following sections. For the
purposes of determining activity for a given reporting period,
only consumer history records with a recorded service will be
evaluated by NetCIL reporting software.
NetCIL Ribbon Menu
Enabling or Disabling Controls: Watch
Video
The CFAL or NetCIL Client ribbon is designed to facilitate basic
database functions and to replicate many of the functions that are available
via the standard MS Access interface. Its availability obviates the need for
most users to have the full version of MS Access installed on their
workstations; the royalty-free runtime version of MS Access can be used
instead.
Functions on the ribbon can also be used to enable or disable any
control in the application, for any user, or for all users.
The ribbon can be accessed by selecting “NetCIL” from the menu bar
at the top of the application. If the runtime version of MS Access is being
used, the NetCIL ribbon will be the only menu option that is available.
When selected, icons will be displayed as shown below. Following
is a description of each control (in order from left to right).

Open Main: Closes any open windows (including
the standard MS Access interface) and opens the NetCIL Client Main form. Available to all users.
Check File Server: Runs a function that automatically
checks data fields and configuration tables to ensure that they are correct.
Available to all users.
Config BFS: Runs a function that automatically
checks to ensure that the database is correctly configured for collection of
Blind Field Services information. Available to all users.
Clear File Server Path:
Removes information about the file server connection from the registry
on the user’s workstation. Useful if moving the file server location or
troubleshooting problems, this function is rarely needed. Available to all
users.
Compact and Repair Client:
Closes the NetCIL Client application and performs a standard MS access
compact and repair procedure. When the client application is installed on a
workstation this function is not needed, as a compact and repair operation is
performed every time that a user exits the application. In a multi-user environment
(such as a Remote Desktop session) where many users are running sessions that
are spawned from a single client file, a compact and repair procedure can only
be run when all connections are closed, and thus an automatic compact and
repair is not run when a user exits. To maintain best performance in a
multi-user environment, it’s recommended that someone (preferably the system
administrator) periodically log on and manually run the compact and repair
procedure via the NetCIL ribbon during a period when no other users are using
the application. With heavy use once per week is recommended; with light use
once per month should be adequate.
Compact and Repair File Server: Closes the NetCIL Client application
and opens the NetCIL file server. The file server will then automatically
initiate a standard MS Access compact and repair procedure. In a multi-user
environment, a file server compact and repair procedure can only be run when
all connections to the database are closed. To maintain best performance, it’s
recommended that a compact and repair procedure be run on a regular basis. With
heavy use once per week is recommended; with light use once per month should be
adequate. Note: Users who run NetCIL as a cloud service on an Amazon server do
not normally need to run this procedure, as it occurs automatically every day,
usually between 2:00 AM and 3:00 AM local time.
Change User:
Allows top-level users to “masquerade” as any database user for
data entry, editing, and reporting, and to enable or disable controls for that
user. The function is only available to level 10 users. When “Change User” is
selected from the NetCIL ribbon, the following form will open:
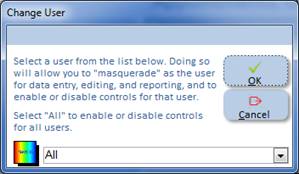
Select “All” or a specific user from the dropdown list. Once
selected, you will be able to enable or disable controls for the selected user,
or for all users. Watch
Video. If you select a specific user, you
will also be able to add and edit records that will be “tagged” with the
selected user’s identification.
Disable Control: Disables use of the selected control
on any form for the selected user (or all users). You must specify the user with “Change User” before
using this function. Select a form, select a control, and the click “Disable
Control”. The control will then be disabled for the selected user (or for all
users). For example, if your agency does not collect Social Security
information, select “Change User”, specify “All Users”, open the People form,
select “SSN”, then select “Disable Control”. No user will then be able to enter
Social Security numbers. If you selected an individual user with the “Change
Users” command, only that user will be unable to enter Social Security
information; all other users will be unaffected. If you want to disable a
button control, right-click on the button to set focus to it, then select
“Disable Control”. Once disabled, the control will appear in gray. This
function is only available to level 10 users.
Enable Control: Re-enables the most recently-disabled
control for the selected user (or all users). Clicking on this button will
re-enable controls until no more disabled controls are found for the selected
user. This function is only available to level 10 users.
Override Controls: Allows a temporary override of
disabled controls. When selected, users must enter the database administrator
password, regardless of how they logged on. If no password-protected
administrator account is found, an error message will be issued.
Copy: Copies selected text to the
clipboard. Available to all users.
Cut: Cuts selected text and places it in
the clipboard. Available to all users.
Paste: Pastes text from the clipboard into the
currently-selected text control. Available to all users.
Sort Ascending: Sorts records in the current form
into ascending order based on the currently-selected field. Available to all
users.
Sort Descending: Sorts records in the current form
into descending order based on the currently-selected field. Available to all
users.
Find and Replace: Invokes the standard Microsoft Access
“Find and Replace” dialog function. Available to all users.
Filter: Invokes the standard Microsoft Access
“Filter” dialog function. Available to all users.
Spell Check: Invokes the standard Microsoft “Spell
Check” function. To use this spell check, the full version of MS Word should be
installed, and it must be the same Office version as is the version of Access
being used. As an alternative, the royalty-free Microsoft SharePoint Designer also installs the spell check function. SharePoint Designer
versions must also match the installed MS Access version. This function is
available to all users.
Export to Excel: Exports all open tables of queries to
Microsoft Excel. Each open table or query is exported to its own workbook file.
Export to Word: Exports all open reports to Microsoft
Word. Each open report is exported to its own Microsoft Word document.
Export to PDF: Exports all open reports to Adobe
Postscript Document format. Each open report is exported to its own PDF file.
Custom App: Allows launching a custom application from any screen; mimics the
function of the “Custom” button on the Main screen.
Consumers: Automatically opens the People form and displays a list of all
active consumers. For Parent to Parent Organizations, a list of all
Parent/Caregivers and Support Parents is displayed.
Switch View: Toggles the currently-displayed input
form between form and data sheet view. Available to all users.
Close Form or Report: Closes the currently-displayed input
form or report. Available to all users.
NetCIL Client Main Form
The
Main form, which is the default form that is loaded on startup, has controls
for input functions that are divided into three distinct areas on the left-hand
portion of the screen: Data Entry, Database Administration, and
Interaction. The right half of the screen contains information about pending
appointments, open referrals, and assigned tasks.
Most database
administration functions have now been moved to NetCIL Manager. For more information,
please refer to the NetCIL Manager
User's Guide.
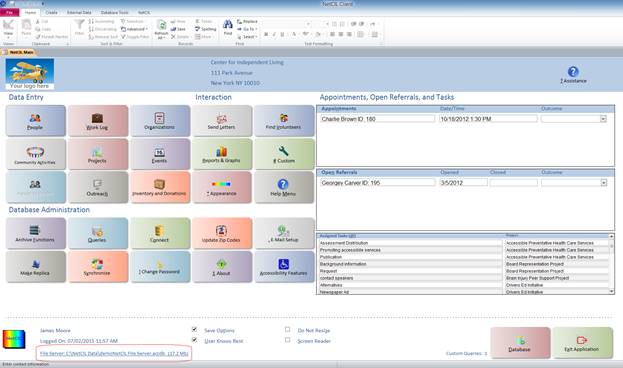
All data in the
CFAL-NetCIL Database is stored in a Microsoft Access file server. The
name, location, and size of the file server are indicated in the lower left
portion of the Main form, circled in red as shown in the graphic above. The file location is a hyperlink; clicking on
the link will open a window to the directory where the file server is located.
On Amazon servers or when operating in a Remote Desktop session, the link is only
enabled for Level 10 users.
When
a user record is configured, a privilege level from 1 to 10 must be assigned.
Level 1 users must also have an input form assigned (usually the People form), and the application will
open directly to the assigned form. The Main
form will also be accessible as a tab at the top of the application window.
Users with a privilege level of 6 or above may select the “User Knows Best”
option at the bottom of the Main
form. Doing so obviates the need to press the F3 function key in order to edit
an existing record. All users can select “Save Options” so that the application
will remember appearance settings for subsequent sessions.

Depending on a user’s privilege level, certain controls on the Main form may be disabled (grayed out). Level 10 users have unrestricted access, and they can disable any control for any user as described in the Ribbon Menu & Controls section. For a complete list of functions and the corresponding privilege levels that are required, please refer to the CFAL/NetCIL User Privilege Levels guide.
By pressing the Appearance button on the Main form (Alt-*), users can set a variety of options - font
size, screen size, logo size, and button styles as described below:
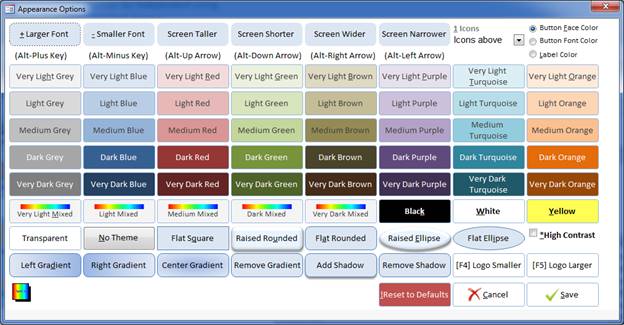
Font and screen sizes
can be adjusted by selecting the appropriate button on the Appearance form’s top row. The Icons
drop down list (Alt-1) allows users to adjust the position of icons on form
buttons, to display icons only, or to display text only. As different display
options are selected, the appearance of the Main
screen will temporarily change to show the effect of the selection. Note that
if the Text Only icon option is
selected, and then the user selects a different icon option, both the Appearance and Main forms must close and re-open in order to re-initialize the
display. In such case, the icon option will be saved. All other appearance
options can be discarded by selecting Cancel
(Alt-C). Selecting Reset (Alt-!) will
reset all form sizes, colors, and shapes to the application’s original
settings.
Font sizes can also
be adjusted by selecting the keyboard combination Alt+ or Alt- on any form.
Likewise, selecting the Alt-Up, Down, Left and Right arrow keys will resize any
form. On forms that contain sub-forms (like the Appointments section of the Main
form), it may be necessary to close and re-open the form in order for it to
display correctly, once the desired screen size has been selected. If the Screen Reader option on the Main form is selected, font and screen
size keyboard combinations will be disabled to avoid conflict with screen
reader applications. For low-vision users who use a screen reader, fonts and
screen sizes can still be adjusted by using the Appearance form.
An option group
(Alt-F) allows users to select color combinations for button faces, fonts, and
labels. Only Level 10 users will be able to adjust the application logo size
(Alt-F4 and F5).
If High Contrast (Alt-*) is selected, the
application will override other settings and display all input forms with white
text on a black background. Buttons will be white with black text. All other
screen styles will be ignored. Screen and font size settings will be retained.
If the user selects Save (Alt-S), the Appearance form will close, and the selected options will be
retained for the current session. If the user selects Save Options at the bottom of the Main form, selected options will be retained for future sessions.
To minimize the chance of accidentally overwriting data,
most NetCIL Client forms require that a user "unlock" records by
pressing the function key F3 or clicking the appropriate link. For users
with a privilege level of 6 or above, selecting User Knows Best on the Main
form will override this requirement, and allow record edits without the need to
unlock them.
NetCIL
Client input forms are designed to display full-screen when correctly configured
as mentioned above. At lower or higher resolutions, input forms will shrink or
expand to utilize all of the viewable screen area. Users with vision
impairment who use a screen resolution of 640x480 may find that some controls
are difficult to read. In such cases, we recommend the use of the Windows
screen magnifier that is integrated into the NetCIL Client application.
Some newer "Letter Box" monitors may not display correctly
due to incompatibilities with their graphics interfaces. Selecting Do Not Resize on the NetCIL Client Main form may prevent display problems
from occurring. Users using screen Readers like JAWS or Window Eyes should
also check the Screen Reader checkbox in order to disable some of the function
keys that may interfere with their screen reader application.
The generic logo on the main screen can be replaced with
your agency logo by storing it as a file called “logo.jpg” or “logo.png” in the
same folder as your file server. “.png”
files are only supported for Office 2007 and later
installations. If you’re using NetCIL Online, ed2c
customer support will normally place your logo file in the appropriate web
directory for you. With the Main
screen displayed, level 10 users can also select function keys F4 and F5 from
the Main form to make the logo appear
smaller or larger. Adjust the logo size as desired, select Save Options, exit and restart the application. The selected logo size will be scaled for all
users upon their next logon as well.
By default, NetCIL Client is designed to automatically terminate
if no activity is recorded for 90 minutes.
Level 10 users can adjust this value by selecting the Accessibility Features button near the
bottom right of the Main screen. The
following dialog will appear:
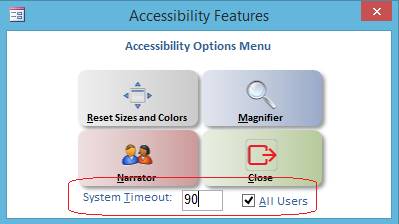
Enter a System Timeout value (in minutes) as
desired. If a value of 0 is chosen, the system will never time out. If the All
Users checkbox is not selected, users who have checked the User Knows Best option will be exempt
from the system timeout limits. Note that the Accessibility Features menu also allows all font and screen sizes
to be reset to their default values.
Magnifier and Narrator will invoke the standard Microsoft Windows magnifier and
narrator functions, if installed.
Pending appointments are
displayed on the Main form in
chronological order. Screen reader users will receive a notification message
that appointments are pending, with an option to set focus to the appointments
list so that they can be read.
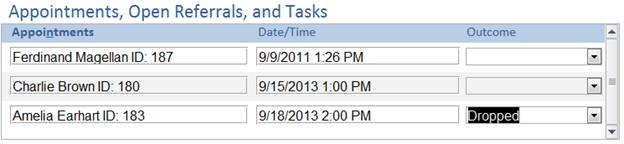
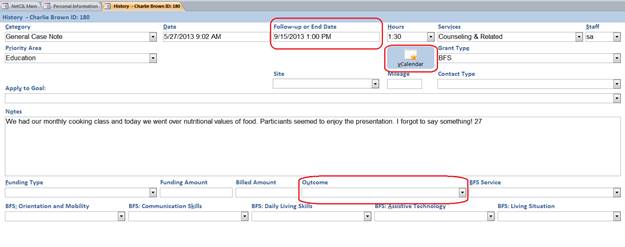
By double-clicking on any
field in the appointments section, the record will be opened automatically as
shown below. Appointments will remain displayed (open) until either the Follow-up or End Date field is cleared,
or until an Outcome for the
appointment is listed as shown in the graphic below.
To create a new
appointment, simply enter a Follow-up or
End Date on any record, and leave the Outcome
field blank. If you wish, you can enter an estimated Hours value and then export the information to a vCalendar file. If
properly configured, your system’s calendar program will automatically start
and enter the appointment information. If you are running NetCIL on a remote
desktop connection, it may be necessary to save the vCalendar file on your
local workstation and then open it.
Appointments can be
“closed” from the Main screen by
entering an Outcome value as shown above, or from the Notes screen as shown below.
In a manner similar to
appointments, the Main screen will display any open referrals.
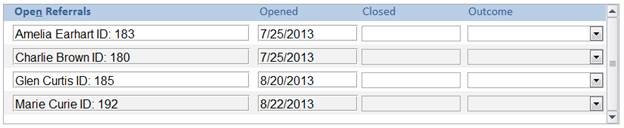
By double-clicking on any
field in the referrals section, the open record will be opened automatically as
shown below. Referrals will remain displayed (open) until a Closed date is entered. The selection of
an Outcome is optional.
To create a new referral,
simply enter a new record, specify a Requested
date, and leave the Completed field
blank. The open referral will appear on the Main
screen of the Referred to Staff user.
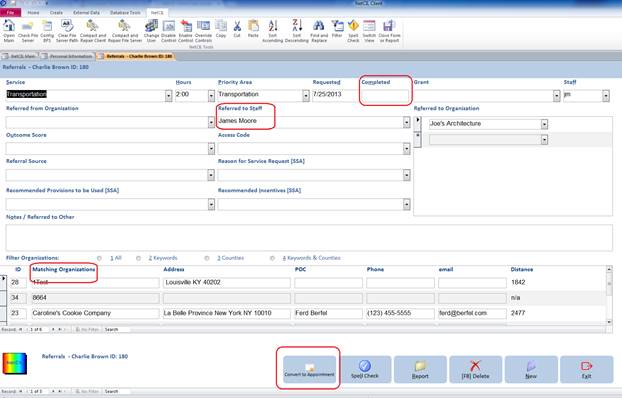
The referrals screen
lists organizations that can be matched
with an individual’s needs. You can filter the organizations list to show only organizations
that match the individual’s list of keywords, counties served to match the
individual’s location, or both. When an organization match is found,
double-clicking its name in the Matching
Organizations column will add it to the list of Referred to Organization for the current referral record.
Referrals can be
re-assigned to another user by changing the Referred
to Staff value. Referrals can also be converted to appointments by
specifying a Completed date and then
selecting Convert to Appointment as
shown above.
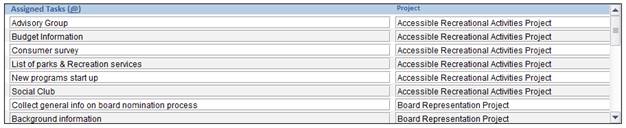
Users with sufficient
privilege can configure projects and assign tasks to other
users. If you have been assigned a task, it will appear on the Main screen when you log on as shown
below:
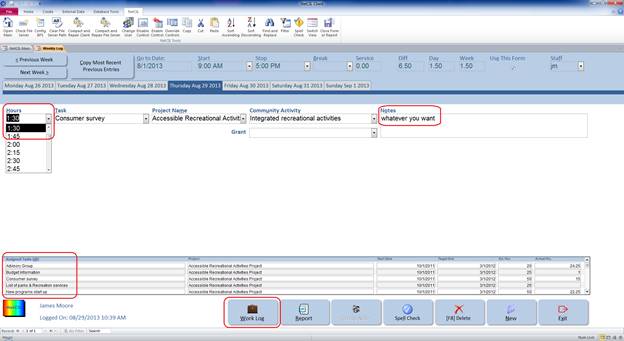
If you perform work on an
assigned task, you can quickly enter your effort by double-clicking on the task
from the Main page. When you do, the Week Log form will automatically open,
and a record will automatically be written listing the task and any other
pre-configured information that is associated with it – the project, community
activity, and (in the background) any associated priority area. You need only
specify the amount of time spent on the task from the dropdown list, plus any
notes that you wish to record:
Assigned tasks also
appear at the bottom of the Week Log
form. You can double-click any task to create another entry. In all cases, the
current date is used. If you need to edit date values, it’s easiest to select
the record, and then press the Work Log
button at the bottom of the screen. The Work
Log form will open and the selected record will be displayed. This form
also allows the entry of additional detail about the entry, if required.
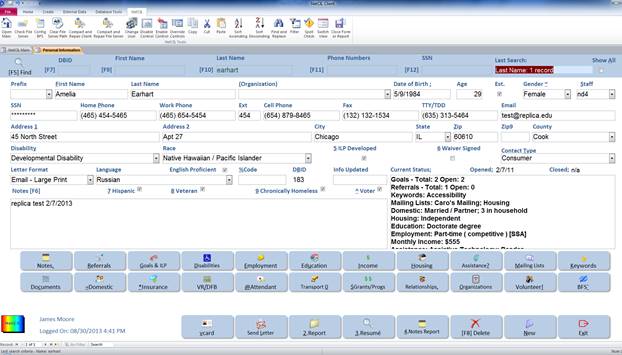
Data Entry - The People Form
The People form is divided into
three sections. The top section is used to perform record searches, the
middle section contains basic demographic information, and the bottom rows of
buttons allow access to transaction data and reports.
Before entering a new
record, it's good practice to perform a search in order to minimize the chance
of duplicate entry. There are several
ways to search for records in the People form:
When function key F5 is pressed, a pop-up search form will appear:

When searching by name, a
dropdown list that contains all records in the database will be displayed,
along with their contact type and telephone number. Only the
selected record will be returned.
When searching by keyword or
query, all records that match the search request will be returned. For example,
if you have associated 35 consumers with a keyword phrase called “Friday Night Book Club,” selecting this keyword will return all
35 records in the People form.
At the bottom left corner of the People form there is a record
navigator. If many records are returned as the result of a search, you
can scroll through the records by clicking on the right arrow located next to
the record number until the desired record is displayed.
![]()
Other search methods in the
people form allow you to search by Last
Name, Social Security
Number, Home Phone Number,
or Work Phone Number.
Several function keys are available to "jump" the cursor to the desired
search field, or to unlock the currently-displayed record for editing:
F7: DBID to search by Database ID
number
F9: To
search by Last Name
F10: To search by Social Security Number
F11: To search by Home Phone number
F12: To search by Work Phone
Note that function key F3 is used
to unlock existing records for editing. Clicking in the search fields, or
the F3 Edit and F5
Search labels, has the same
effect as pressing the corresponding function key.
Last Name searches can utilize the wild card
character *, and are not
case-sensitive. For example, a search for “sm*th” will
return all records with last names “Smith” and “Smythe.”
You can enter as many wild card
characters in the search string as you wish. “Sm*th*” will return all “Smiths,” “Smythes,” and “Smithsons.” Note that the use of wild
cards may result in slower search results. All other searches will only return
records that match the search criteria exactly. The results of the most
recent search will be displayed in red in the right-most portion of the search
section.
Selecting the Show All check box in the upper right corner of
the People form will display all
records in the database. You can then use the record navigator to find
the desired record, or you can use the built-in search and filter capabilities
of Microsoft Access.
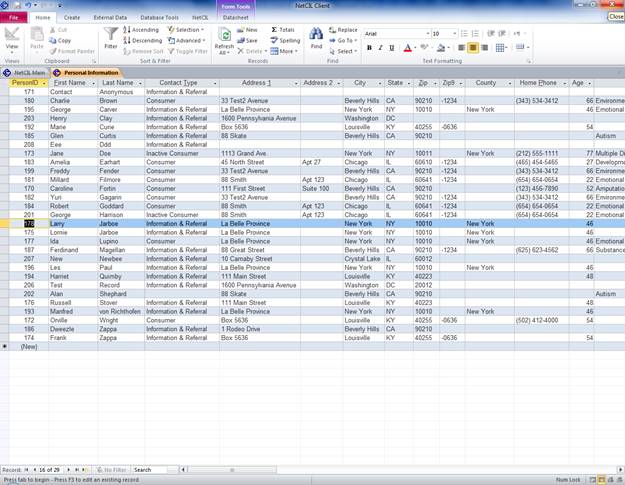
Datasheet View
Once you have checked the Show All checkbox, you may want to view your
data as a spreadsheet instead of the standard NetCIL Client form view. To do
so, double click on the first name of a person. You can go back and forth from
one view into another by double clicking on the first name of person. If you
cannot use a mouse, you can select View, Datasheet View (for MS Access 2000 to 2003). Or if
you are using MS Access 2007, maximize the ribbon first, then select View, Datasheet view. Please
note that the user will have the same privilege level on either view.
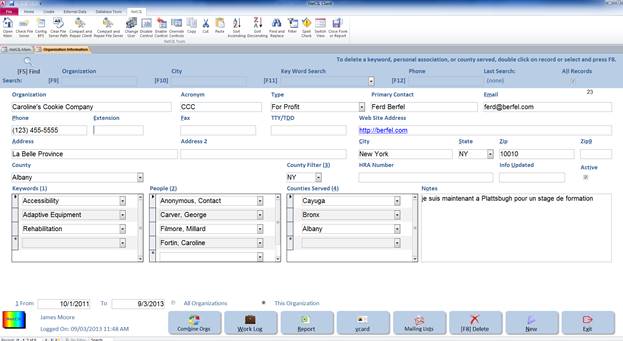
Importing a Contact
from Outlook into the People Form
If have a contact in
your Outlook address book that you would like to import into the People Form of NetCIL Client, you must first
save your Contact as a V-Card in Outlook by pressing Save As and Exporting
the Contact as a V-Card form (.vcf
format). Remember the location where the V-Card is saved. Then, open
the People form and select New. Click on the Import
/Export Contact icon (see
below) or press [F2] on your keyboard. A window will open
and will ask you to locate the V-Card file. Navigate to where the V-Card is
saved and select Open. You
will then get a message saying that the V-Card was successfully imported
and after you click ok, your contact will appear on the People Form of NetCIL Client.
 Import/Export Contact Icon
Exporting a Contact from the
People Form to Outlook
If you have already entered
a contact on the People form of NetCIL Client and would like to Export it
into your Outlook address book, you can do so by first pulling the record up on
the screen then clicking on the Import/Export
Contact icon or by pressing the
[F2] key on your keyboard. A window will open and ask if you would like to open this file? Click Ok to proceed. Your
Outlook address book will open with the new contact. Select Save and Close to keep this contact.
Sub-Forms
Below is the list of all
sub-forms. When selected, the bottom row of buttons will open pop-up forms that
allow entry of a variety of transactions that are related to the displayed
record. Each of these functions is
discussed in the Data Entry sections of this manual.
![]()
![]()
The Send
Letter button allows you to add a person into the
queue to receive a letter. When you click on the button, a
dropdown list of pre-configured letters will appear. Select the
appropriate letter from the list and Exit the form. This process will have
added this person automatically into your letter queue when you perform
your next Mailing.
The Report button will
generate a detailed report which will display information previously
entered in all sub-forms of the People form.
The Resume button helps generate a
resume for an individual by transferring some information previously
entered on the People form (Name, Address,
Telephone Number and Email) and in the Employment form
(Employer and date).
The Notes Report generates a
report of all notes previously entered.
The Delete button will only be available
to level 10 users or Database Administrators.
The New button allows you to enter a New
record.
The Exit button closes the People form.
Data
Entry – People - Notes Form
General Information on Notes
The Notes sub-form provides a method to
record general interactions with an individual. As new records are written,
the date and time of entry and the user’s ID are automatically recorded so that
a transactional history can be compiled. An Initial Entry record
is automatically generated when an individual’s data is first recorded.
Do not delete this record, as it is used for reporting purposes. To enter a
new note, press the New button and select a category for
the entry from the drop-down list in the Category field. Select a
category that relates to the information that you need to enter. Please note
that the default category is General Case Note. The Date field
can be edited as necessary. Hours spent on the
interaction can be recorded in fifteen-minute intervals. If services
were provided and/or your work was performed as part of a grant, specify Grant
Type and Services as applicable. Contact Type is
an optional field that can be used to further categorize your
notes. For official state and federal reports such as New
York VESID, California CILR or the federal RSA 704 reports, please note
that only a note for which a service was selected will count
as "served" during the period.
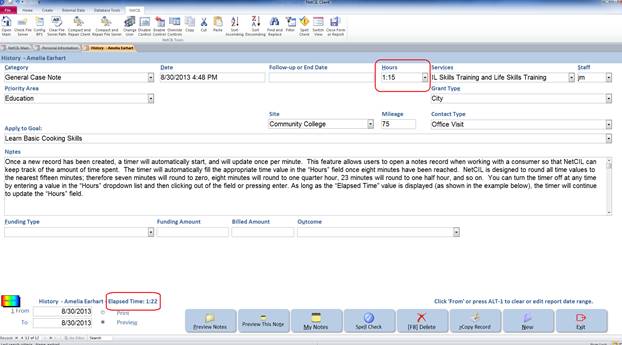
When the Notes
form opens, it will automatically sort records in chronological order, and it
will display the most recently-written note. Focus will be set to the New button; pressing enter, ALT-N, or
clicking the New button will enter a
new record. Once the record has been
created, a timer will automatically start, and will update once per
minute. This feature allows users to
open a notes record when working with a consumer so that NetCIL can keep track
of the amount of time spent. The timer
will automatically fill the appropriate time value in the Hours field once eight minutes have been reached. NetCIL is designed to round all time values
to the nearest fifteen minutes; therefore seven minutes will round to zero,
eight minutes will round to one quarter hour, 23 minutes will round to one half
hour, and so on. You can turn the timer
off at any time by entering a value in the Hours
dropdown list and then clicking out of the field or pressing enter. As long as
the Elapsed Time value is displayed
(as shown in the example below), the timer will continue to update the Hours field.
To edit an existing record, the user may have
to first press the F3 function key if the User Knows Best check
on the Main form is not checked. There will be cases
where the database user will only be allowed to edit his or her own records.
A user with privilege level 5 or above will be able to edit all notes.
Below level 5, users will only be able to edit their own notes. Only the
database administrator, the level 10 user will be able to delete any notes.
You will also note that the selection of certain
categories causes additional edit fields to appear. For example, on
the People form, when the Contact Type is changed
from Consumer to Inactive Consumer, the notes
will open automatically to the category Consumer Becomes
Inactive, and an additional field appears next to
the Grant Type drop-down box where you can record the reason
why the individual became inactive. The following graphic illustrates
such a case:

Multiple Services
Often during interaction with a consumer, more than one
service will be provided or work will be performed under more than one
grant. The most accurate way to record such activity is to write multiple
case notes – there is no limit to the number of notes that can be
recorded. By writing multiple notes, the amount of effort expended for
the provision of each service will be accurately recorded.
The notes field is a free-form area where you can record
any comments regarding your interaction with an individual.
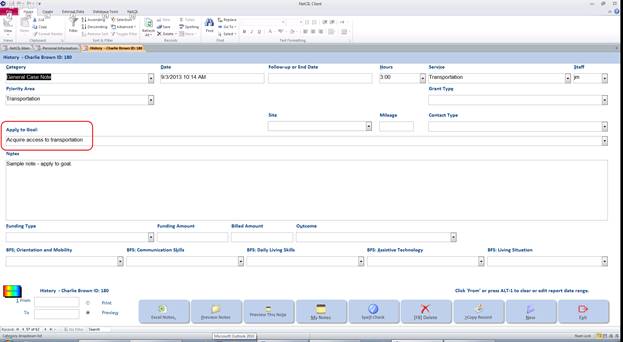
Apply Services / Notes to Goals
The Notes form also allows you to
assign provision of a service to any goal that has been previously recorded for
a given Consumer. An Apply to Goal dropdown list is
displayed showing all goals, even if they have been closed. The dropdown
list displays the Goal Description and Goal Start Date. A Sample
Services Applied to Goals query will display goals, services, hours,
and dates for all records.
Datasheet View for Notes
Notes can be viewed as forms or datasheets
(spreadsheet). To switch modes, select View…Datasheet View or View…Form
View when the Notes form is open. The view
can be toggled by double-clicking the Date field. Please
note that new records can only be added in the form view. Existing
records can be edited in either view, as long as a user has sufficient
privilege.
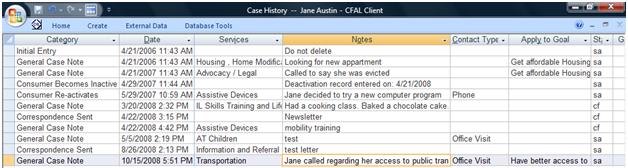
Preview Notes
As shown on the graphic below, there are options
to Preview Notes, to Preview This Note or preview My Notes. At the bottom of the Notes screen, the From and To fields
will allow you to enter a date range for your report. The notes that
will appear on the report will only be the ones included in the specified
period. If no dates are entered, the report will include the entire note
history record. If the Preview this Note button is selected,
the report will only include the note shown on your screen. The
My Notes button allows you to preview
only the notes that have your initials, during the selected date range.

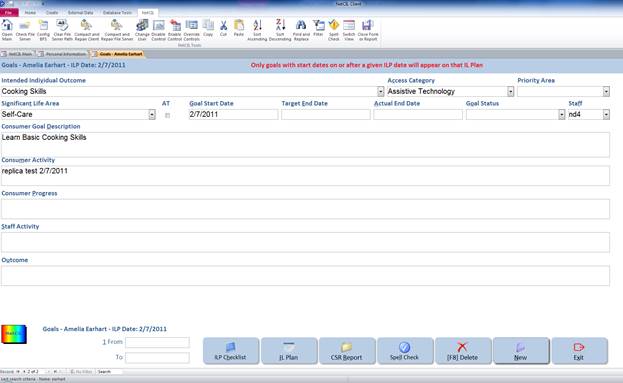
Data
Entry – People – Goals and ILP
This form allows the user to define the ILP (Independent
Living Plan) and set goals for their consumers. Once you have
selected ILP developed on the People form, click
on Goals and ILP and press the New button
to set a new goal. This will drop down the list of preset Goal
Standards. Make your selection from the list (if you have some preset
goals), if not, select an option from the Significant Life Area drop
down list. This list is set by RSA and cannot be
modified. If the goal will improve the consumer's access to
either Assistive Technology, Health Care or Transportation, make
your selection from the Access Category drop down list. If not
applicable, this field can be left blank. Set the Goal Start
Date, a Goal Target Date and an Actual
End Date when the goal is completed. You may set as
many goals as you wish to for anyone in your database and add any notes that
pertain to the Consumer Activity, Consumer Progress, Staff
Activity and the final Outcome of the goal, as shown
below. Only the Significant Life
Area, Access Category, Start Dates and Actual End
Dates fields are currently used for federal and state reporting
purposes.
The Goal form also allows you to better define the
Independent Living Plan. By clicking on the ILP Checklist button,
a new screen will open with a list of options that are normally required
when developing an Independent Living Plan for a consumer. You may select
any or all of the items. When you do so, NetCIL Client automatically
writes a case note to record each element of the checklist. Once completed,
you can preview or print an IL Plan report that can be signed and placed in an
individual consumer’s paper file.
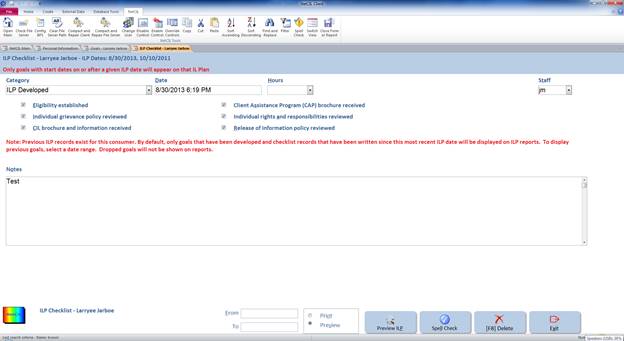
Reactivating an Inactive Consumer and setting a new ILP
If a consumer became inactive and reactivated at a later
date, a new ILP can be set in the Notes form.
Be before this can be done, the contact type must be reset to Consumer.
On the People form, change the contact type back to consumer, the notes should automatically open showing
the category: consumer reactivates. Still
while in the notes forms, you can now set the new ILP by clicking the New
button and selecting the Category: ILP
Developed . New goals can now be
configured in the ILP & Goals form. Please note that if you want to preview
the ILP, if no date is entered in the From
and To fields, the report will only
display the current ILP. But the screen
will alert you that there were previous ILP developed for the consumer, as seen
on the graphic above in red.
Datasheet View for Consumer Goals
Goals can be viewed as forms or datasheets
(spreadsheet). To switch modes, select “View…Datasheet View” or
“View…Form View” when the Goal form is open. The view can be toggled
by double-clicking the "Goal Start Date" field. Please note
that new records can only be added in the form view. Existing
records can be edited in either view, as long as a user has sufficient
privilege.

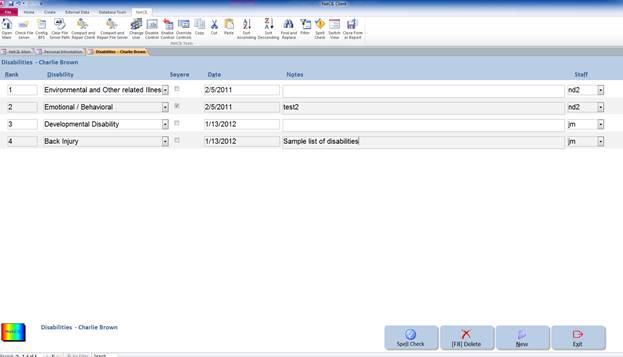
Data
Entry – People - Disabilities
An individual’s
primary disability can be recorded on the People form. If additional
disabilities need to be recorded, you can do so via the Disabilities form. Select
the disability from the drop-down box, assign it a rank, and enter the date and
any notes as applicable. The disability listed on the People form should
be #1 on the Rank column.
If you try to change the primary
disability on the People form, you
will notice that the Disabilities
form will automatically open and display a warning message and will list 2
disabilities ranked #1, as shown below:
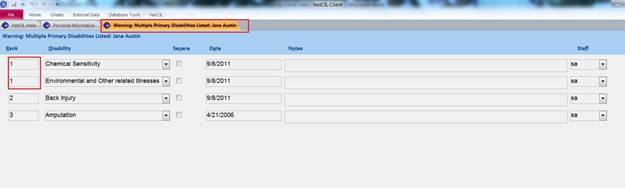
To correct the problem, just
re-order the disabilities and make sure that the one listed on the People form
is ranked #1.
Data
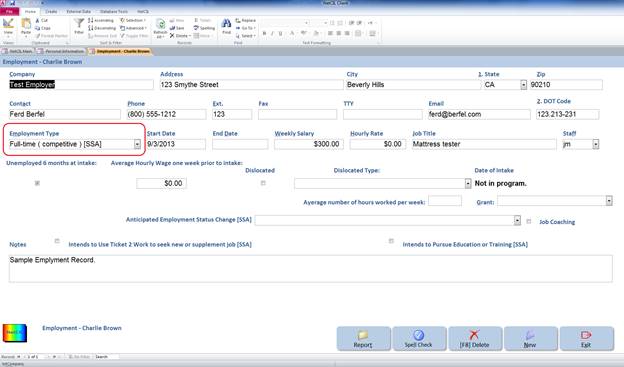
Entry – People - Employment
Use Employment History to enter data
about a consumer’s past or present employment. Enter applicable data as
desired. The number of days worked is automatically calculated based on the
dates that you enter. If the employment is current, leave the end date
blank, and the number of days worked will be calculated based on the system
clock.
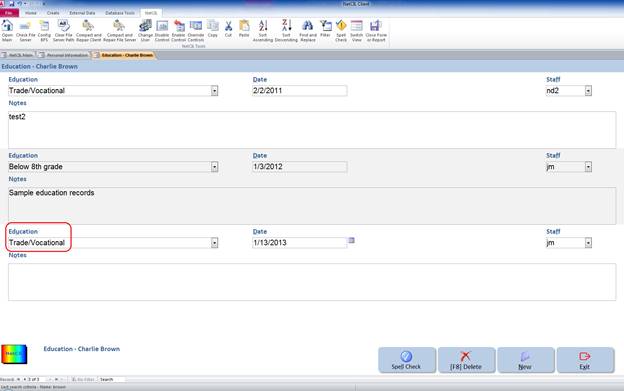
Data
Entry – People - Education
The Education History button is used to
record the education experience of a consumer. Select the applicable Education type from the
drop-down box, the date, and any appropriate comments.
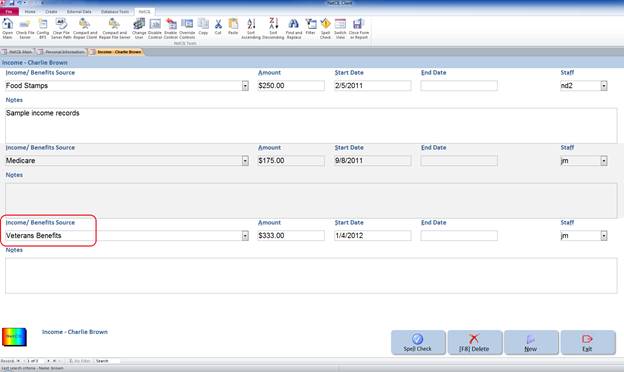
Data
Entry – People - Income
The Income/Benefits
History sub-form is used to enter
data about a consumer’s income and benefits history. Select the type of Income/Benefits from the drop-down
list, and then enter the Amount, Start Date,
End Date,
and Notes as applicable.
This form allows you to select multiple sources of Income and Benefits. Reports that
calculate income will use this information rather than data from the employment
section.
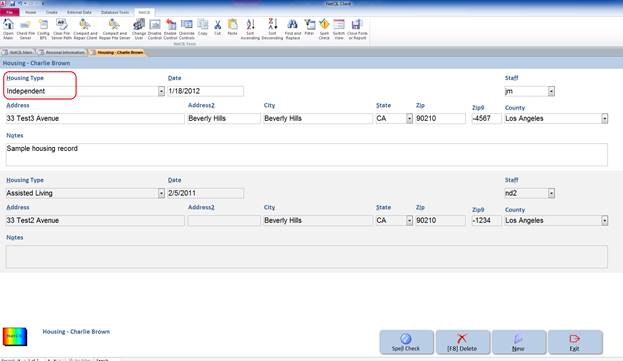
Data
Entry – People- Housing
Use Housing History to enter present or
past housing data for a consumer or to specify a Housing Type from
the drop-down box. Enter the Date, Address, City, State, and Zip as
appropriate. When an address is entered on the People Form,
it is automatically transferred onto the Housing History sub-form.
Every time a change occurs on the People form, the old record
will be kept in the Housing History but the new address will
remain first as to show current address.
Data Entry - People - Assistance
The Assistance sub-form is used to
enter data on equipment that is loaned by you to an individual, or to enter information
about any assistance equipment that they may already possess. Select the
equipment type from the Assistance Equipment drop-down box,
indicate if the equipment is a loan, and in such cases enter a loan date and a return date. When the equipment is
returned, enter the Returned Date. The Borrower Form button will display a Borrower’s Agreement form for the consumer
to sign. The View Inventory button allows you to
enter, edit, and manage your inventory. By checking the Equipment Loan box, the item will
automatically be removed from your inventory until it is returned.

Data
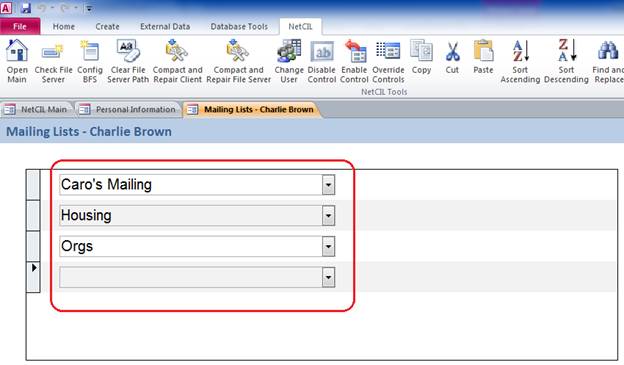
Entry – People - Mailing Lists
The NetCIL Client database administrator has the ability
to create mailing lists. This sub-form allows you to associate a person
with those predefined mailing lists. You can associate a person with as
many mailing lists as you wish. Mailing lists provide an easy way to
manage correspondence. This feature allows you to list which
documentation or newsletters each consumer is receiving.
Data Entry –
People - Documents
NetCIL Client gives the user the capability
to link external documents to a specific person.
From the People form, click on Documents.
Then click on the Add Site Documents button.
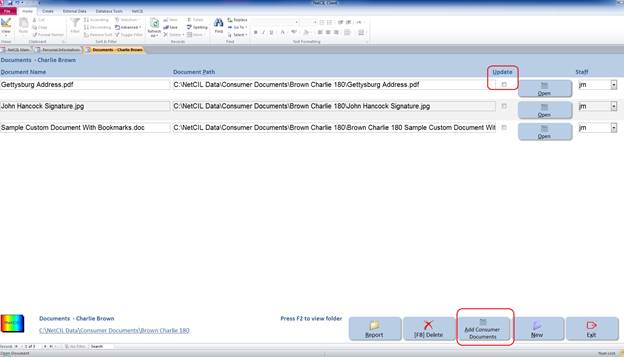
This will automatically add a sample Word
document pre-configured with bookmarks.
When used with NetCIL Client, this sample document will auto-fill values
from your database using the following bookmarks. You can auto-fill values in your own
documents by using Microsoft Word and creating bookmarks that match the
bold-face values to the left of the colons below. To experiment with this sample document,
place it in the “Consumer Documents” folder where your file server is
located. Then, retrieve a record using
the NetCIL Client “People Form”, press the “Documents” button near the bottom
of the screen, and select “Add Site Documents”.
You can also add external documents (pdf files,
Excel spreadsheet, Word documents) to the person file by simply clicking on the
New Document button. Enter the name of the document and browsing
to its location by clicking on Open. This process will link the document to the
person or consumer.
Keywords provide another way to make
associations in your database. Database administrators can create a set
of keywords by directly editing the Keywords
table as shown below.
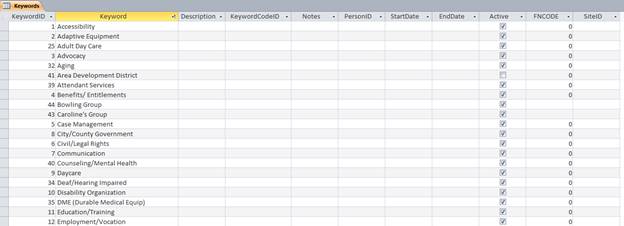
Note that most fields are currently unused. A KeywordID will be automatically
assigned; simply enter a value in the Keyword
field. In versions 1.47 and above, un-checking the Active field will prevent a keyword from appearing in dropdown
lists when new records are written. Inactive keywords will still appear in
previously-written records.
You can associate keywords with people, organizations,
projects, and inventory items. Doing so allows you to correlate your activities
across all of the entities in your database. For example, if you are working on
relief efforts after a flood in your community, you could create a keyword
called “Spring 2013 Flood.” You could then assign that keyword to all of the
people in your database who were affected by it, organizations that are
assisting in relief efforts, relief projects that you organize, and inventory
items that are specifically designated for flood relief. As you record
information that is associated with flood relief, you can assess your efforts
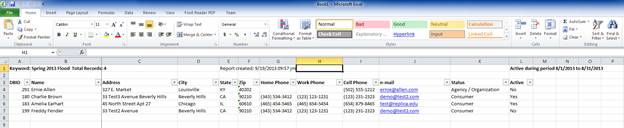
by creating a Keyword Report:

When Make Report
(ALT R) is selected, an Excel workbook will be created with six tabs. The first
tab will display all people who are associated with the selected keyword, along
with a column that shows if any activity (service provision) was recorded
during the selected period:
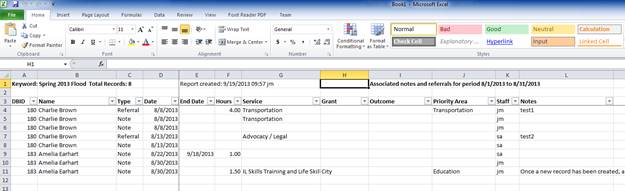
The
second tab will display any notes or referrals for individuals that were
recorded during the selected period:
In a like manner, a list of
associated organizations, projects, and inventory items will be created. Any
work log entries that include associated organizations or projects for the selected
time period will also be shown.
Data
Entry – People- Keywords
You may wish to review the Keywords section of this manual before continuing. To
associate a keyword with an individual, select the Keywords button
(ALT-K) at the bottom of the People form. Select keywords from the
dropdown list (ALT-K) as shown below. You can as many entries as you
wish.

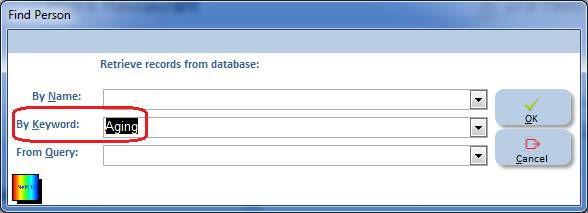
Once a keyword association has been established, you can
retrieve records linked to a specific keyword by selecting F5 on the People form and then selecting By Keywords:
as illustrated below.
Data
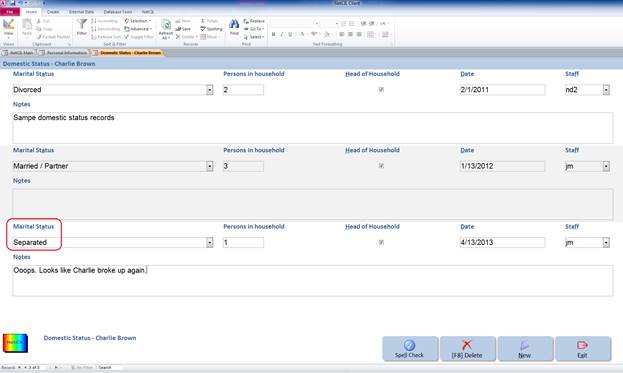
Entry – People - Domestic
Use the Domestic Status sub-form to enter an
individual’s marital status. Select the applicable Marital Status from the drop-down
box, the number of Persons in Household, the Date, and any comments as
applicable.
Data
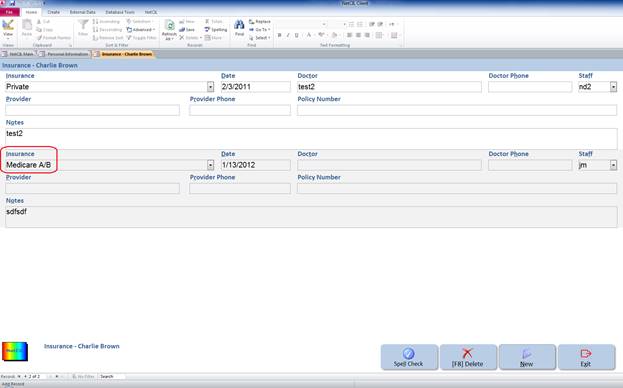
Entry – People - Insurance
The Insurance History sub-form is used to
enter data on the insurance status of an individual. Enter data as appropriate.
To add additional information click the New button at the bottom
right of the screen.
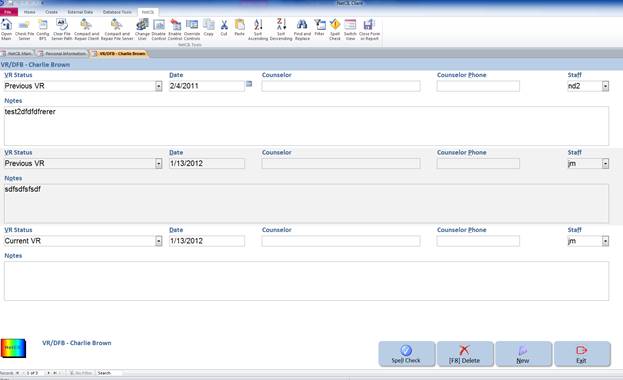
Data
Entry – People - VR / DFB
The VR/DFB Status sub-form is used to
record Vocational-Rehabilitation data about an individual. Enter data as appropriate.
If the consumer is not a client of DR/DFB this form can be left
blank.
Data Entry – People –
Attendant Care
Before recording attendant care data, you should configure
(and periodically review) the contents of three tables: Attendant Attribute
Codes, Attendant Codes, and Attendant Proficiency Codes. An optional fourth table, Attendant Attribute
Type Codes, can be configured if you wish to further categorize attendant
attributes (skills).
You may also want to review your list of Grant Codes as
well, if attendant care services are provided under the auspices of one or more
grants. Configuration of any table is always available to Level 10 users by
selecting the green “Database” button in the lower right corner of the
CFAL-NetCIL Client Main form. If you are using the run-time version of MS
Access, selecting “Database” will open a form where you can select the desired
table from a dropdown list, after which you can edit its contents.
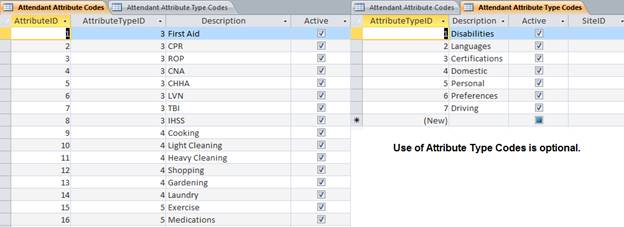
All of the “Attendant” tables listed above are for your
agency’s internal use, and they can be configured with as many or as few
records as you wish. Of these, Attendant Attribute Codes is the most important,
as it defines how you will match consumer’s needs with caregivers. Your
database comes pre-configured with some basic needs like “cooking” and
“cleaning”; before you start data entry you can edit or delete records from
this table as needed. Once you begin data entry, do not delete records from
these tables, or you risk creating “orphan” records if deleted values have been
used. Instead, simply un-check the “Active” field as required, and the
deactivated records will no longer appear in dropdown lists when new Attendant
Care records are written:
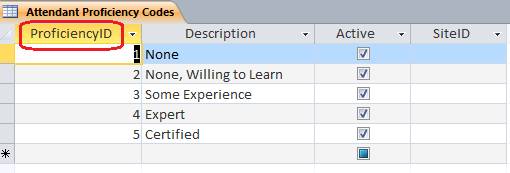
The Attendant Proficiency Codes table is designed to
reflect levels of expertise at a given skill. If you decide to modify this
table, be sure to list them in order of increasing competence – That is, assign
“No experience” a “ProficiencyID” value that is less
than that for a “Certified” record.
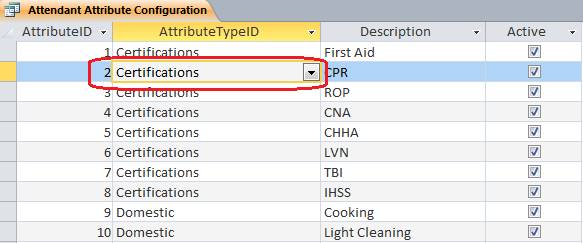
As mentioned, the optional Attendant Attribute Type Codes
table is provided to further categorize service providers, and can be edited to
any set of values that you wish. If want to use the table to further categorize
your list of skills, a query named “Attendant Attribute Configuration” is
provided to assist you. The query uses a combo box lookup value for “AttributeTypeID” as shown below:
For a complete list of combo box dropdown controls and the
tables that are used to populate them, please refer to the NetCIL
Dropdown Table Sources Reference Guide.
When you select “Attendant” (ALT @) from the People form,
the following form will appear:
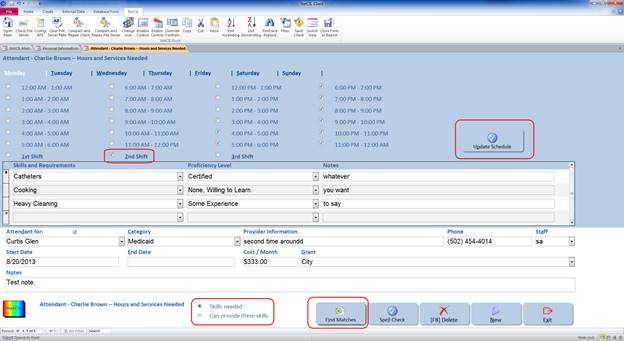
If the current record on the People form is tagged
with Contact Type “Attendant” or “Personal Assistant”, the Attendant Care form will
open to allow you to record hours of availability and skills that can be provided. You can also
assign consumers to the attendant. If the People form record is identified by
any other contact type, you can select “Skills needed” or “Can provide these
skills” at the bottom of the form as shown above. By selecting “Can provide
these skills”, you can record information about any person in your database who
may be able to provide attendant services. For records identified by Contact
Type “Attendant” or “Personal Assistant”, it is assumed that the individual is
only a provider of services, and the option to record “Skills needed” is not
available.
It’s recommended that you first identify the hours
when services are needed, or can be provided. The tab section at the top of the
form allows you to identify 24 one-hour time slots for any day of the week. For
convenience, you can select eight time slots at once be selecting the
appropriate “Shift” check box as shown above. Data for a given day of the week
will not be recorded until you select the “Update Schedule” button.
Once a schedule has been defined, record a list of
services and that are needed (or that can be provided). Specify a proficiency
level (or a desired level of proficiency).
To match an individual with attendants who can
provide services, or to match attendants with individuals who need services,
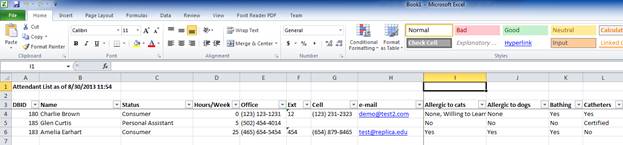
select the “Find Matches” button at the bottom of the screen. An Excel workbook
will be generated with two tabs: The fist will be a list of all currently-recorded
attendants and other individuals who can provide services, along with a list of
all the skills that you configured in the Attendant
Attribute Codes table. If a given skill has not been recorded for the
individual, “no” will be written in the appropriate skill column. If a skill is
recorded, it will be shown as either “yes” or the skill level that has been
indicated:
A second
tab in the workbook will show a list of all matches for the individual or
caregiver. Possible matches will be recorded in descending order, with the best
match shown first. Scores are based on the number of matching skills, weighted
by the level of expertise for each, plus the number of matches found for hours
of availability and need:

If you
wish to match an attendant with an individual, or vice-versa, select them from
the combo box dropdown list at the bottom of the form, and fill in other
information as desired. You can record as many records as you wish. Once you
have selected an “Attendant” or “Attendant for” an individual, you can quickly
view their People record by double-clicking on their name in the combo box.
Return to table of contents
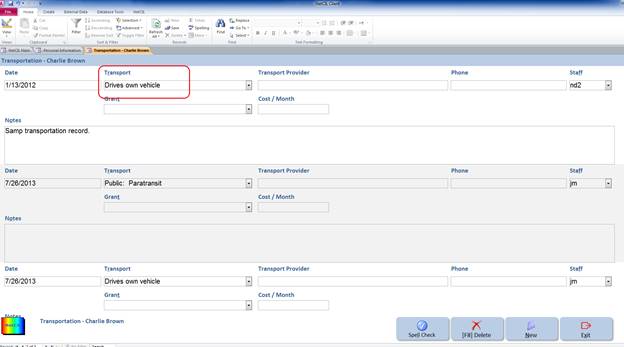
Data Entry – People - Transport
The Transport Info sub-form is used to
record information about an individual’s transportation needs or
capabilities. Enter data as appropriate. Note that multiple transportation
records can be written, so that changes in a consumer’s transportation
capabilities can be recorded. To add additional transportation information
click the New button at the bottom right of the screen.
Data Entry – People – Grants /
Programs
The Grant sub-form is used to intake a
consumer into a grant or program. By pressing the New button you
can select a Grant or a Program from the drop-down list. Set the Intake
date and a comment if you wish. Certain grants or programs have
an associated Requirements Form, where you can record any required
additional information. When you press the Req. Form button
the associated Requirements Form will appear, or you will see a message that
says, No form has been defined for this grant.
Complete the form as applicable and press Exit to return to
the Grant History sub-form. The Grant History sub-form
allows centers to gather statistics and run reports based on specific
grants or programs.

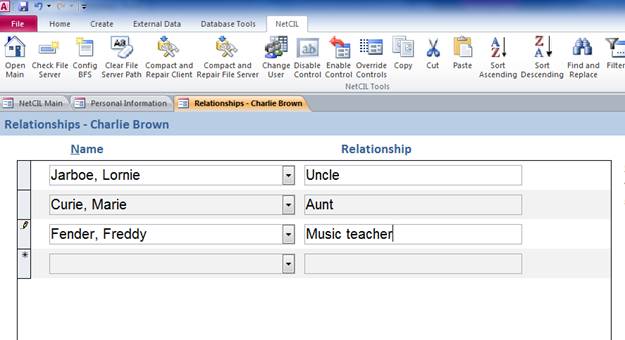
Data
Entry – People- Relationship
The NetCIL Client
application has the ability to associate many of its data elements with other
elements in the database. The Relationship sub-form
allows you select any person in your database (from the drop-down list) and
associate them with the individual whose record you are editing. You can
also specify their relationship in the Relationship field.
This is useful if two of the consumers are related in some way such as husbands
and wives or roommates.
Data
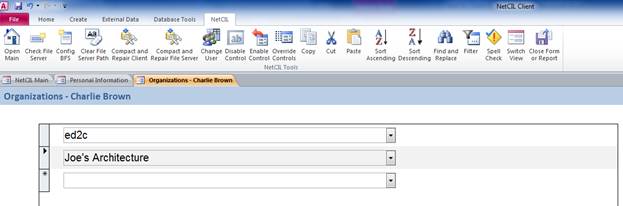
Entry – People - Organization
The Organization sub-form allows you to associate
a person with an organization. Every organization that has previously
been entered in the Organizations form will automatically
appear in the drop-down list. You can associate a person with as many
organizations as you wish.
Data
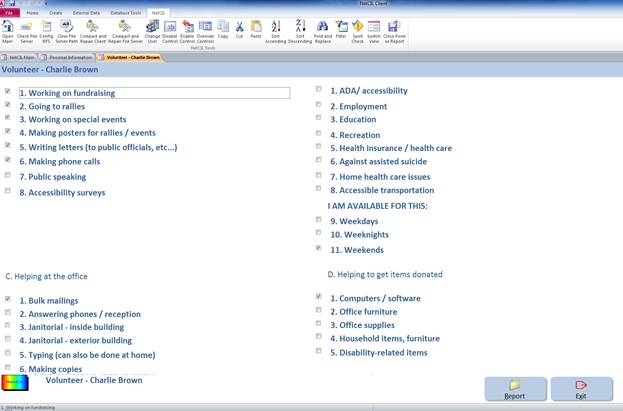
Entry – People - Volunteers
This sub-form is used
to identify people in your database who are willing to work as
volunteers. The form is designed to categorize volunteers by the types of
activities that they are willing to perform as well as the times that they are
available. If your organization does not have a volunteer program this form can
be left blank.
Interaction
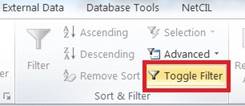
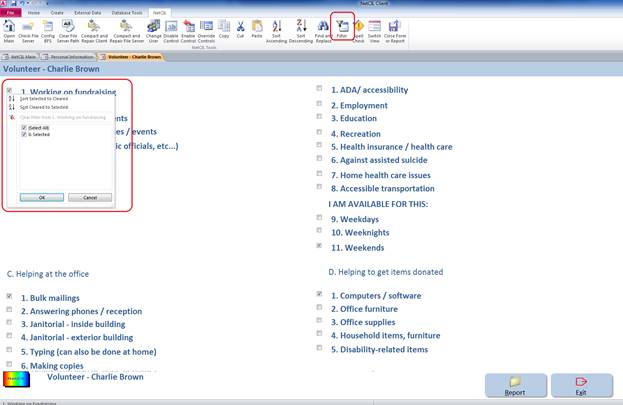
- Finding volunteers
If you wish to retrieve a specific list of Volunteers based on specific
criteria, NetCIL Client gives you the capability to do so. On the Main
form of NetCIL Client, in the Interaction
section of the screen, click on the Volunteer
button and select the desired criteria by checking the appropriate checkboxes
then select Toggle filter on the MS
Access Ribbon, as circled in red on the graphics below.
Data
Entry – People – Blind Field Services (BFS)
If your agency
provides services under Title VII Chapter 2 (Blind Field Services), you can use
NetCIL to record and report all requisite information. To do so, your database
must be properly configured. The process is quite simple; select the “Config BFS” icon from the NetCIL Ribbon, and your database
will automatically be populated with the correct values. There is no harm in
selecting the function more than once, and it’s even a good idea to
periodically check your configuration.

Once configuration is complete, data recording is straightforward. Open the BFS form from the People form, and record “Cause of Visual Impairment”, “Non-Visual Impairments”, “Source of Referral”, “Education Level”, “Living Arrangement”, “Residence Setting”, and “Onset Date” as pertinent. An example is shown below:
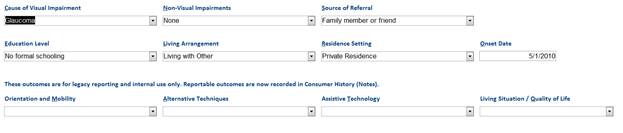
Note
that outcomes are no longer recorded on the BFS form, but are provide for your
internal use.
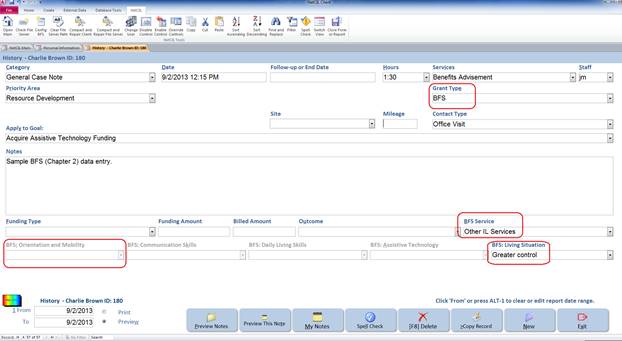
To record BFS Outcomes, open the Notes form, write a new record,
and select “BFS” (or Chapter 2) from the “Grant Type” list. Controls for BFS
Outcomes will appear; to assist in data entry accuracy, the appropriate outcome
control should be enabled while others will be disable as shown below. Record
the provision of BFS service as pertinent.
To report BFS (Chapter 2) data to RSA, generate a report via
NetCIL Manager, and use the result to enter data via the RSA website. For more
information, please refer to the Blind
Field Services Data Collection Protocol.
Data Entry - Work Log - General
Before using the Work Log, you may want to review
the Fee for Services configuration section.
The Work Log is used to record staff
activity related to Community Services or Activities, trainings,
seminars and Group Case notes.
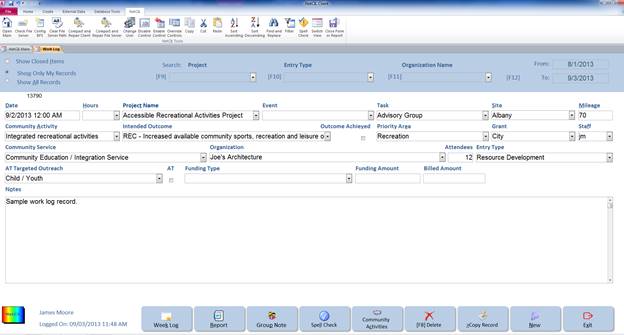
To record staff hours, press the New button
to add a new record. Then enter the date of your Work Log activity.
If your Work Log entry is related to a Community Activity that
has already been configured through NetCIL Manager, choose that
activity from the drop-down list.
Record the number of hours you spent on the activity from the Hours drop-down
list (you may want to include your travel time or administrative time in your
entry). If the activity is associated with a specific
grant, choose that Grant from the drop-down list.
If the activity has taken place outside your agency you can list the location
in the Site drop down list along with the mileage from your
agency to that location.
NetCIL Client users from California must choose an activity type from the Community
Service Old drop-down menu for the Work Log Entry to be counted on the
State CILR report. For more information on the California State Report,
please refer to the CILR Data collection protocol.
Enter an Entry Type from the drop-down list to record a
more detailed entry that best describes the type of Work Log
activity.
If the Work Log activity is associated with a project or task that has already
been configured through the Project Form of NetCIL
Client, select it from the Project or Task drop-down menus.
See the Projects section of the manual for more details.
If the activity involved the public or more than one consumer enter the number
of Attendees in the that box.
You can also associate to Work Log entry with an Organization or Event that
has already been entered in the NetCIL Client Organizations and Events forms .
For California only: If the Work Log entry is related to your AT services
choose from the AT Targeted Outreach drop-down menu and make
sure the AT box is checked.
Then enter a brief description of the activity in the Notes field.
These descriptions do not have to be lengthy because they will not show up on
any of your reports, they are just for your internal reference.
If you are unable to enter all your Work Log activities on the day that they
occur you can change the date on each new Work Log entry to reflect the actual
date that the activity occurred. These entries will then be listed in
chronological order within your Work Log.
Data
Entry - Work Log - Group Case Note
If your Work Log
entry involved more than one consumer and you would like to post the Work Log
entry directly to the consumers file, you can use the Group Case Note feature from the Work
Log.
Start by entering the
necessary information that best describes your entry. Enter the date of
the activity, the number of hours you spent with the consumers. Choose
a Grant from the drop-down
menu if the activity is associated with a specific grant. Once you have
finished your entry, press the Group Case Note button at the bottom
of the screen.
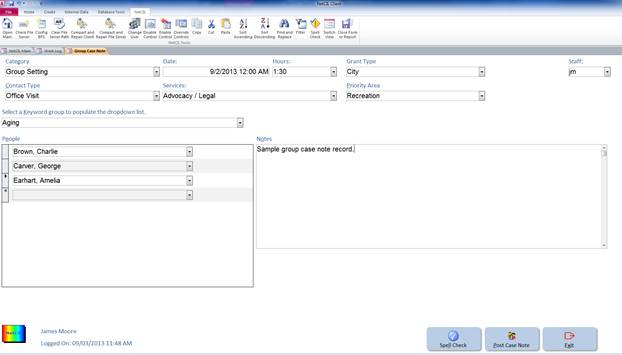
A new window will
open and your note will be automatically transferred. Select a Contact Type and a Service to associate with the
activity. If you have already associated some people with a specific
Keyword on the People / Keyword sub-form , enter that keyword
and those consumers will automatically be listed. Or you can
choose every person separately by selecting them on the People drop-down list. Once
a person is selected, use the Enter key on your keyboard
to move to the next line. Repeat the process for every person that you want to
select.
After finishing the
case note click the Post Case Note button at the
bottom of the screen. A confirmation message will appear.
Select OK to close the confirmation message.
Every person selected will now have the note in their records.
Just select Exit to return to the Work
Log window.
Data Entry –
Organizations
The NetCIL Client
database can store information about any of the Organizations with which you
normally interact. It also provides you with a capability to refer
people to organizations by matching keywords
and locations.
As with most NetCIL
Client forms, a facility is provided to search for organizations in your
database. To conduct a search, select one of the following methods:
F3: Unlock
current record for editing (if “User Knows Best”
is not enabled).
F5:
To display a list showing all organizations in your database
F9:
To search by Organization
F10: To
search by City
F11: To
search by a Keyword associated with an organization.
If a keyword is associated with more than one organization, all of the organizations associated with that keyword will be returned. The number of organizations will appear in the Record field at the bottom left corner of the form. By clicking on the right arrow located next to the record number, you can navigate through the list of organizations that were returned by the search.
F12: To
search by phone number
To add a new organization
to the database, press the New button in the bottom
right hand corner of the screen. Enter all desired information such as Organization,
Acronym, Type, Primary Contact, e-mail, and Phone. You may also
associate keywords with the organization in order to enhance your search
capabilities. An organization can be associated with as many Keywords
as
you wish. You can also enter
notes to briefly describe each organization in the Notes field. Once the organization
has been entered into NetCIL Client, you can Export it to your Outlook address book
as a V-Card by pressing the icon or by pressing the Alt v on
your keyboard.
 (Export to Outlook
Icon)
(Export to Outlook
Icon)
You may receive
a security warning, asking if you want to open the vCard file.
Press OK.
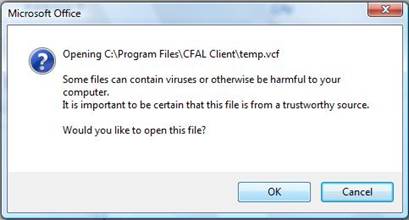
Press Save and Close to keep this
organization in your address book.
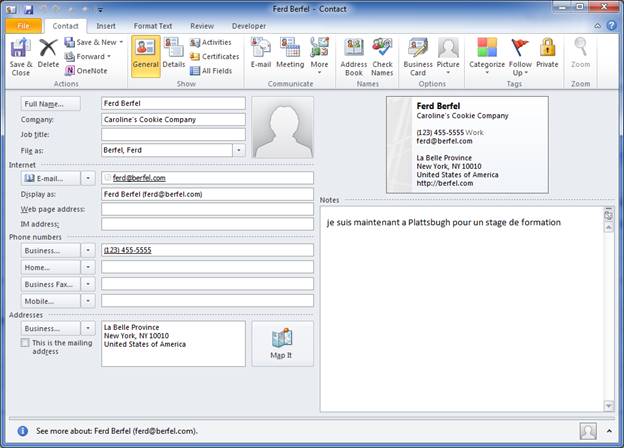
It is advisable that one or two people within your agency be
given the responsibility of maintaining your organization list. Doing so helps to
ensure the integrity of data that is entered. In the inevitable cases where
duplicate entries are found, Level 10 users can combine them by selecting the
“Combine Orgs” function at the bottom of the Organizations form:  When run, the function will retain the first instance (lowest
database ID number) of each set of duplicate organizations. It will then “map” any
IDs of duplicates in all transaction tables, and then delete the duplicates
from the Organizations table. A spreadsheet report will be generated that lists
the duplicates that were combined.
When run, the function will retain the first instance (lowest
database ID number) of each set of duplicate organizations. It will then “map” any
IDs of duplicates in all transaction tables, and then delete the duplicates
from the Organizations table. A spreadsheet report will be generated that lists
the duplicates that were combined.
When you interact
with an organization, you can create a work log entry to describe your
activity. Doing so is the equivalent of creating a Note for an individual. To
create a work log entry directly from the Organizations form, select Work Log at the bottom of the form. The
Work Log form will open automatically, and a record will be written indicating
the current date and time, the selected organization, and your initials as
shown below. You can of course enter additional information as desired.
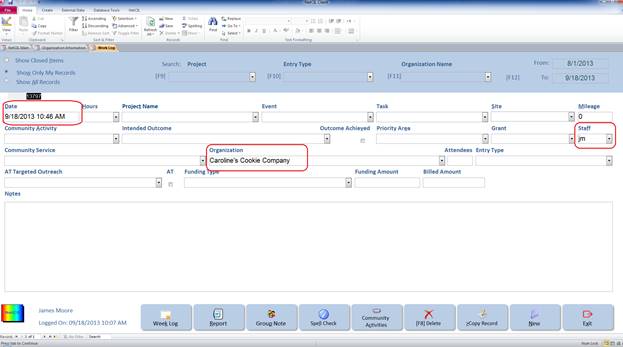
To create an Excel
Workbook report of your interactions with one or more organizations, select Report at the bottom of the
Organizations form. Before doing so, you can set a date range for the report,
and you can select to create a report for work log entries for all
organizations, or only for entries that involve interaction with the selected
organization.
![]()
When properly configured, you can refer people to
organizations by matching keywords and locations. To do so, you must first
configure organizations with “Keywords” and “Counties Served”. As shown below, note
that the “Counties Served” list will default to the state where the
organization is located; if an organization’s list of “Counties Served” crosses
state boundaries, select the appropriate “County Filter”, and then select
counties as desired. Note that during this process, “Counties Served” in other
states may temporarily disappear from the list. When finished editing, simply
delete the value in the “County Filter” to review all “Counties Served” in all
states for a given organization.
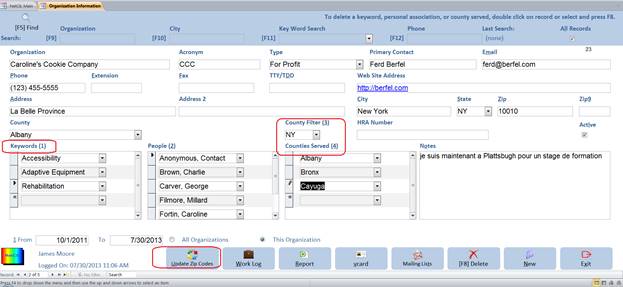
To
create referrals, configure consumers (and others if
you wish) with “Keywords” as desired via the “People” form.
When
you open the “Referrals” form for an individual,
you’ll note that you now have a list of organizations that match the
individual’s settings for keyword and counties. You can change the filter to
display all organizations, those that match keywords only, counties served
only, or both. If you wish to create a referral, simply double-click the
“Matching Organization” name and it will be added to the current referral
record.
Data
Entry - Community Activities
Independent Living
Centers who need to submit a federal RSA/704 Report have to record hours
spent working towards their Community Activities goals.
Community Activities must be entered into
the NetCIL Client database via the Community Activities button or through the NetCIL Manager Config menu by an agency administrator.
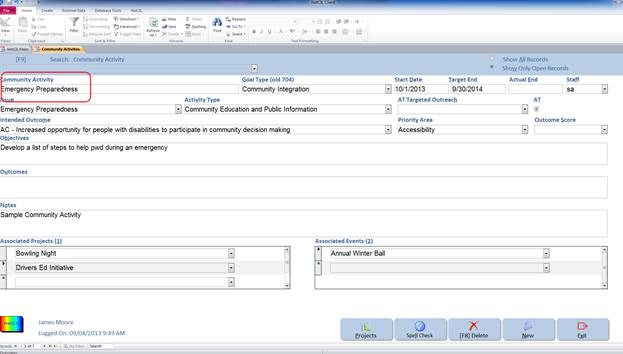
Community Activities
are long range or overarching goals related to community wide issues
that the ILC wants to achieve as a whole. These Community Activities
should be created by the Executive Director or other management staff from the
agency's yearly plan. Therefore, there should only be a few Community
Activities created each year. The Community Activities screen should not be
used as a Work Log to Record meetings or outreach activities.
To add a new
Community Activity click the Community Activity button on the front
screen of the NetCIL Client database. Then click the New button in the lower
right-hand corner of the screen. Create a title for the Community
Activity that briefly describes the activity. This title will appear in
the Community Activity drop-down list in the Work Log Form and will be used by
staff to record their hours. For California Centers, select a Goal Type (704 old) from the drop-down
list to be associated with that specific Community Activity.
Record a Start Date for the Community
Activity along with a Target End Date. Once the
Community Activity has been completed, enter an Actual End Date for that
activity. When the Actual End Date has been entered,
that Community Activity will be listed on the 704 report as completed and once
the date has passed, that Activity will no longer appear as a choice
Community Activity drop-down list in the Work Log Form.
Select an issue from the Issues drop down
list to associate that specific Community Activity with an issue tracked by the
704 report. If the issue you are working on does not appear in the
drop-down list, a database administrator can add another issue to the database
table called Community Issue Codes. Choose an Activity
Type that relates to the specific Community Activity you are
creating. This information (Community
Issue and Activity Type) will also be recorded on your annual 704 report.
When a Community Activity has been completed enter an Actual End Date and an Outcome Score into the drop down
list.
For California Centers: If a specific Community Activity is
related to AT services select from the AT Targeted Outreach drop down
list and make sure the AT box is checked so that activity will be recorded
within the AT section of the 704 report.
Enter a brief description of the Objectives
and Outcomes for each Community Activity.
These fields will automatically be transferred onto the Community Activity section of the
federal RSA/704 Report.
Projects and Events previously configured can also be associated with each Community
Activity that will appear in the corresponding drop down lists.
Entering
time spent on a Community Activity
Once a Community Activity has been added to the database via
the Community Activity form, it will
appear on the Work Log form in the Community
Activity dropdown list. Each time a staff person spends time working on a
specific Community Activity those hours should be recorded in that staff
person's work log. These hours will be calculated and recorded in the
appropriate sections of the 704 report.
Each Community
Activity must have a name in order to appear in the Work Log drop down
list. Staff members must choose a Community Activity and select the number
of hours they spent working on that activity within their Work Log. The total
number of hours spent by each staff on each Community
Activity will then be summed up automatically on the 704 Report.
Data Entry – Projects
You can search for Projects in much the same
way that you search for people. To do so, utilize one of the
following methods:
F9: To search by Project Name – list of projects will be displayed
in the dropdown box.
F10: To search by Keywords that are associated with a project. If a
keyword is associated with more than one project, all of the projects
associated with that keyword will be returned by the search. You can view
the number of projects returned from a search by examining the Record field
at the bottom left corner of the form. By clicking on the right arrow
located next to the record number, you can select the project that you wish to
open.
F11: To search for projects starting on a
certain date.
F12: To search for projects ending on a
certain date.
To add a new project, press New and then enter a Project
Name, Project Description, Start Date and End
Date if applicable. By clicking on Goals or Keywords a
drop-down list will appear from which you can select associations as you see
fit. The following graphic illustrates
the Projects form:
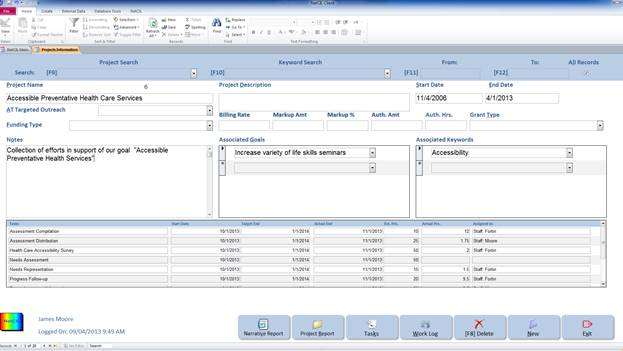
At the bottom of the form there are additional
buttons:

The Narrative Report button will generate
a Narrative Report as a Word Document that will show the Project Name,
Date, and Description, with Work Log entries
and Community Goals linked to it.
The Project Report button will generate a
detailed report on a specific project and all information pertaining to it.
Data Entry – Projects - Tasks
The Tasks button will open a sub-form that
allows you to associate tasks with a project.
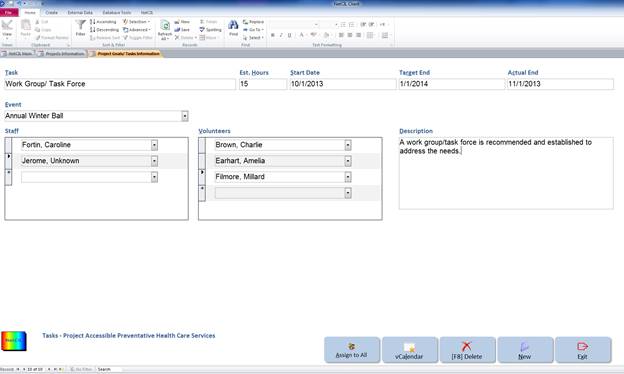
To enter a task, press the New button,
and enter the Task, Estimated Hours, Start Date, Target
End and Actual End dates as appropriate. You can
select any number of your staff members to be associated with the task. Staff members must have
previously been entered as database users. You can also select any
number of volunteers to be associated with a task. Volunteers must be
designated via the People form.
Return to table of contents
Data Entry - Events
The Events form allows you to enter
events that can then be associated with Projects and Goals. As
with most forms, there is a section that allows you to search for an
event.
F9: To search by Event name
F10: To search by Keyword
F11: To search for events with a
specific start date
F12: To search for events with a
specific end date
To enter a new event, press the New button
(or ALT + N) and enter an Event Name, Time & Date, Event
Type and a Description as appropriate. By
clicking on Associated Goal or Associated Project a
list of previously entered goals and projects will be displayed. You can
associate the event with as many goals and projects as you wish. If you
wish to record a work log entry to be associated with the event, press
the Work Log button at the bottom of the screen.
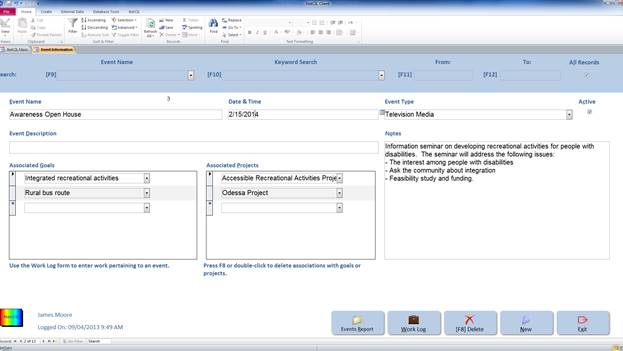
Data Entry - Outreach
Outreach represents a special type of project or
event. As such, a special form is provided to record outreach
activity. If the outreach activity involves recurring events, consider
the creation of a Project with the same name as the
activity. By doing so, you can allocate and segregate all of the hours
that you spend on the outreach activity and associate that time with one of
your organization’s goals. If the activity is not a recurring event, it’s
still a good idea to associate the effort expended with one of your
organization’s projects.
The following graphic show the outreach form.
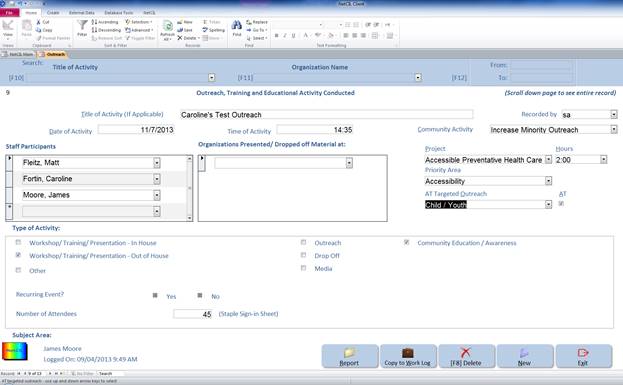
The Outreach form can be used to
collect information about Outreach, Training and Educational Activity
programs. Enter the Title of Activity, Date and Time as
appropriate. You can associate any Participating Staff member
and/or Organizations with the outreach event, and answer
specific questions related to the activity. The Outreach form also lets
you associate a Project and record the hours spent on a
specific activity. By pressing the Report button you can
generate a detailed report of the Outreach Activity. By pressing
the Copy to Work Log button, the Work Log form will open and some of the information will be
transferred automatically onto the form.
You must however be careful when using the Copy to Work Log feature as it will duplicate the hours on the Work
Log form. All hours recorded on the Outreach
and Work Log form will be added onto
the 704 report if they are linked to a specific Community Activity. .
If several staff members attend the same outreach activity
only one staff person should complete the Outreach form. The
person who completes the form can include all the names of the other people who
attended the activity.
Data Entry – Inventory
Some organizations
maintain an inventory of equipment and other items that can be loaned or given
to their clients. The Inventory function of NetCIL provides you with a
sophisticated method of managing such items. It also provides you with a method
for tracking monetary and tangible item donations.
To create an
inventory list select the Inventory (ALT-I) button on the front screen of
NetCIL Client. You must have a privilege
level of 8 or greater in order to use this function. To add a new item to the
inventory list click that New button at the bottom
right-hand of the screen. At a minimum, enter an Item Description, select a Category, and enter a Beginning Inventory value. Selecting a Category will be useful when you loan or
give items to individuals, as it will allow you to filter your list of items.
You can create your own Category list
by editing
the Assistance Codes table.
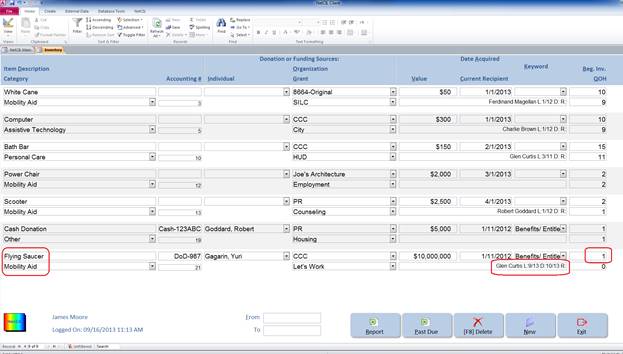
Other fields are optional. Accounting# is for your agency’s internal use and can be used to
link an item to your bookkeeping system. If an item was received from an Individual, an Organization, and/or under the auspices of a Grant, you can record that information in the Donation or Funding Sources section. If the item has a known dollar
value, you can enter it in the Value
field. Note that if you record a Beginning
Inventory value of more than one, you should record a Value amount that reflects the combined value of the total number
of items.
If you assign a Keyword value, you
can further categorize inventory items, and they will appear in the Inventory
tab whenever you create corresponding keyword reports.
If you donate or loan an item to an individual, a name will appear in the Current Recipient field. If the item has been loaned to a single individual, double-clicking the field will automatically open the Assistance Equipment form for the individual, and the record will be displayed:
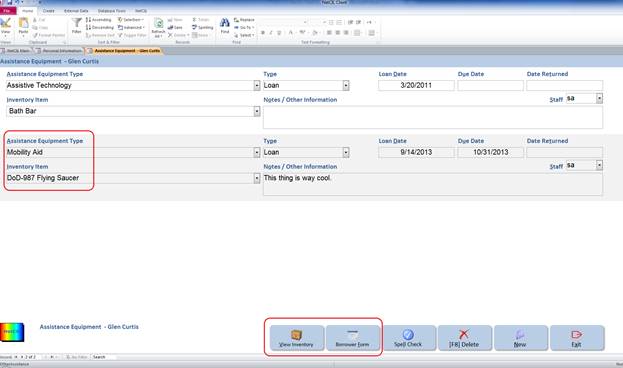
If an item has been loaned to multiple
individuals, a message like the one shown below will appear.
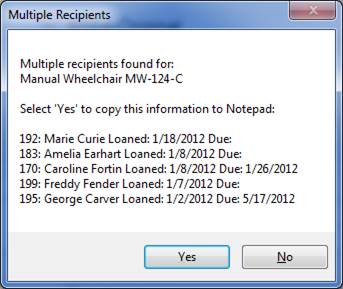
As indicated by the message, you
can copy the list of recipients to a notepad file for reference.
Two Excel Workbook reports are
available for inventory items. By selecting the Report (ALT-R) button a workbook will be generated like the one
shown below. The Excel data filter will be automatically enabled, allowing you
to filter by any category.
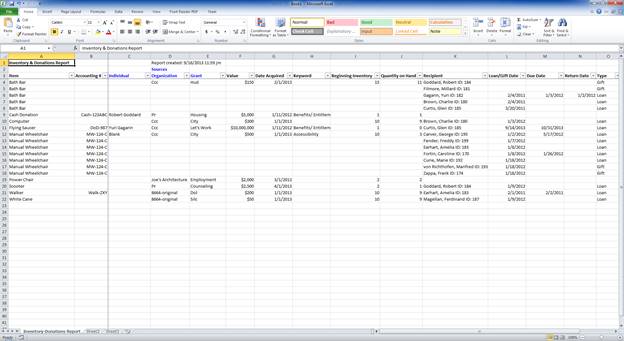
In a like manner, selecting Past
Due (ALT-P) will generate a workbook report of all past due items that have
been loaned.
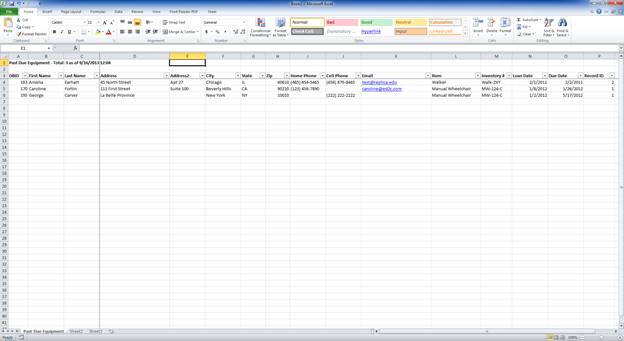
For
more information, see the Assistance Equipment
section of this manual.
Letters, Labels, and
e-mail Correspondence
NetCIL offers a sophisticated way to manage correspondence
with the people and organizations in your database. It takes
full advantage of the powerful mail-merge features of Microsoft Office
applications, it can generate mass emails, and it can create lists for you to
export to other applications such as commercial printing services.
With NetCIL Client and
Microsoft Office you can configure correspondence in a variety of formats,
target any group of people from within your database, and track the flow of
information to those groups. When entering personal information into your
database, select the preferred method of communication in the Letter Format dropdown box near the
bottom of the People screen. The
supported formats are audiotape, Braille, CD, letters in either standard
or large print, and e-mail. The default is a standard letter. If the contact
does not wish to receive correspondence, select None from the dropdown list.
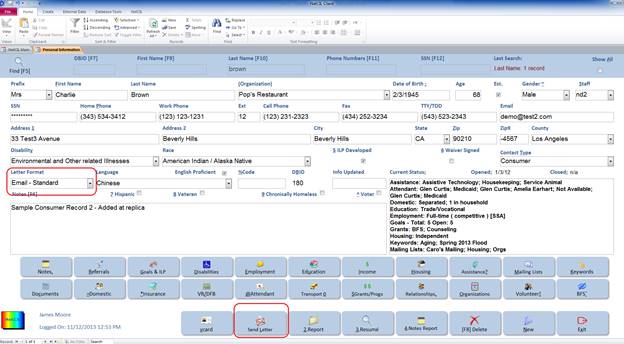
Any pre-configured letter can be sent from the People screen. To do so, press the Send Letter button near the bottom of the screen, select the appropriate letter name from the pop-up menu, and press OK. A copy of the letter will be queued for printing.
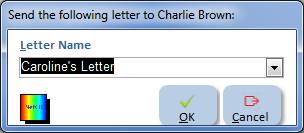
You can also generate an
e-mail message to an individual from within the People form. If you have entered a
valid address in the e-mail field, double-click the field, and if your workstation
is properly configured, an e-mail message will be generated for you to
edit. If you send the message, a record will be written to the
individual’s history notes to indicate the time that the message was
sent. If you are unable to generate an e-mail message, then your
workstation mail system has not been properly configured. Contact your
system administrator for further assistance.
Each letter name can
have two documents associated with it. One document is designed to
contain a standard-format version, and the other a large-text version. A sample
of each type is included with the NetCIL Client application.
In most cases, your
organization will choose to send e-mail or pre-printed correspondence to its
contacts. In such cases, you need only to define a name for the
correspondence in the Letters input form. You can then generate an e-mail
message, or create mailing labels to place on the correspondence.
The top of the Letters
form contains step-by-step instructions on how to send correspondence. A more
detailed explanation of the process is listed here.
From the Main form, select Send Letters.
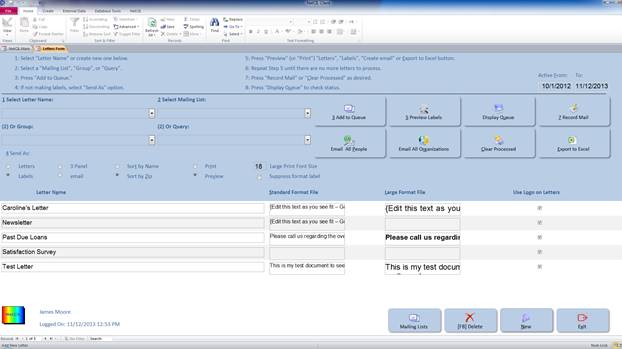
In order to send a new letter to a group of people,
perform the following steps:
1. If you only wish to
generate e-mail or mailing labels, skip to step 2. Otherwise, write
your letter using any OLE-compliant word processing application, such as
WordPerfect or Microsoft Word. Create two versions – one with large text. You
may want to begin with a copy of the sample letters, as they are formatted with
the correct margins, hanging indents, and spacing to be compatible with the
application’s reports. It would probably be a good idea to store your finished
letters in a folder that is accessible to everyone who uses your network.
2. Click on the New button at the bottom of the screen
and enter a descriptive name for the letter in the Letter Name field.
3. If you only wish to
generate mailing labels or send e-mail, skip to step 8. Otherwise,
right-click the Standard
Format File field.
Select Insert Object…from
the pop-up menu.
4. Select Create from File from the next dialog box, as shown
below.
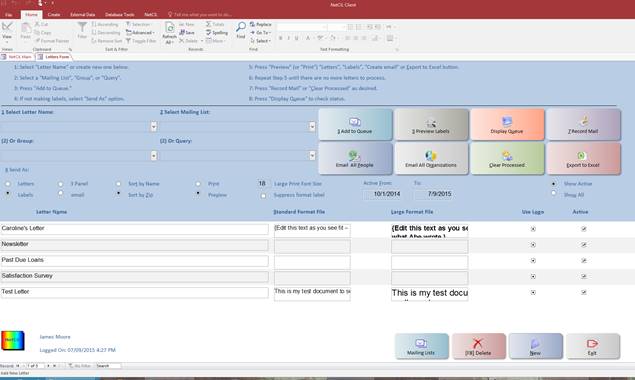
5. Make sure that the Display as Icon check box is cleared, and that the Link check box is checked. Browse to the folder where you stored the
letters that you created, and select the appropriate document name.
6. Repeat steps 4 through 6
in the “Large Format File” field. If you want to print your letters on blank
paper using a custom logo file, repeat steps 4 through 6 in the “Logo File”
field. For best performance when including a custom logo, use a 100
dot-per-inch GIF or bitmap image, 6.5 inches wide by one inch high. You must
have an OLE-compliant application on your computer that can edit your logo
image type. Examples of applications that can process GIF images are Corel
Draw, Microsoft Photo Editor, or Adobe Photoshop. MS Paint, an application that
is supplied with Microsoft Windows, can process bitmap images. Bitmaps
therefore don’t require special software for editing, but they are larger than
GIFs, and they don’t support transparent backgrounds. Sample logo images of
each type, formatted with the appropriate characteristics, are included with
the application.
7. Once a letter has been
configured as described above, it can be edited by double-clicking on the
appropriate field in the Letters form. If you selected the Link option as described in step 6, any
changes that are made to letter documents will automatically update all
corresponding letters that are sent using the NetCIL Client application.
8. From the application Main
screen, select the name of the appropriate letter from the Send Letter dropdown box.
9. If you want to send your
letter to all consumers, organizations, organization personnel, or to everyone
in your database, you can do so by making the appropriate selection in the Select Group dropdown box. Note that organization
addresses can only be printed as mailing labels. If you need to send
alternate-format correspondence to a contact within an organization, list the
contact in the People form and specify the format that is desired.
By doing so you can also automatically track the date and time when the
correspondence was sent.
10. If you want to send your
letter to every person and organization on a mailing list, select the
appropriate list from the Mailing List
dropdown list. Note that you can manage Mailing Lists by selecting the Mailing Lists button near the bottom of
the Letters form.
11. If you wish to target a
specific group of individuals, you can create a custom query that defines the group,
and then select the query name from the Query
List dropdown box. A sample
mass mail query is included with the application. At a minimum, the query must
include the PersonID
and CommFormatID
fields from the People table. For
more information on custom query development, refer to Microsoft Access
documentation.
12. When your selection has
been made, press the Add to
Queue button. All people in
your database who have been designated to receive a letter will be added to the
letter queue. If the Queue already had People in it, a warning message will
alert you and ask you to clear the Queue prior to proceeding with the mailing,
as shown below:
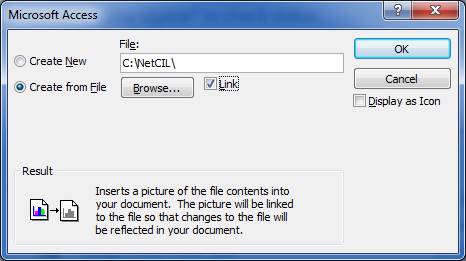
13.
If you wish, you can preview the letters and labels before
printing by selecting the Preview Labels
button. If you are satisfied with your labels, just print directly from the Preview.
When printing labels, the format (E-Mail, Large Print, Braille…) will appear if the format is
set to something other than Standard
in the upper right-hand corner of each label.
To suppress this option, check the Suppress Format checkbox as shown in red on the graphic
below.

If you wish to include each person’s name and address on a letter
that you have created, select the Letters option near the bottom of the main
screen. Letters will print with each person’s name and address correctly
positioned for mailing in a standard number 10 window envelope. If you choose
to print labels, addresses are designed to print three-across on standard Avery
number 5160 or 5260 label sheets. A third option allows you to print addresses
onto 3-panel pre-folded mailers. When printed, all letters are sorted by zip
code.
-
If you wish to print a letter or a label for someone whose
Communication Format is set to email, a warning message will appear as shown
below.
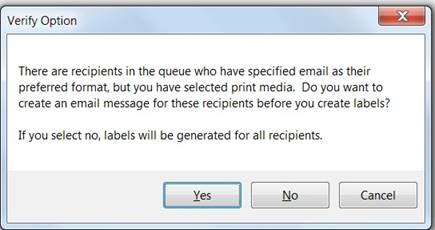
Select the No button, if
you wish to send a letter or create labels instead of an email.
1-
After a batch of letters or labels has been printed, you’ll be
asked to confirm that all letters have printed correctly. No prompt will be issued in the case of e-mail; it will be assumed
that the message was sent. If any letters need to be reprinted,
answer No to the prompt, preview the letters again,
and reprint as required. When each batch has processed correctly, answer Yes to the prompt, and all letters from
that batch will be marked as having been printed. It may be necessary to
iterate through the printing process several times before the letter queue will
record all mail as having been printed. At least one iteration will be required
for each type of correspondence and format that is in the queue.
2-
When all correspondence has been mailed, press the Record Mail or Clear
Processed buttons near the
bottom of the Main form. If you select Record
Mail, a transaction record
will be written for each person for whom a letter has been sent, indicating the
name of the letter and the time that the letter was sent. If a custom query was
used as the record source for the letter, the name of the query will be
recorded as well. If you select Clear
Processed, no transaction record will be stored. In either case, all
records in the letters queue that are marked with the print flag will be purged
from the queue.
3-
When printing letters as labels, the requested letter format will
be printed in the upper right corner of each label unless you choose to
suppress it. For alternate formats such as audiotape, Braille, CDs, labels will
always be generated, and will list the requested format. The labels can then be
affixed to tapes, CDs, or envelopes as appropriate.
4-
If you encounter any problems while creating mass mail, it’s easy
to start over. Select the letter Queue button, and examine the status of all
correspondence that is waiting to be processed. You can easily clear the
print flag on all records by pressing F6 or selecting Clear Status. You can
also completely purge the queue and start over by pressing F8 or selecting Clear Queue.
Creating a Mass E-Mail
You can create a mass e-mail with NetCIL Client by simply
clicking the Email All People
button. Every person in your database
with a valid email address will automatically be added to the BCC line (Blind Carbon Copy) of your email. Recipients of a BCC message will see only their own e-mail address. Please note that
only the records in the People table containing a valid e-mail
address will appear in your mass e-mail.
By using this scheme, any attachments that you wish to include with your
correspondence can then be-preformatted according to the recipient’s
requirements (large print or standard).
The same process can be done if you want to email all
organizations in your database. Simply click the Email all Organizations button to generate your email.
The
Letters Queue form shows that status of correspondence that is being processed.
After you create a list of correspondence, the list will appear in the Letters Queue
as shown below. The database identifier and name of the individual, the letter
and format requested, and the print status will be displayed. Letters that have
been printed will have the status box checked. You can export the list to an
Excel spreadsheet for use by a commercial printer, or you can edit any record
if you wish. Pressing [F6] Clear Status will clear the “printed” checkbox for
all records. Pressing [F8] Clear Queue will delete all records from the queue,
regardless of print status.
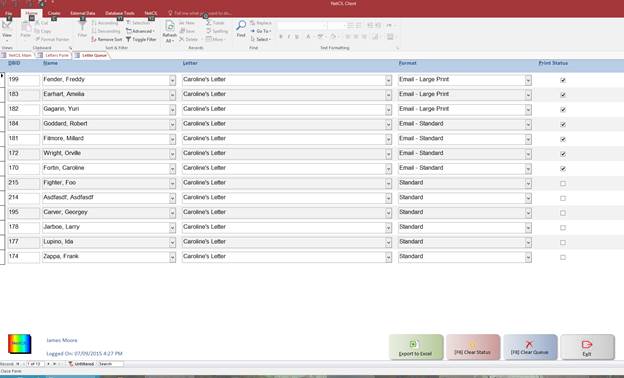
Database Administration – Creating an Archive
The Archive function provides an easy method to create a backup
copy of your database, and it allows you to purge your active database of old,
inactive records.
To create a backup copy of your database, select the
Archive Functions button from the Main form: 
Select the Archive button in the lower right corner of the
Archive form:
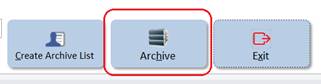
A confirmation message will appear:
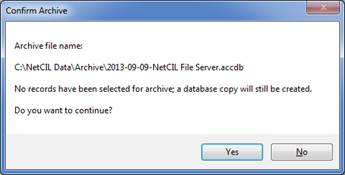
If you select “Yes”, a copy of your database will be
created as indicated in the message. No records will be purged from your active
database. The copy can be useful for retrieving records that are inadvertently
deleted from your active database, and it can provide you with a backup in case
other problems occur. The function allows only one archive per day to be
created; if you want to override this limit, simply rename the archive after it
is created.
One of the biggest problems that afflicts all databases is
the accumulation of “junk” records over time.
Partially-completed and expired data can make it difficult to accurately
track important information as it gets lost in a mountain of old digital
“debris”. The NetCIL Archive function
addresses this problem by giving you a simple facility to archive old data,
while also allowing you to easily search and retrieve that data whenever
necessary.
To access the NetCIL archive functions, select the
“Archive” button in the Database Administration section of the NetCIL Main
screen. Level 5 users can open the form
to perform record search and retrieval functions; level 9 users can archive data.
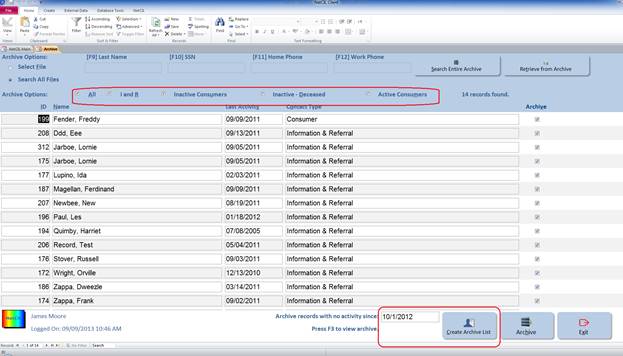
In the lower right corner, a date value for archiving will
be displayed. Records that have no
recorded data since the selected date will be retrieved when the “Create
Archive List” function is invoked. The default value will be the beginning of a
fiscal year at least four years prior to the current date. You can set this value to any date that you
desire. Once selected, press the “Create
Archive List” button. A list of records
will be created, showing names, date of last activity, and current status
(contact type) as shown above. Active
consumers will be shown first, followed by inactive consumers, and then I&R
contact types. Records will be sorted
alphabetically within each sub-list. Other types such as agency contacts will
be ignored by the archive function.
By default, all retrieved records will appear with the
“Archive” checkbox selected as shown above.
You can individually select or deselect records, or you can select and
deselect groups of records as shown in the “Archive Options” section near the
top of the screen. For example, you may
wish to only archive records for deceased consumers. To do so, create an archive list, un-check
the “Archive All” archive option, then check the “Inactive-Deceased”
checkbox. Only records for inactive
consumers who are listed as deceased prior to the archive date will be
selected.
The archiving of consumers who are listed as “active”
represents a special case; normally,
consumers who have no recorded activity in over a year should be deactivated
manually. The process for doing so is
described in the Data
Entry - The People Form section.
In the real word, it’s often difficult to keep up with all consumer
contacts; the NetCIL Archive function helps with that problem by allowing you
to deactivate consumer records for individuals with whom you have had no
contact for long periods of time.
After creating an archive list and selecting the desired
records (or groups of records) as described above, press the “Archive”
button. A message like the one below
will appear:

Being a special
case, active consumer records will be modified prior to archiving as follows:
-
All open goals for selected consumers will be closed and set to
“Dropped”.
-
A deactivation record will be written, and the reason will be set
to “Other”.
For all records modified, the date (or end date) will be
the date of last recorded activity. Note
that this function may affect the statistics of some reports that are run for
the period that includes these dates of deactivation; therefore it’s
recommended to only archive data that is at least two years old.
By default, an archive file will be created with the
naming convention “yyyy-mm-dd-“
and the name of your NetCIL file server.
The archived data will be placed in a folder called “Archive” beneath
the directory where your file server is located. For NetCIL Online installations, this
directory will normally be c:\NetCIL Data\Archive on your NetCIL cloud server.
When the archive function is invoked, an archive file will
be created, and then confirmation to proceed with archive will be requested:
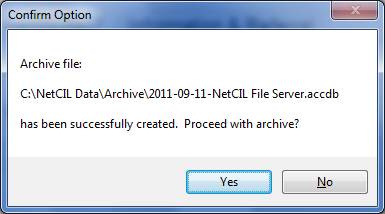
If you enter “Yes”, selected records will be then be
purged from the active database. A
confirmation message will appear, and a spreadsheet report of archived records
will be created. Note that NetCIL Online
users don’t need to compact and repair their file servers after archive; the
function occurs automatically.
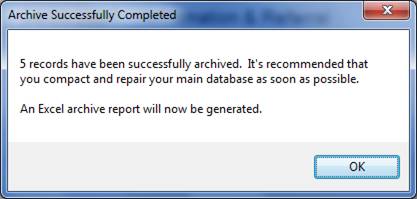
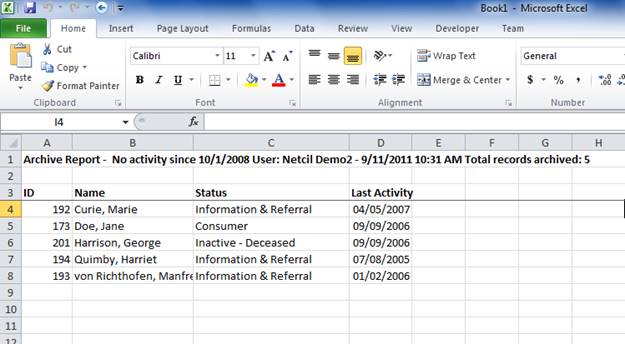
As mentioned previously, note that it’s possible to create
an archive without purging any records;
to do so, simply open the archive form and select “Archive” without
creating an archive list. The following
message will appear:
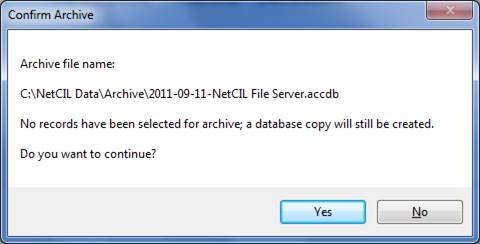
A database copy that follows the naming convention as
described above will be created. The To
avoid the accumulation of too much archive data, the function only allows one
database copy per day to be created.
Database
Administration – Retrieving Records from Archive
Retrieving archived records is a straightforward
process. Like with the People form, you
can search for records by last name, SSN, home phone, or work phone. If
searches based on those fields are performed in the People form and no matching
records are found, the option will be given to search archives as shown below:
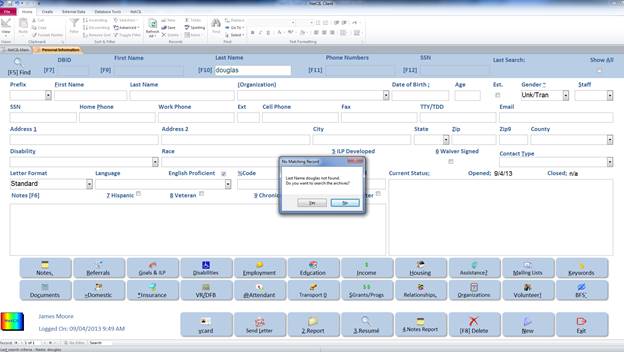
If you select “Yes”, the Archive form will open
automatically, and the appropriate search field will be filled in according to your
People form search. You can of course
modify the search criteria as desired.
Just like with the People form, the use of wild cards when searching for
last names is allowed. For example,
entering “sm*” in the last name field will return all
instances of “Smith”, “Smythe”, and “Smithson” that
are found. Search characters are not
case-sensitive.

By default, the archive function will search all archive
databases. Records will be returned from
the most recently-dated archive first.
The archive function will continue to look back in time until records
are found or until all archive files have been searched. At your option, you can select a specific
file to search by changing the “Archive Options” to “Select File”, pressing the
“Select File to Search” button, and then selecting the desired file from the
“Locate Archive File Server” dialog box as shown below:
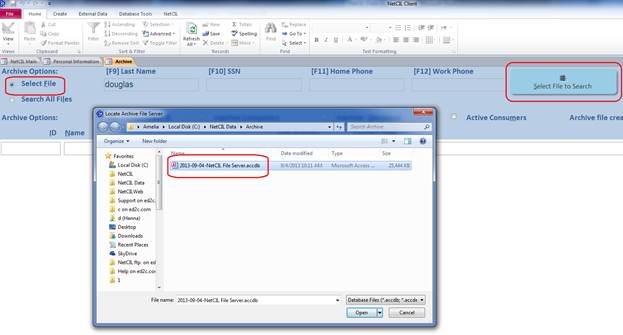
Once a search has been performed, matching records will be
displayed:
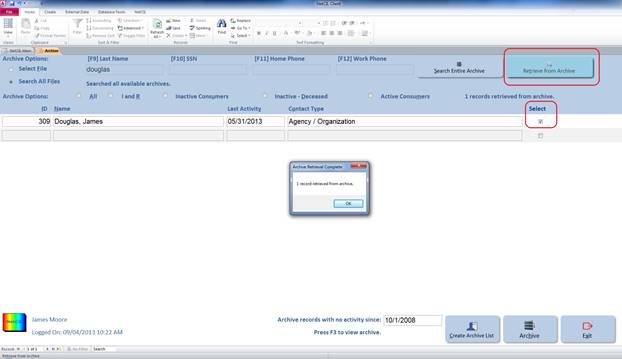
Select or deselect records or groups of records in the
same manner as described above for archiving, then select “Retrieve from
Archive”. A confirmation message will appear.
When retrieved records are displayed with the People form,
the Notes field will indicate that the record has been retrieved, and from
which archive the record came. In the
example shown below, Jane Doe was an active consumer when archived; her record
has been retrieved but she is still listed as an inactive consumer:
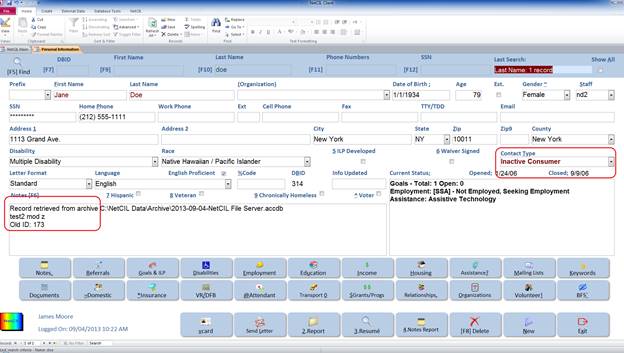
At present,
only records from the NetCIL “People” table can be archived and retrieved.
Database
Administration - Replication and synchronization
Replication – An Overview
The NetCIL Client application
system is designed to support remote data collection. Users who can connect laptop computers to your
organization’s office network can make a replica copy of your database, disconnect from the network, collect data
anywhere, and then transmit the results back to your central database.
The replication scheme that is
implemented in NetCIL Client uses internal business logic that is specific to
the application, not the standard replication
scheme that can be implemented in Microsoft Access. There are advantages
and disadvantages to this approach. The main advantage of an
application-specific replication scheme is that the replication logic maintains
better control of data exchange, since it has better knowledge of the application’s
requirements than a generic replication scheme can possess. The database
sizes are considerably smaller than they would be if generic replication were
used. The application’s internal logic also automatically handles the
resolution of write conflicts between database copies, whereas a generic scheme
cannot. The only disadvantage of the specific replication scheme is that
it does not allow for structural design changes to the file server while there
are unsynchronized replicas. This disadvantage should not impose any
problems in an operational environment, as file server structure changes are
rarely needed, and they can still be effected after data synchronization.
All replication schemes must employ a
method to handle write conflicts. A conflict occurs
when two or more users using two or more copies of a database make edits to the
same record in more than one copy. When data is synchronized, one user’s
changes must be preserved while the others are discarded. NetCIL Client
uses the following rules to resolve write conflicts between database
copies:
· Changes to configuration tables and organizations are only preserved in the master (main) file server. For example, disability and services lists will always be copied from the master to the replica when synchronization is performed. Replica users should not attempt to configure tables themselves, as their changes will be overwritten, and doing so may result in the recording of erroneous data.
- Changes
to personal information in the People table are assumed to be more
current in the replica than in the master. If a replica user makes
changes to a record that existed before the replica was created, those
changes will be made to the master record when synchronization is
performed. Any changes that were made to the same record in the
master will be overwritten. As such, care should be exercised if you
have outstanding replica copies of your database. Instead of editing
existing personal records in the master database, create new records, and
your edits will be preserved.
·
If two replicas make edits to the same record in the
People table, the changes in the replica that performs the most recent
synchronization will be preserved. You should be careful to coordinate
with your colleagues if you plan to use multiple replicas. If two replica
users must edit the files of the same person, always create new records instead
of editing existing records. Doing so will ensure that all information is
preserved.
There is nothing in the
NetCIL Client structure that prevents you from implementing the standard
Microsoft Access replication scheme if you wish, but it is strongly advised
that you not do so. If you implement Microsoft replication and are not
very careful, you may accidentally lose important data.
Make Replica
To make a replica
database, perform the following steps:
1. Make sure
that your laptop or workstation is connected to your network, and that the
NetCIL Client application is connected to your main file server. You can
verify the connection status by examining the “File Server” message in the
lower left corner of the Main screen.
2. Press the Make Replica button. 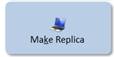 A standard dialog box will appear.
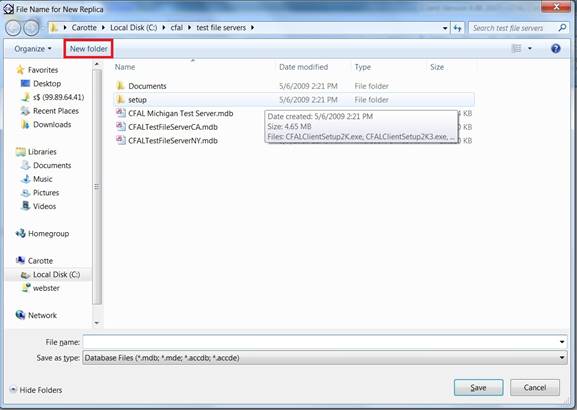
3. Navigate to an
folder on your laptop’s or workstation’s local disk drive. It’s probably
a good idea to keep your NetCIL Client data segregated in its own folder, but
it isn’t necessary. To make a new folder while the dialog box is open,
press the New Folder icon in the
upper part of the dialog box, as shown in red in the picture above.
4. Enter a filename
and press Save. You can use any
name that you wish for your replica copy, but it’s best to pick a name that
will be easy to remember. It isn’t necessary to specify a file extension
(such as .mdb) with your filename. If
you specify the name of a file that already exists, you will be warned
before the file is overwritten. If the file is a replica that has just
been synchronized with the master, there is no harm in replacing it with a new
copy.
5. An exact copy of
your master file server will be created. When the copy operation is
complete, you will be asked if you want to connect to the new replica. If
you answer yes, the application will connect automatically. Once you are
connected to the replica, you can disconnect from your local area and work
autonomously.
Synchronization
After you have collected a significant amount of data into your replica file server, you can transmit the information to the master by performing synchronization. To do so, utilize the following procedure:
1. Make sure
that your laptop or workstation is connected to your network, and that the
folder where your master file server resides is connected using the same drive
mapping as was done before you made the replica. If you are at a remote
location, you can make your connection via dialup
networking over a standard modem, or via Virtual Private Networking (VPN)
through an Internet connection.
2. Press the Synchronize button.  A
confirmation message will appear that displays the approximate time required
for synchronization, based upon the size of your file servers and the speed of
your network connection. If you answer “Yes” to
the prompt, synchronization will be performed
automatically, and progress meters will be displayed in the status bar area of
the Main screen (lower left
corner).
A
confirmation message will appear that displays the approximate time required
for synchronization, based upon the size of your file servers and the speed of
your network connection. If you answer “Yes” to
the prompt, synchronization will be performed
automatically, and progress meters will be displayed in the status bar area of
the Main screen (lower left
corner).
3. When the
synchronization is complete, a report will be generated in preview mode.
If any errors occurred during the synchronization, they will be detailed in the
report.
4. If you are
connected to your network via a low-speed dialup connection, it’s probably best
to continue working with your replica database after synchronization, as the
creation of a new replica may take a long time. If you have a high-speed
connection, it’s best to make a new replica after
synchronization. In either case, keep in mind that the longer you use a
replica without creating a new one, the likelier that you are to encounter
errors when you synchronize.
Fee-for-Service
Configuration, Data Recording, and Reporting
Before you can record fee-for-service transactions,
you must configure funding codes and default values for projects and services.
A future version of NetCIL Manager will possess the capability to perform the
configuration; for now, these tables can be edited via the database window of
NetCIL Client (green database button, Main screen, lower right).
Run the “Config Funding
Codes” query:

Funding ID is an automatically-assigned database
primary key. “FundingCode” and “FundCat”
are any codes that are meaningful to your agency or to external systems, such
as accounting codes for book keeping systems. The fields can contain any value
up to 255 characters but must be unique (no duplicates between records).
“Bill Rate” can be used to designate the amount that
you are reimbursed by your funding source or for your internal cost of
providing a service. If you specify markup amounts, billing rate plus markup
will be calculated when transactions are recorded and when billing reports are
generated. You can specify markups as either an amount or a percentage. If both
values are recorded, markup percent will override the markup amount. When
billing reports are generated, software will compare the total hours-to-date
and funding amounts-to-date that have been accrued for each funding source. If the
amounts accrued exceed “Authorized Amount” or “Authorized Hours” values,
accrued totals will be displayed in red on billing reports. Future NetCIL
versions may contain logic that prevents the selection of Funding Codes if
authorized amounts or hours have been exceeded.
If a default GrantID is
specified for a given funding code, its value will be automatically recorded
when a service is provided and when a project is selected.
If desired, open the Services table and specify a
default FundingID, corresponding to a record in your
Funding Codes table. If specified, funding codes will be automatically selected
and monetary amounts will be automatically calculated when the provision of a
service is recorded. If a funding code is manually entered, only active codes
can be selected.
![]()
In a like manner, open the NetCIL Client Projects
form and, if desired, specify a default Funding Type for each project. Note
that the billing rate, markup amounts, and authorized amount fields are present
in both the services and projects tables; however, these fields are only for
reference. All transaction amounts
and default grant codes are calculated and recorded directly from values that
are contained in the Funding Codes table.

When
recording the provision of direct services, funding amounts will be
automatically calculated as follows. If a service is specified, and if the
service has been tagged with a default funding type, data from the Funding
Codes table will be automatically calculated in the consumer history
transaction. If Funding Type or Hours are edited after initial entry, Funding
Amount and Billed Amount values will be recalculated. These fields can also be
edited without restriction; however, when billing reports are generated, a
warning will be issued if there is a mismatch between calculated and recorded
amounts.
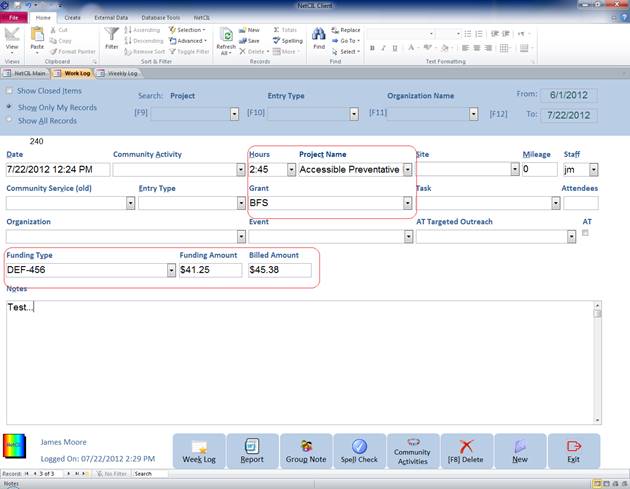
When
recording the provision of indirect services, funding amounts will be
automatically calculated in a similar manner. If a project is specified, and if
the project has been tagged with a default funding type, data from the Funding
Codes table will be automatically entered and calculated in the work log
transaction. If Funding Type or Hours are edited after initial entry, Funding
Amount and Billed Amount values will be recalculated. These fields can also be
edited without restriction; however, when billing reports are generated, a
warning will be issued if there is a mismatch between calculated and recorded
amounts. The same logic applies to the use of the Weekly Log; however, not all
information is displayed on this form, although it will still be calculated.

To
create a billing report, open the NetCIL Client Reports and Graphs page, select
a date range, and select “Billing Report”. An Excel spreadsheet report will be
generated with three tabs: A list of all direct services and indirect services
with financial transactions for the reporting period, and a summary of data for
all active funding codes. For direct and indirect services, if calculated
values do not equal recorded values, a warning message will be generated. For
funding codes, if total hours or amounts accrued to date exceed authorized
amounts, the totals will be displayed in bold-face red.
For additional assistance
with any of the topics covered in this manual, licensed users are encouraged to
contact ed2c technical support:
(888) 678-0683
Return to this document’s table of contents
Return to online help table of
contents