NetCIL
Manager User Guide
Applies to: NetCIL Manager 1.70
Revision
Date: 10/3/2011
Introduction
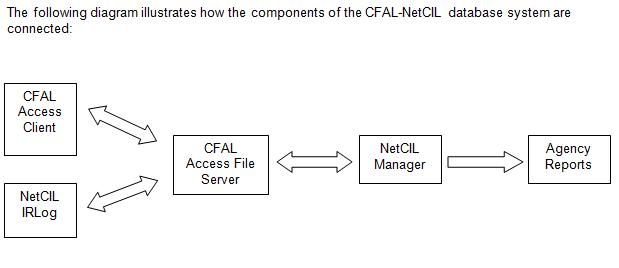
NetCIL Manager is a software application
that is designed to handle administrative functions for the NetCIL (CFAL)
database system. The application is also
used by administrators to generate state and federal reports such as the RSA
704. All administrative functions must be handled by NetCIL Manager.
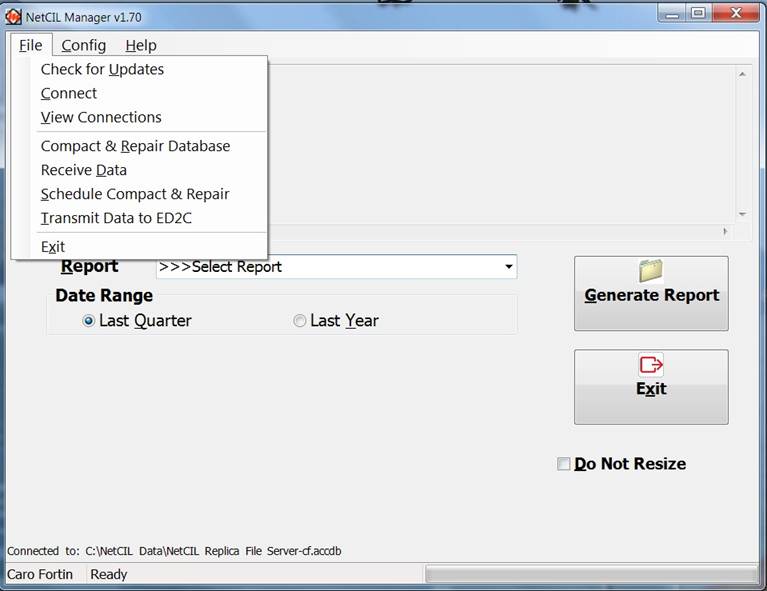
1- File Menu
Check for NetCIL
Manager Updates
Under the File menu click the second option
“Check for Updates”. NetCIL will automatically check if you are running the
latest versions of Manager and CFAL Client. You will see this screen:
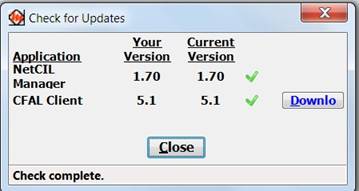
If there is an update available click the
blue Update and the update will download.
If you are running the current versions of CFAL Client and/or NetCIL
Manager a green check mark will appear.
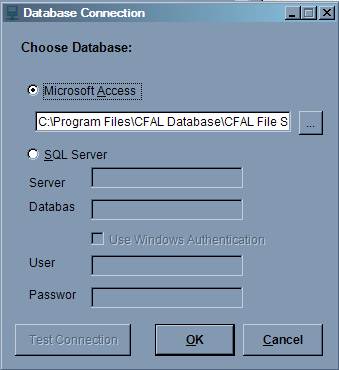
Connect
If the NetCIL application has already been
installed and is running properly on a computer, NetCIL Manager should
automatically locate the file server. If
your network connection changes and/or you need to re-connect to your file
server you can do so by clicking the “Connect” option and navigate to the
network drive where the file NetCIL File
Server.mdb is located.
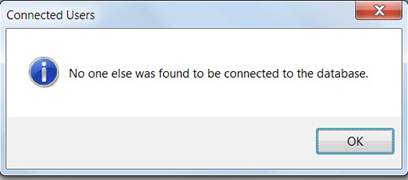
View Connections
This feature allows you to see if a user
has an open connection to either NetCIL, NetCIL
Manager or I&R Log applications. If
the staff has not exited the application, their Windows login name will appear
once you click the “View connection” menu option.
Transmit Data to
ED2C
If you are properly configured with an FTP
account (usually this process is done at the time of the initial installation
and configuration), this option will allow to securely transmit your data to
your ed2c FTP account. Under the File menu click the forth option “Transmit
Data to ED2C”. You can transmit data
while people are still using NetCIL.
NetCIL Online is automatically configured to back up your file server on
a daily basis. You can always choose to
transmit manually as well; each function does not overwrite the other.
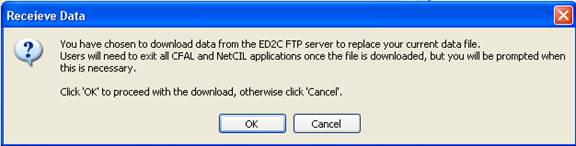
Receive Data
If you transmitted your data to ED2C for
analysis or repair using the “Transmit Data” function mentioned above, you can
automatically receive your repaired file server by clicking on the “Receive
Data” option. A warning message will
appear (see below). Click ok to continue.
Please note that your current file server will never be replaced but
instead will be renamed NetCIL File Server.old and the application will remember the
location of the file server.
Compact
& Repair Database
In order to recover lost space, improve
performance, and guard against errors, the NetCIL file server should be
compacted and repaired on a regular basis. It’s recommended that you perform
this operation at least once per month. If you have many users and a large
database, you may want to perform this operation more often. To do so, follow
these steps:
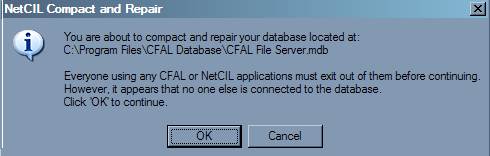
1. Under the File menu Click on the Compact
& Repair option
2. Make sure that all users have exited the
NetCIL application (see screen shot below). You can verify that all connections
are closed by checking for the existence of an ".ldb" file in the
directory where the file server resides. The “.ldb” file will have the same
name as your “.mdb” file server. If the “.ldb” file exists and you are sure
that all users have exited the application, try deleting the “.ldb” file. If
you are unable to delete the file, then someone is still using the application.
3. Make a backup copy of your file server.
4- Click ok to proceed with compact &
repair
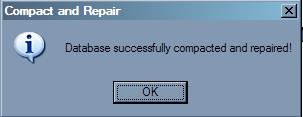
If the process is successful, the message
below will be displayed:
Schedule
a Compact & Repair
Under the File menu you can also click on
“Schedule Compact & Repair”. This option allows you to automatically
Compact & Repair your database by creating a scheduled task. Please read
the message below carefully.
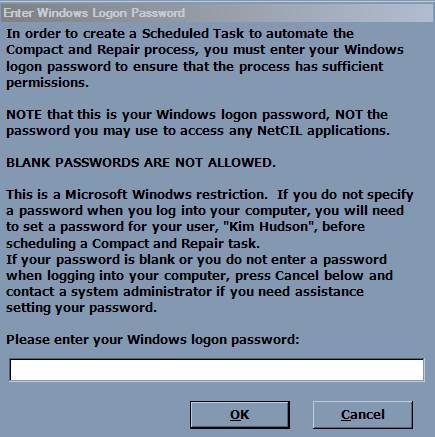
Once a password has been provided, you will
need to decide on an appropriate time and schedule to perform the regular
“Compact & Repair”.
Special
Note for Office 2007/2010 Users
At present, Microsoft restrictions prevent
the NetCIL compact and repair functions from being used with the new “accdb” file format that became available in Office version
2007. Compact and repair functions are
therefore built-in to the file server software.
If your file server is not properly configured for auto-compact and
repair, please contact ed2c customer support to have your system updated. To check your file server version, open it
directly. You can determine the name of your
file server by examining the link information at the bottom of the Manager Main
screen (shown here circled in red):
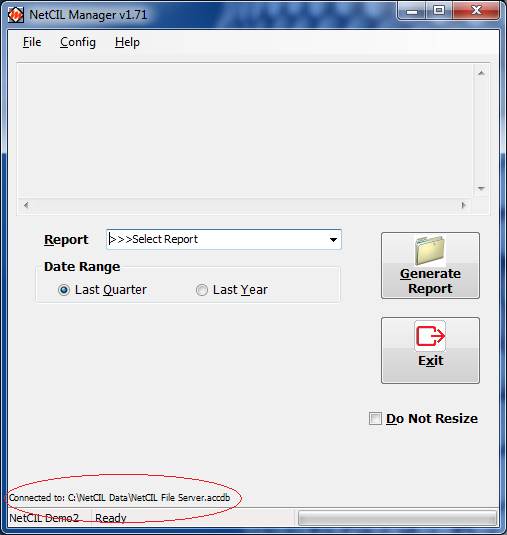
In
the example shown above, the file server is named “NetCIL File Server.accdb” in
the folder “c:\NetCIL Data”. Open the
folder, then open the file. If the following screen appears, your file
server is up-to-date.

NetCIL Online users do not need to schedule
a compact and repair process, as it is performed automatically on a daily
basis.
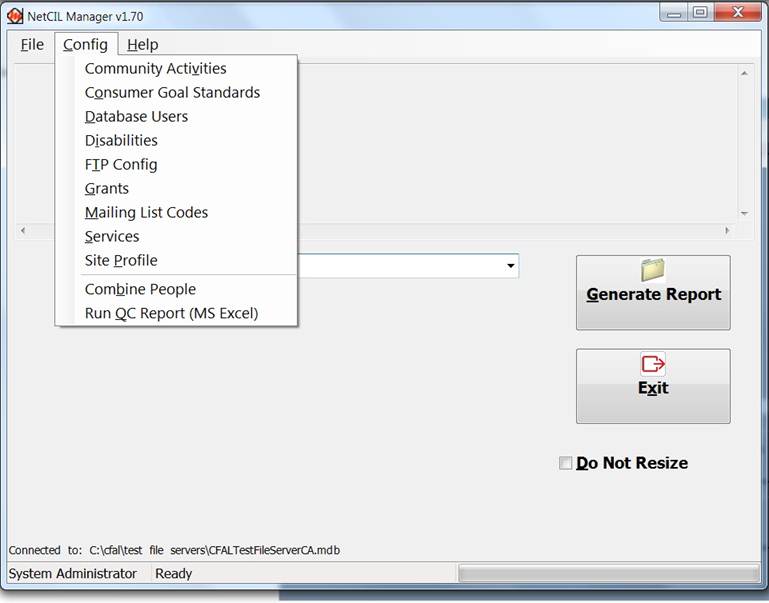
2-
The Config Menu
These options will allow the database
administrator to configure and customize specific drop down lists within the
NetCIL database.
Community
Activities
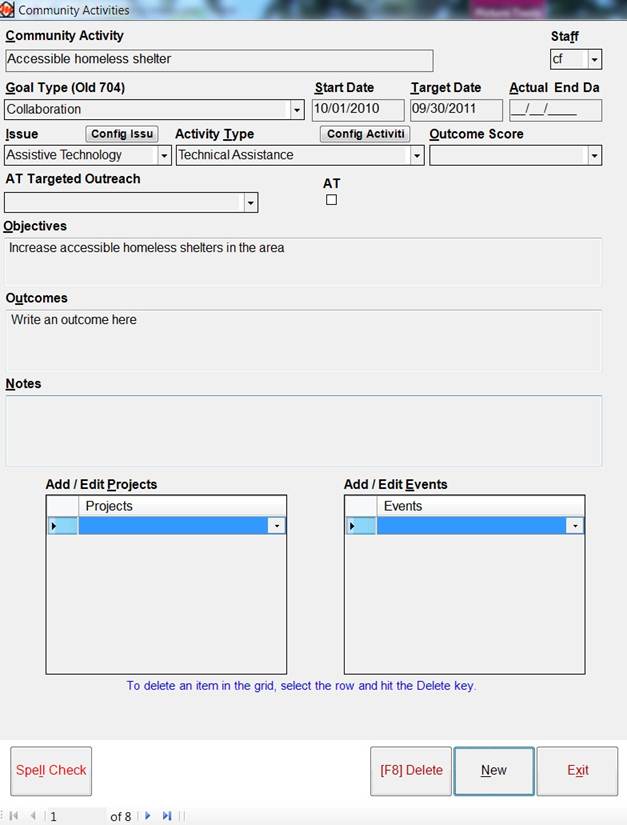
The 704 Report has replaced Community Achievements
(System Change) with Community Activities. To accommodate this change,
“Community Achievements” in NetCIL are now referred to as “Community
Activities”. These are activities that
your agency as a whole is working on to improve conditions or address issues on
a community level. Staff members should use Work Log entries to reflect the
time they spend working on these “Community Activities” in order to properly
report data for Section D on the 704 report.
To configure NetCIL for Section D reporting, follow these steps:
- Click the “New” button at the bottom
right of the screen
- Enter a descriptive name for a
“Community Activity” that will reflect its pertinent “Issue Area” and
“Activity Type.” This field is for
internal use to help staff identify the different community activities and
will not appear on the RSA 704 Report
- You can still associate the activity
with the old 704 “Goal Type.”
- Enter a “Start Date,” “Target End”
and “Actual End” dates as appropriate.
When creating Work Log entries, users will not be able to select
Community Activities past the “Actual End” date of the activity.
- Associate the activity with a
pertinent “Issue” and “Activity”.
These two fields will be reported on the 704 Report Community
Activity Table.
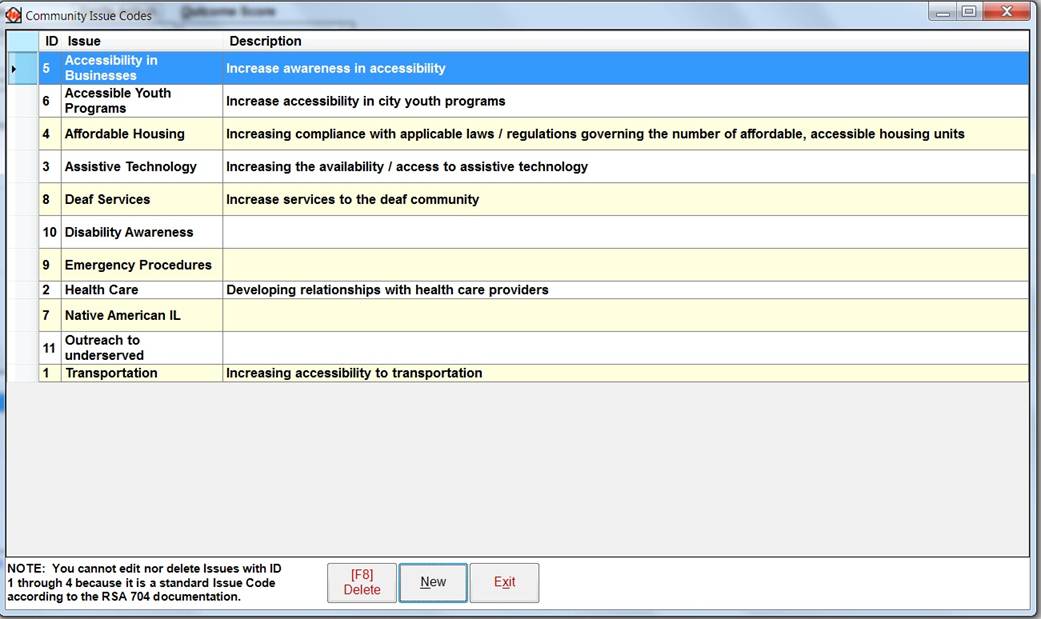
- Community Issues: There are 4 pre-configured Community
Activity Issues mandated by RSA. But if you wish to add to these issues,
you may do so by opening a new table in NetCIL called “Community Issue
Codes” This table is pre-configured by NetCIL to reflect the minimum
number of categories that RSA has chosen to highlight. You may add records
to this table in order to track activity for additional categories as
required. NetCIL Manager will
generate data for all combinations of Issue and Activity areas that are
found in the Work Log for a given time period.
- RSA wants CILs to report all issues
that you are working on. They have four core issues already pre-configured
but if you want to add issues that are specific to your center and area,
select to “Config Issue” button. Please note
that you cannot delete the issues with ID 1 through 4 as they are standard
RSA issues.
- Activity Type: This drop-down list is
also pre-configured to reflect RSA mandated categories and therefore
should not be modified if your agency generates a RSA 704 Report.
- List “Objectives” for the activity as
appropriate. Text that you enter here will be reported in the 704 Report
Community Activities Table.
- List “Outcomes” for the activity as
appropriate. Text that you enter here will be reported in the 704 Report
Community Activities Table. For internal use, you can also assign an
“Outcome Score” to the activity.
- Enter “Notes” as appropriate. This
field is for internal use only, and text that you enter here will not
appear on 704 Reports.
Configure
consumer goal standards
Consumer Goal Standards
The Goals form in NetCIL contains a control
labeled “Goal Standard”. This control
uses data from the table “Consumer Goal Standards,” and it is designed for
internal agency use. If you predefine a
set of goals for your agency, proper default values will be automatically
entered into each consumer’s Goal History records.
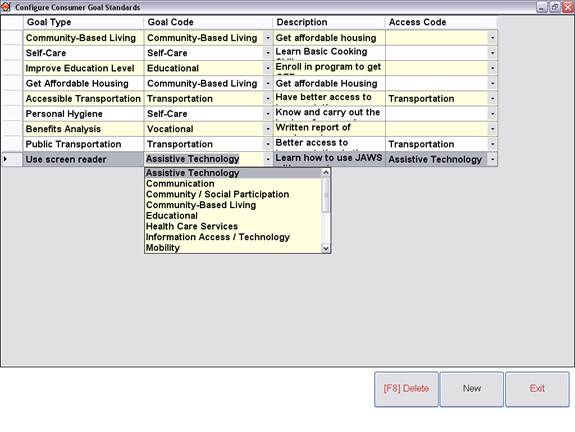
Many consumers have similar goals. A NetCIL database administrator can use the
Consumer Goal Standard feature to create standard goals that staff can apply to
all consumers with the same specific goal. To use the Goal Standards feature,
you must manually enter records into the Consumer Goal Standards table as
follows:
Goal Type: Name
of goal as known to your agency
Goal Code: Dropdown
list of standard RSA-recognized goal types.
Description: Default text description of the goal
Access Code: Assistive Technology; Health
Care Services; Transportation
To add another standard goal click the
“New” button at the bottom right of the screen.
When a NetCIL user clicks the Consumer
Goals & ILP button from the People Form they can select a Goal Standard
from the drop down list for an individual consumer. The “Type of Goal” will be set to the value
in the Goal Code field, the “Access Category” will be set to the “Access Code”
value, and the “Goal Description” text box will be filled with the text from
the “Description” field of the selected record in the “Consumer Goal Standards”
table. All of these values can be edited
by the user if necessary. This feature
is provided to enhance the accuracy of goal information by providing
pre-defined values for data entry. For
convenience, there is a query in versions 4.6 and above named “Sample Consumer
Goal Standards Query” that is designed to assist with data entry into the
Consumer Goal Standards table.
Database Users
Everyone
who uses the NetCIL database should be registered in its Database Users table.
If an unregistered user attempts to run the application, the user must log on
as the system administrator in order to gain access. If you supply a password
to the system administrator account, access will be denied unless the password
is supplied. You will also need the administrator password if you need to open
your file server directly. Do not delete the System Administrator entry in your
Database Users table. Doing so may prevent you from accessing your data.
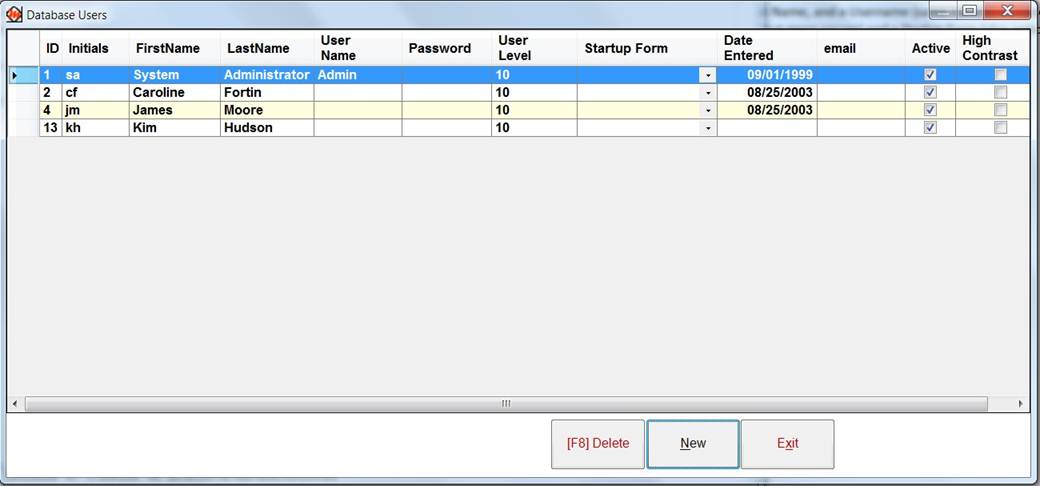
When
entering the name of a new user, first click the “New” button in the bottom
right corner of the Database users screen. Then
specify Initials, First Name, Last Name, and a Username (same name that is used
to log on to your network), if you want the NetCIL and NetCIL applications to
default to a specific user when opening the application. Each user must be
given a Level of access (see below), a password (optional but more secure) and
a Startup Form (also optional).
Every
time you have a new staff member using NetCIL you need to add their name to the
Database Users table.
If
the Username entry is incorrectly specified or if you leave this field blank,
both the NetCIL and NetCIL applications will not be able to recognize the
identity of the user, and the following message will appear:
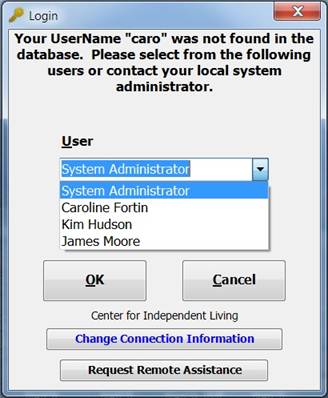
The user will need to select his or her
name from the drop down list and provide a password if one was entered.
If a Windows Username is provided, this
screen above will not appear and both applications will open directly to their
Main screen.
NetCIL
and NetCIL use a 10-level user privilege scheme that allows access to software,
database, and reporting functions. The
levels 1-5 are intended to be
assigned to front-line staff
members, and levels 6-10 are for supervisory staff. The following table describes each of
the currently-utilized levels and their capabilities (note
that not all levels are listed; these are reserved for future use):
|
Client Functions |
Minimum Level |
Remarks |
|
People |
1 |
Privilege level 1
can only access a single form (usually the People form), which must be
assigned in the database users section of NetCIL Manager. |
|
Work Log |
2 |
Privilege level 9
or higher is required to view other users’ work log records and to configure
Community Activities. |
|
Organizations |
5 |
|
|
Community
Activities |
9 |
|
|
Projects |
6 |
|
|
Events |
6 |
|
|
Parent-to-Parent |
1 |
Available only to
Parent-to-Parent organizations. |
|
Outreach |
5 |
|
|
Inventory |
8 |
|
|
Archive |
5, 9 |
New function in
NetCIL 5.0, NetCIL 1.0, and NetCIL Online. Level 5 users can search and
retrieve from archives; level 9 users can create archives. |
|
Queries |
8 |
“Action” queries
can quickly alter large amounts data; therefore only trusted users should be granted
this privilege level. |
|
Make Replica |
5 |
|
|
Synchronize |
5 |
|
|
Send Letters |
4 |
|
|
Find Volunteers |
2 |
New function in NetCIL
5.0, NetCIL 1.0, and NetCIL Online. |
|
Run Reports |
2 |
Level 7 or higher
is required to run reports on other (or all) staff members. |
|
User Knows Best |
5 |
If “User Knows
Best” is not selected, users will
have to press the F3 function key to unlock existing records for editing. |
|
Edit All Records |
5 |
User levels 1-4
can only edit records which they have entered. |
|
Delete Records |
9 |
Applies to People
and all sub forms. |
|
NetCIL Manager Functions |
8 |
A minimum
privilege level of 8 is required in order to run NetCIL Manager. |
|
Reports |
8 |
Agency-level
reports such as the Consumer Summary and RSA 704. |
|
Database
Configuration |
10 |
Level 10 users
can configure tables and grant privileges to other users. |
|
NetCIL IRLog |
1 |
No restrictions
are currently placed on the use of IRLog; therefore, it’s recommended for use only by
users with privilege level 5 or higher. |
Disabilities
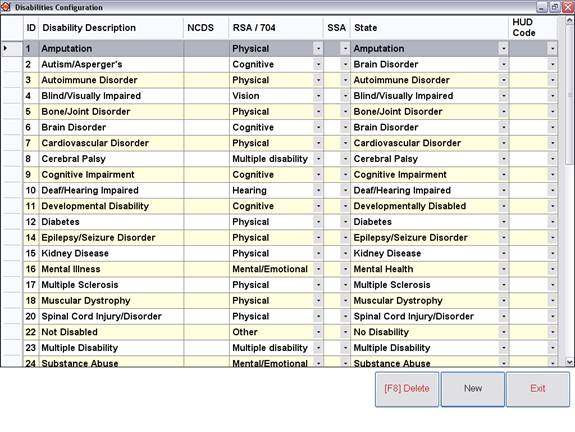
The Disabilities Configuration form allows
you to list as many disabilities as you wish. Proper reporting statistics will
be generated as long as you assign one of the standard agency disabilities to
each record in your list. As with other elements of your database, care should
be taken in order to keep this list accurate and configured properly.
To add a new disability, click on the “New”
button at the bottom right of the screen. Make sure that you link each specific
disability to the appropriate state and federal category.
If you have questions about what category a
specific disability should be linked to please refer to the RSA 704 Data
Collection Protocol and/or the data collection protocol from your state. These
documents can be found in the Documents folder within the NetCIL Database
folder, or online at www.netcil.com under
Downloads.
FTP Config
In order to answer questions and resolve
problems with data ED2C provides licensed NetCIL users with an ftp (file transfer
protocol) account on the company’s web server. Users can move a copy of
their NetCIL file server to and from the site for backup, analysis, or
modification purposes. The FTP
configuration form can be accessed from the config
menu of NetCIL Manager, as illustrated by the following graphic.
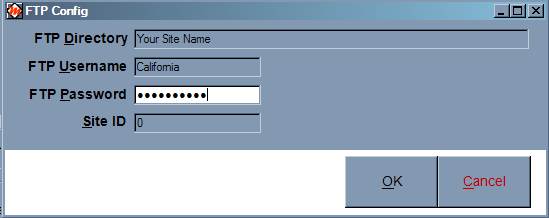
The
Installation directory name, FTP Username and FTP Password will be provided by
ed2C at the time of initial installation.
Grants
The Grants screen is used to enter
information for work that you perform under specific grants or programs such as
RSA, HUD Section 8, and SSA.
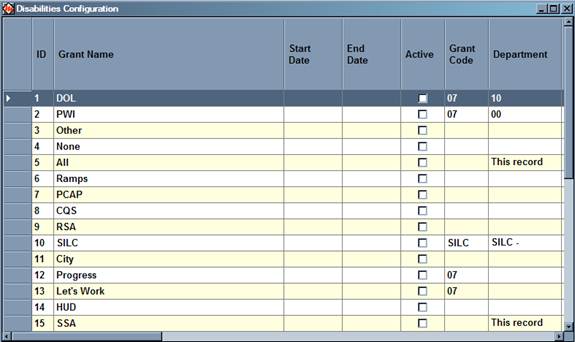
To add a new Grant, click on the “New”
button at the bottom right of the screen. This new grant will then appear on
the dropdown lists in the People Form and on the Work Log. The Grant will then be listed on your 704 report
and your specific state report as well.
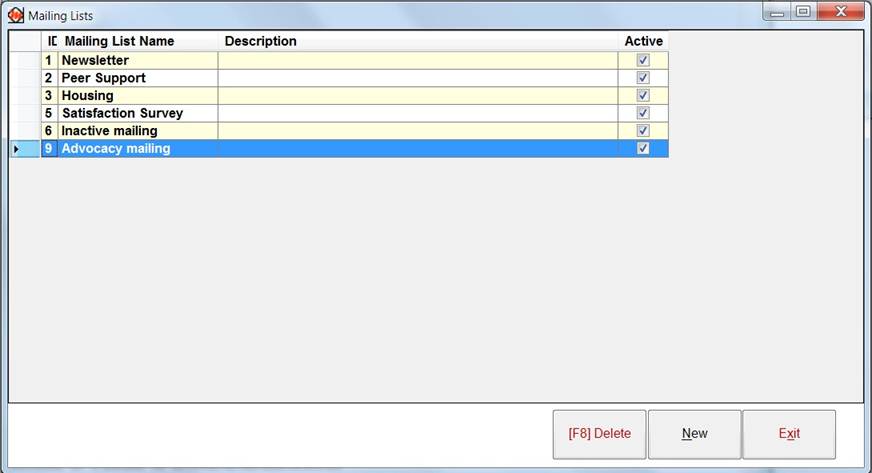
Mailing List Codes
If
you wish to use NetCil Client to generate mass
mailing, you can configure mailing list by selecting the “New” button. Once you
have configured your list, it will appear on NetCil
Client, in the Mailing List sub-form where you can associate the person to a
specific mailist.
Services
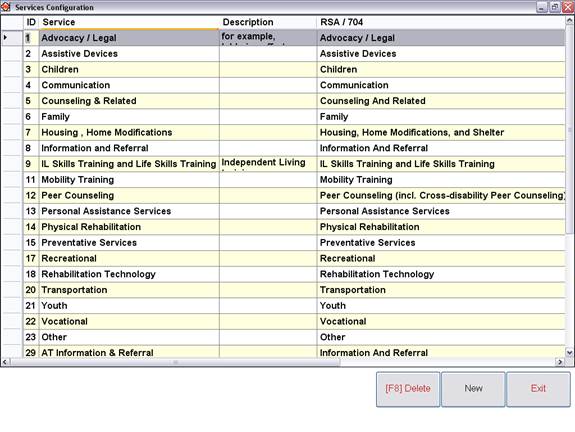
The Services Configuration form allows you
to list as many services as you wish. Proper reporting statistics will be
generated as long as you assign one of the standard agency services to each
record in your list. As with other elements of your database, care should be
taken in order to keep this list accurate and configured properly.
To add a new service, click on the “New”
button and make sure that you link the specific service to the appropriate
state and federal category. If you delete a service it will no longer be
tracked on NetCIL or in your reports.
If you have questions about what category a
service should be linked to please refer to the RSA 704 Data Collection
Protocol and/or the data collection protocol from your state. These documents
can be found in the Documents folder within the NetCIL Database folder, or
online at www.netcil.com under Downloads.
Site Profile
The
Site Profile form allows you to record specific information about your
organization. The information that you record here will be included in a
variety of reports to oversight agencies such as the Department of Education
704 Report.

Combine People
A new feature
added to NetCIL Manager version 1.41 assists database
administrators in the elimination of duplicate records within the People Form.
If a consumer is listed twice in the NetCIL database, you can now keep one
record and delete the duplicate while combining all of the notes and goals into
the record that is kept.
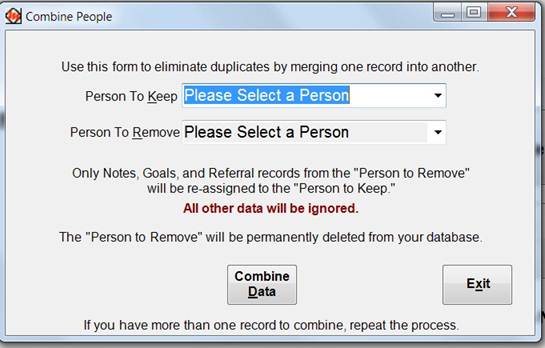
First
select a record you want to keep from the top drop down box, then
select the duplicate record you want to delete from the second drop down
box. When you click the “Combine Data”
button in the middle of the lower half of the screen the two records will merge
into one.
Run QC Report (MS
Excel)
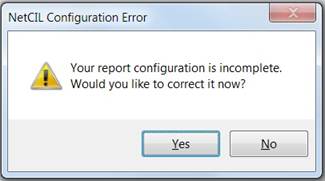
To
ensure that your database configuration is up to date, you can select the “Run
QC Report” option. This action will do
two things:
1-
Check
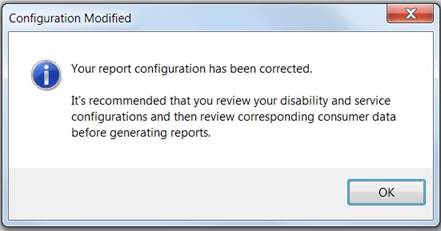
your database configuration and update it if you answer yes on the
configuration error message. You will then get a configuration modification
message which confirms that your configuration has been corrected. Although
this action should not affect your disabilities and services, we suggest you to
review them to ensure proper configuration.

2-
Fix
errors with invalid dates and generate an Excel spreadsheet of all data
correction. After you have run the
configuration repair function, you will be prompted to run the QC report, as
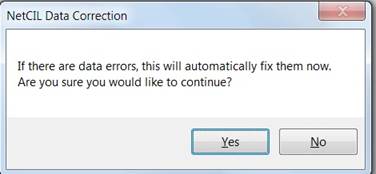
shown below. Select “Yes” to
continue.
If
there is erroneous data detected, a warning message will let you know. Select the OK button to continue.
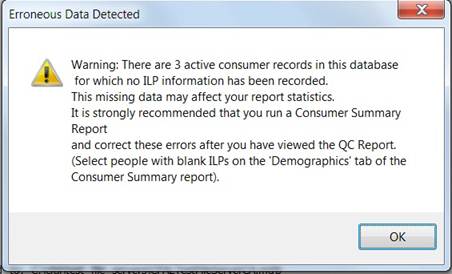
The
Excel spreadsheet that will be generated will show mainly case notes with
invalid dates, Inactive consumers still receiving services after their date of
deactivation, old goals that were not closed after a consumer was deactivated.
3 - NetCIL Manager
- Report Section
In
the drop down list that says >>>Select Report you will find a list of
reports available to you. This list will vary depending on the state where your
center is located.
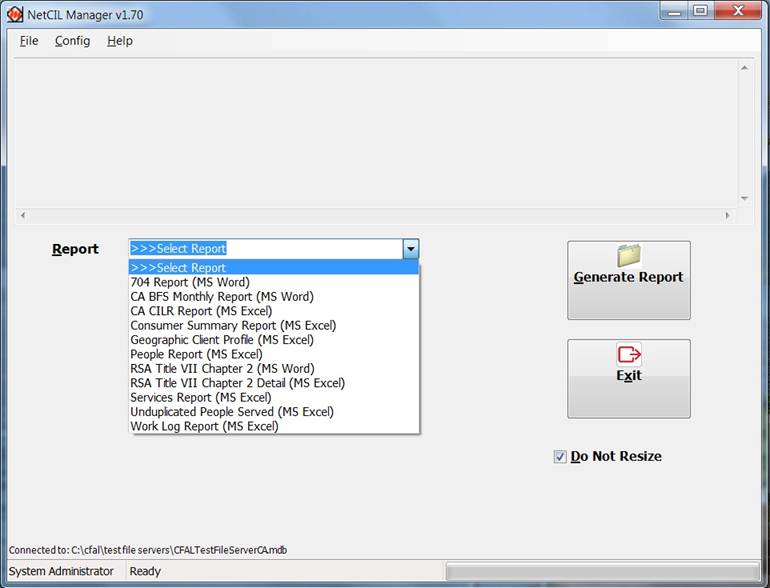
The standard reports in NetCIL Manager are:
1-
704 Report: Standard RSA 704
yearly report
The 704 Report can
be generated by grant. After selecting your report for the drop down list, an
additional list of Grants and Counties will appear. Just select the desired
grant.
Please note that in
order to retrieve data based on a specific grant, an intake into a grant must
be made for a specific person on the “People” form, on the “Grant History”
form.
The 704 Report can
also be generated by County. This will retrieve a set of data based on a
specific county. After selecting your report for the drop down list, an
additional list of Counties will appear. Just select the desired county.
2-
BFS Monthly Report
(Blind Field Service Monthly Report or Chapter II): Official Blind
Field Service Monthly report-This report allows you to track the types of
services received by a particular visually impaired consumer over a certain month.
3-
CILR Report: Used
in California (AB-204) -This report will generate a detailed Excel spreadsheet
listing demographic and services provided to all consumers over the preceding
quarter. You can also filter this report to find out specific information about
the consumers served, such as how many consumers were served from a specific
zip code.
4-
The Consumer
Summary Report:
Extensive consumer report which retrieves all necessary information needed to
track data for the federal report and some state reports. Information on this
report includes: demographics, individual services, unduplicated consumers
served, consumer goals set and met, community goal set and met, and I&R
services provided. This report can help
the database administrator maintain and manage the data and in turn generate
accurate state and federal reports.
Please note that
the Consumer Summary Report can be generated by grant. After selecting your
report for the drop down list, an additional list of grants will appear. Please
note that in order to retrieve data based on a specific grant, an intake into a
grant must be made for a specific person on the “People” form, in the “Grant”
form.
5-
Geographic Client
Profile:
Generates a total number people served by state, counties, zip code during a
specific period of time.
6-
People Report (MS
Excel):
This report will generate a list of all active people during the reporting
period and their demographics, regardless of their contact type.
7-
RSA Title VII
Chapter 2 (MS Word) :
RSA Chapter 2 grant report
8-
RSA Title VII
Chapter 2 Detail (MS Excel): RSA chapter 2 detailed report
9-
Service Report: This report
provides detailed information and statistics about the types of services your
agency has provided within a given time frame.
10-
Unduplicated People
Served (MS Excel):
This report will generate an Excel spreadsheet showing an unduplicated number
of consumers, I&R contacts, inactive consumers that were served during the
reporting period.
11-
Work Log Report (MS
Excel):
This report provides detailed information taken from staff work log entries
regarding specific community activities, tasks and events.
Additional State
reports: To run a specific state report,
your state must be specified in the state field of the site profile set up
screen.
1-
California
State report
2-
New
York State VESID report
3-
Michigan
State report
Additional options
can be available while running certain reports:
1-
The
704 report and Consumer Summary report can be run by specific grants
2-
The
704 report can be run by a specific county
3-
Selecting
the “Send Letter Using Report Results” option, you can automatically generate a
mailing list in NetCil Client, using the results of
your 704 report. Only people who count on the 704 report will be added to the
mailing list. This can be useful for sending Satisfaction surveys for consumer
served during a specific period of time.
How to generate
reports in NetCIL Manager:
To generate a report, select its name from
the dropdown list then select the appropriate date range and press the
“Generate Report” button. Depending on the format of the report, a Word or an
Excel document will be generated with the appropriate set of data.
Common
704 issues:
1-
“Carried over
Consumers”
In order to be
counted as a “Consumer Carried over from Previous Year”, a person must have a
contact type set to “Consumer” and have an initial entry prior to the reporting
year. There must also be activity (a
note in their history, a goal) every consecutive year since their date of
initial entry. For the RSA 704 report, the fiscal year runs from October 1st
until September 30th.
Example: if a
consumer starts on 04/15/2004. This person must have activity in their history
(one single note will be enough) in 2005, 2006 and 2007 in order to count as a
“Carried Over Consumer”.
If there is a gap
of more the one year at the time of the report (no activity from 10/01/06 until
9/30/07) and you write a note after October 1st 2007, this consumer
will now be counted as a “New” consumer in your 704 report for fiscal year
10/01/2007 until 9/30/2008 .
2-
“New Consumers”
In order to be
counted as a “New Consumer” a person must have a contact type set to consumer and
have an initial entry during the reporting year (between October 1st
and September 30th).
Also counted as a
“New Consumer” is a person with a contact type set to “Consumer”, with a date
of initial entry set earlier then the year before the reporting year, with no
activity in the year prior to the reporting period and activity in the
reporting year.
Example: A consumer
starts on April 15th 2005.
This consumer will have no activity between October 1st, 2006
and September 30th, 2007 and will not have been de-activated. If a note is written after October 1st,
2007, this person will be counted as a “New Consumer” in your 704 report for
fiscal year 07/08.
3-
For New York
Centers who generate both the RSA 704 report and the State VESID report
Question:
Why is the total number of
CSR’s different on the federal and state report?
Answer:
New York VESID report does
not take into account the federal “Carried Over
Consumers” category. So if a consumer was served in the previous year, this
person will automatically be carried over for the next year on the 704
report. The NY VESID report will only
count CSR’s who were provided with a service during the reporting year.
4-
For Michigan
Centers who generate both RSA 704 report and the Michigan State report
Question: Why are the demographics on the
State and federal report different?
Answer:
In the demographics section
of the 704 report, only the people with a CSR will be counted. This translates
into NetCIL as only the people with a contact type set to consumer (or
inactive consumers if they became inactive during the reporting year) will
count.
For the Michigan
State Report, the demographic section will include I&R
contacts as well as active consumers and inactive consumers who became inactive
during the reporting year.
5-
Discrepancy between
two fiscal years
Question: When running a 704 report, why is
the total number of opened CSR’s
during a specific fiscal
year not matching the number of CSR’s carried over in the following year?
Answer:
To answer this question we need
to refer back to the first point of this document which is “New Consumer and
“Carried over consumer”.
Carried over: A consumer with an initial
entry prior to reporting year who has been served
every consecutive year.
New consumer: This category includes
consumers with an initial entry during the reporting year or consumers with an initial entry prior to the reporting year but with a gap of a
year or more in their activity.
For example: if a “Consumer summary Report”
from 10/01/06 until 9/30/07 is generated from NetCIL Manager, there may be
people called: carried over not served. These people are carried over
(because there was activity the year prior to 06-07) but as of yet, have not
been served. If they don't get deactivated before the end of FY 06-07, and
if they are served in FY 07-08, they suddenly appear in the "New
Consumer" category because they have a gap in their activity that is more
then one year. To avoid this problem,
people who appear in the category “consumer carried over not served” should be
reviewed and deactivated before the end of the fiscal year.
For additional
assistance with any of the topics covered in this manual, licensed users are
encouraged to contact ed2c technical support:
(888) 678-0683
Return to Online Help Table of Contents