NetCIL – Make
Replica and Synchronize Data
Applies to version
2.2 and above
Updated: 9/10/2020
NetCIL allows you to make a copy of your database,
disconnect from your office network or online server, and then use it anywhere
– with or without an internet connection. When you reconnect to your network,
changes that you make are synchronized with your main database. When not in
use, your database copy is encrypted to keep it safe. If you do have an
internet connection, your encrypted data is backed up to NetCIL servers every
time that you exit the application.
These instructions assume that you’ll be using a laptop, but
of course you can install and use a NetCIL replica on a desktop computer as
long as you’re able to occasionally connect to your main office server. You should be using Windows 10 in either
case.
** Important Note: If the user account on your laptop
does not allow you to create files in any directory, NetCIL may not be able to
operate correctly. If your laptop was issued by your organization, ask your IT
personnel to ensure that you have a folder called “C:\NetCIL Data” on your
laptop, and that you have “Modify,” “Read and Execute,” “List Folder Contents,”
“Read,” and “Write” privileges on that folder.
1. Ensure
that you have the current version of NetCIL Client (and, if needed, NetCIL
Manager) installed on your laptop. All NetCIL applications are available at https://netcil.com/Downloads.aspx.
If you use NetCIL on an Amazon server, you can install NetCIL applications on
your laptop after creating your first replica if you wish. If you do install
NetCIL applications before creating a replica for the first time from your
Amazon or remote server, don’t bother to run them until you’ve created your
first replica. If you don’t have Microsoft Access on your laptop, install one
of the runtime versions that are available at netcil.com. If you’re in doubt as
to which version of NetCIL Client to install (32-bit versus 64 bit), we
recommend that you install the 64-bit version, as long as your laptop has at
least 4 Gb of memory.
2. Run
NetCIL Client as you normally would. If you’re on a laptop in your office, run
the application there. If you use an Amazon server, run it via the Remote
Desktop icon that you have on your laptop.
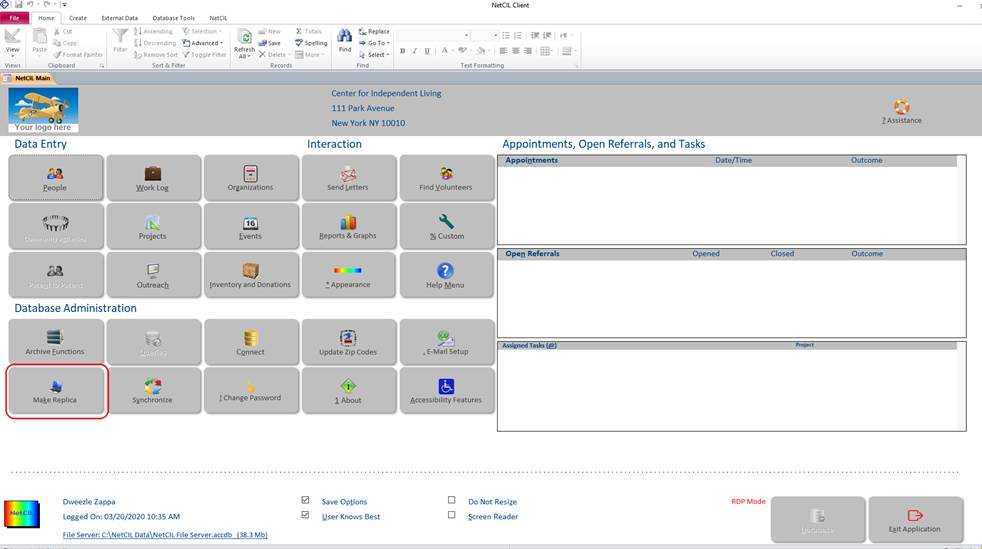
3. Select
“Make Replica” (Alt-K):
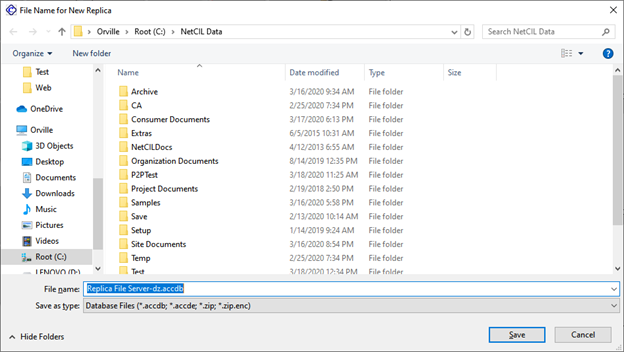
4. A file
dialog box will open, and NetCIL will suggest a file name and a location on
your laptop for the replica file to be stored. You can change any of these
values of course, but it’s highly recommended that you just accept the
defaults. Trust us, it’ll be a lot easier. If you’re in your office, the
default filename for your replica will be “C:\NetCIL Data\Replica File
Server-{your initials}.accdb” (Note that you may not
see file name extensions, depending on your Windows account settings):
If you’re creating a replica from your Amazon server, the
default filename will be \\tsclient\c\NetCIL Data\Replica File Server-{your
initials}.zip.enc” – That’s the path to your laptop
that your server sees. For efficiency and security during transmission, the
file is a compressed, encrypted copy of your data. It will be decompressed and
decrypted when you first use it.
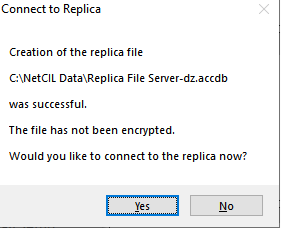
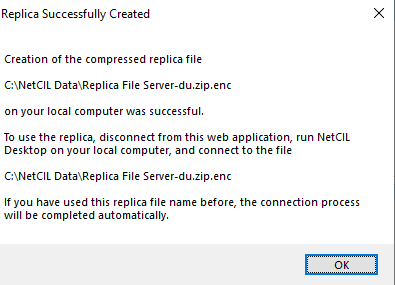
5. Select
“Save”. Your replica will be created and delivered to your laptop. After
successful delivery, you’ll receive one of the following messages.
- If you’re at your office, you’ll be asked to connect to your replica. Select “Yes”.
- If
you’re connected to an Amazon server, you’ll receive a message with
instructions on how to proceed:
6. Follow the on-screen instructions and begin using your replica. Edits and additions that you make to any records on the “People”, “Parent-to-Parent” (if applicable) and “Work Log” forms will be transmitted to your main NetCIL data when you synchronize (see Step 7). Note that Organizations, Community Activities, Projects, Events, Outreach and Inventory should only be configured when connected to your main database. You can of course associate any of this data when making edits to People or Work Log records in your replica. For example, you can record work on a project while using a replica, but you cannot create a project. Also note that the option to encrypt your data on exit is available in the lower right corner of the Main form:
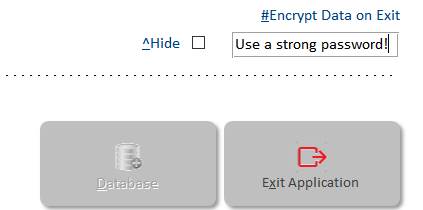
If you supply a password, you’ll be prompted to enter it
when you restart NetCIL Client. It is strongly advised that you encrypt your
replica data whenever it’s not in use; If fact, if you choose not to, NetCIL
will pester you to change your mind every time that you exit the application.
Once you choose a password, it will be selected by default whenever you exit;
There’s no harm in re-using the same password repeatedly. If your data is
backed up to NetCIL servers, your password information will also be encrypted
and transmitted, so that we can assist you with password recovery in case you
forget it. Note that if you plan to use NetCIL Manager to run reports, you’ll
need to leave your data in an unencrypted state while you do so. Do not use
NetCIL Manager to make edits to your replica; Those edits will not be saved
when you synchronize. If you’re connected to the internet when you exit, you
should see your data being backed up:
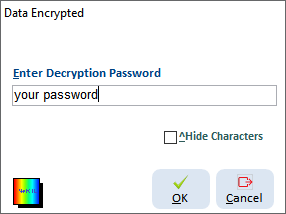
When you restart NetCIL Client, you’ll be prompted to enter
your password:
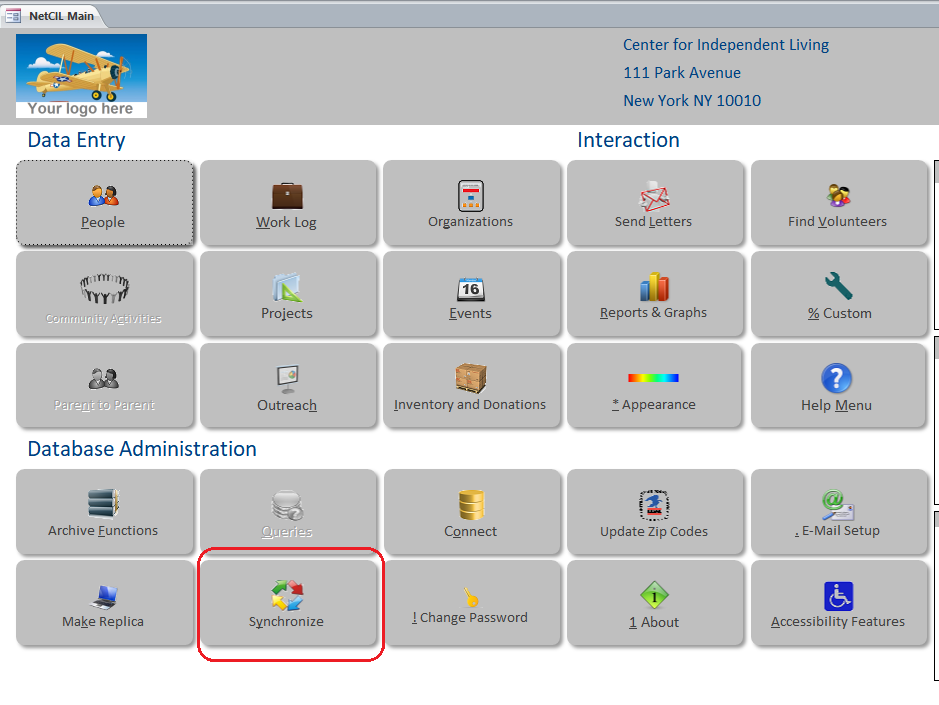
7. On a periodic basis, synchronize your data with your organization’s master copy. There’s no limit to the amount of time that you can wait to synchronize; As long as your replica data is being backed up, there’s no real danger that you’ll lose any edits. To synchronize, return to your office, run NetCIL Client on your laptop after connecting to your network, and select the “Synchronize” button on the Main form. If you’re using NetCIL Online on an Amazon server, run your local copy of NetCIL Client and select “Synchronize”. Doing so will allow you to leave your data temporarily unencrypted without having to clear your encryption password. After decrypting your data, connect to NetCIL Client on your server to perform the synchronization:
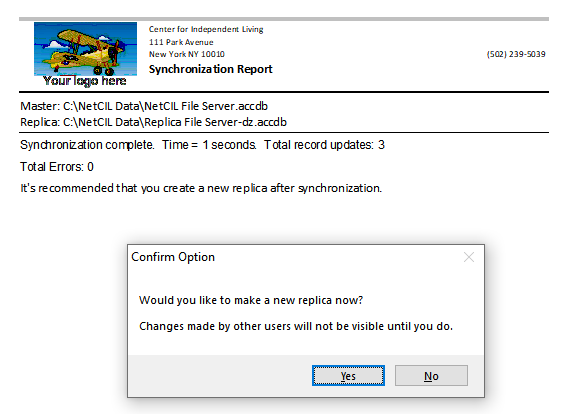
In any case, when prompted to continue; Select “Yes”. After
a successful synchronization, you’ll receive a report and a prompt, asking if
you want to make a new replica. It’s recommended that you do so, although it
isn’t absolutely necessary. However, as the prompt indicates, changes that
other users have made will not be visible to you until you make a new replica.
If you’ve never used synchronization before, it’s
recommended that you practice by performing these steps while making a few
simple data entries and edits. Once you’re comfortable with the process, you’ll
find that NetCIL synchronization is an efficient, secure way to use your data
without having to worry about internet performance or availability. For those
with knowledge of Microsoft Access synchronous database functions, please note
that NetCIL does not use Microsoft synchronization, but rather its own,
proprietary synchronization scheme that is especially designed for the NetCIL
application. The synchronization function works very well; If however you do
encounter any issues with its use, we stand ready to assist you.