NetCIL Installation
Guide
Applies to: All NetCIL
versions
Updated: 1/28/2021
Quick Instructions:
- Create a server instance, virtual
or otherwise. Any MS Windows Server operating system will do. Your users
will need to be able to access the server via Remote Desktop. It’s highly recommended that you use either a VPN or MFA
to guard against brute-force RDP attacks. Some sites have a license for the
RDPGuard
application; We can transfer that license from their old AWS server if you
wish.
- Install the following MS Office applications on
the server: Microsoft Access, Word, and Excel. It’s
recommended but not required that you install the 64-bit version of Office
365, but any version will do. If your site doesn’t
have a full license for MS Access, you can install the royalty-free runtime
version of MS Access.
Links are available at https://netcil.com/downloads.aspx.
If you install 64-bit MS Office applications on your server,
install the MS Access
Version 12 Database Engine, which is also available from the downloads
section of the NetCIL website.
- Create a directory called
C:\NetCIL Data – You can choose a different drive if you wish.
- Grant all users read, write, and
modify privileges on the folder that you created in step 3. The easiest
way of course if to create a user group called NetCIL with those
privileges and RDP access rights, and add users
to that group.
- Contact us. We’ll
take care of the rest.
Detailed Instructions:
The following instructions are designed to assist qualified IT
personnel in the installation of a NetCIL database system. These instructions assume basic familiarity
with Windows operating systems and networking. For more information, please contact us.
Operating System
Requirements
NetCIL will run on any of the Windows operating system
versions that are currently supported by Microsoft. The list includes Windows 10, Windows Server
2012, and newer server editions. Older versions are no longer supported by
Microsoft. These systems can still be used, but it’s
strongly recommended that you upgrade to supported systems, if for no other
reason than for the sake of security. Please remember that your NetCIL database
will contain a great deal of sensitive information. If you operate a network in
your office, it is recommended that you not use “Home” editions of Microsoft
Windows. “Home” editions are only
capable of five simultaneous connections to a database, and they have other
networking restrictions that limit their utility in a business
environment. Upgrades to professional
versions of all Microsoft products are available to non-profits at very
reasonable rates from:
Application Software Requirements
At least one licensed copy of the full version of Microsoft
Access is recommended in order to facilitate
management of a NetCIL database. In order to take full
advantage of NetCIL capabilities, all users should have licensed copies of at
least Microsoft Word and Microsoft Excel. It is now also recommended that you
use the 64-bit versions of MS Office, as long as all
of your computers are equipped with at least 4Gb of memory, which is usually
not an issue. NetCIL applications can
also be run with the 32-bit versions of Office. NetCIL is compatible with the
following MS Office versions: 2010, 2013, 2016, 2019, and Office 365. Please
note that Microsoft no longer supports Office 2010. The royalty-free versions
of Microsoft Access are sufficient to run NetCIL applications; They are
available from the Downloads section of the NetCIL website:
https://netcil.com/Downloads.aspx
Installation
Environments
NetCIL can run stand-alone on a single computer, on a
peer-to-peer network, or on a traditional client-server network. For multi-user environments, the recommended
configuration is to install all NetCIL components on the local drives of a server, and configure users to connect to client
applications via Remote Desktop (RDP). The more-traditional configuration,
where client applications are installed on workstations, connected to a file
server that is stored in a shared folder (usually on a server) is also
supported. The RDP configuration offers better performance and is more fault-tolerant,
but it requires a somewhat more complex configuration. We have a sample system,
using Windows Server 2019 on an Amazon Web Services instance that we can show
you for reference. To view it, please contact
us.
There are four components to the NetCIL database system:

NetCIL Client (MS Access application) –
Most data entry and reporting. All users need this application.

NetCIL Manager
(.Net application) – System configuration and agency-level reporting
such as the 704. Only managerial staff need this application.

NetCIL IRLog (.Net application) –
Used for quick intake and referral data entry. The application is designed for
front-desk or reception personnel, and its use is optional.

NetCIL File Server (MS Access file) – All data is
stored here. NetCIL replication allows users to move an encrypted copy of this
file to a laptop, disconnect from their main network, and use NetCIL remotely
with no internet connection required.
More information about replication is available by viewing
this help topic.
A traditional client-server installation is shown in the
following graphic:
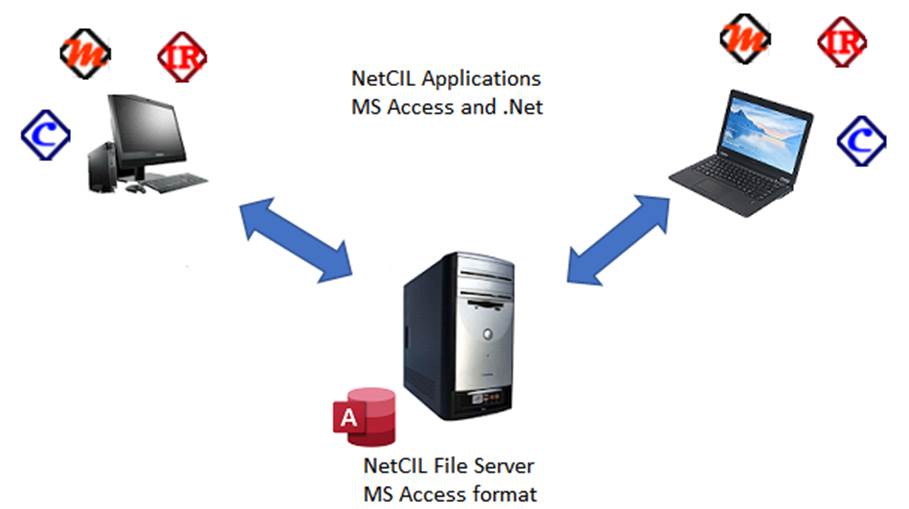
In this configuration, the only NetCIL component that is stored
in a shared location is the MS Access database that contains all NetCIL data.
The applications NetCIL Client, NetCIL Manager, and IRLog are installed on all
client workstations, and all data transfer occurs over the local area network.
This configuration works well, but it requires a high degree of network
efficiency and robustness. Network interruptions that occur during data write
operations can cause file server corruption. Such issues are easily correctible
as a general rule; However, doing so requires that all
connections to the file server be closed before doing so. This configuration is not recommended for remote use, with or
without a VPN connection, as network bandwidth limitations will inevitably
affect performance.
The next graphic shows the configuration for thin-client
application use via services like Remote Desktop or Citrix:
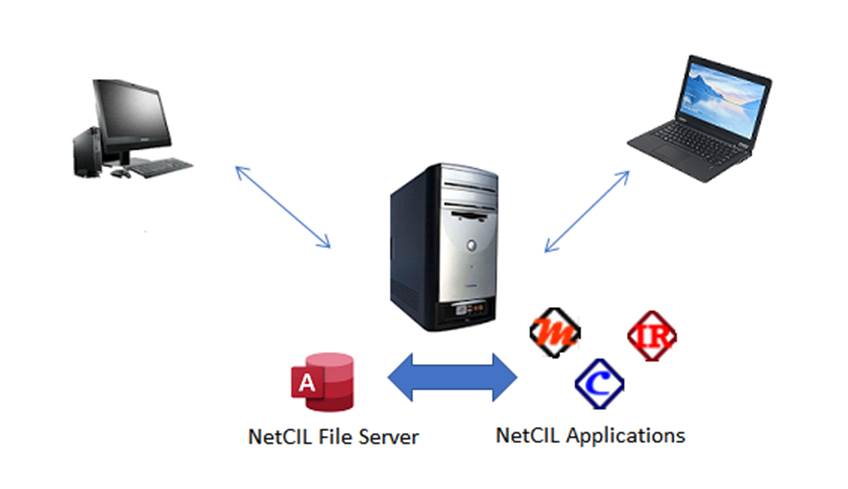
In this instance, all NetCIL components are installed in
shared locations that physically reside on a network server. All data traffic
occurs within the server, and only graphical information is transmitted between
the server and client workstations. This arrangement offers superior
performance even on a local area network, and it is highly recommended that it be used for remote operations. NetCIL
installations that use Amazon Web Services (AWS) or
Microsoft Azure use this configuration.
All data resides in the NetCIL File Server. Almost all users will require the NetCIL
Client application in order to enter and read
data. Exceptions are “front desk”
personnel who normally handle telephone and walk-in referrals. NetCIL IRLog is designed to handle those
tasks. Supervisory personnel will need
NetCIL Manager in order to perform database
configuration functions and to run agency reports.
Virtual Private Networking (VPN) connections are not needed in order to use Remote Desktop, but performance will not be
affected if VPN is used. VPN use is in
fact encouraged in order to provide an additional
layer of security.
Installation Procedure
As indicated above, there are some differences in the
installation structure depending on the method that you choose for operation.
The preliminary steps are however identical. By default, NetCIL applications
attempt to connect to a file server named “C:\NetCIL Data\NetCIL File
Server.accdb”. You can of course install a file server on any drive and in any
directory, as long as the appropriate permissions are
granted to users as explained below. If you change any of the default
locations, NetCIL applications will display a file open dialog box when first
run, asking for the location of the file server. Once identified, the path
information will be stored in the system’s registry. The information will be
used for subsequent operations, including software updates, so that unless the
file server is moved, you won’t need to specify the
file server path on a given system more than once. The following steps assume
the use of all default path names; Modify them as you see fit.
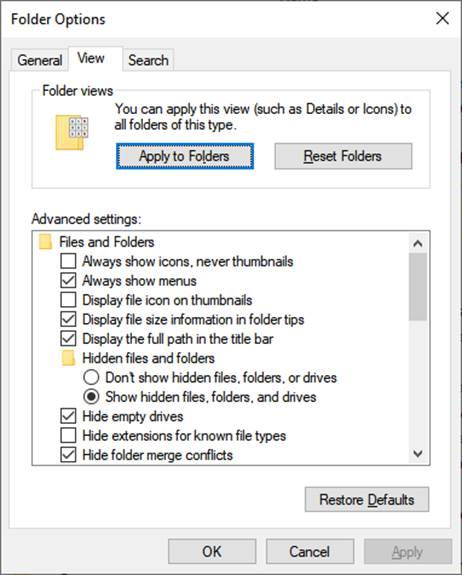
For proper file management, it’s
recommended that you disable the option to hide file extensions for known file
types as indicated below (View… Options… Change folder and search
options). When there is an open
connection to an Access database, (“.accdb” file
extension) an accompanying record-locking file (“.laccdb”
extension) is created, and it’s helpful to be able to
distinguish between the two. The presence of the record-locking file indicates
that there is an open database connection. In order to
perform file server maintenance, all connections must be closed.
- Please start by contacting us in
order to obtain a NetCIL file server. There is no charge for doing
so; We place no restrictions on NetCIL use, and payment of our suggested
fees is voluntary. We’ll configure a baseline file server with information
that is specific to your organization and then send you a link so that you
can download it onto your systems. If you are already a NetCIL user, and
you intend to convert from 32-bit to 64-bit Office systems, we’ll need to convert your file server to 64-bit format
for you.
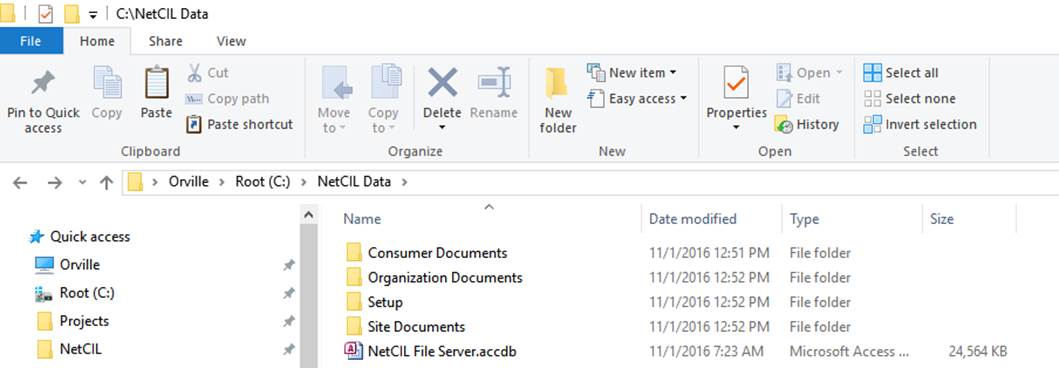
- Create a folder called
“C:\NetCIL Data” and, if operating in a multiuser environment, ensure that
the folder is visible to all NetCIL users. The resulting directory
structure should resemble the following graphics:
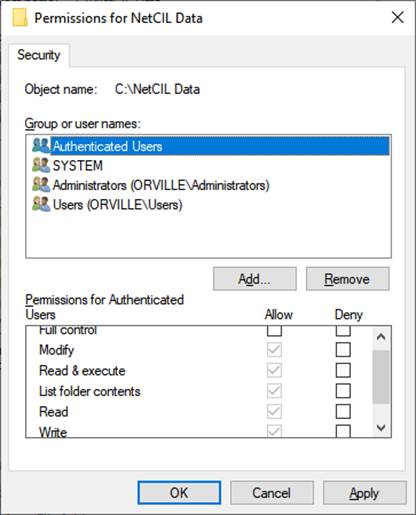
- Once created, set permissions on
the folder “NetCIL Database” (or its equivalent) to allow network file
sharing. If you run a Windows
server using Active Directory, it’s
recommended that you create a group
called “NetCIL”, assign those rights to the group, and then add all NetCIL
users to the group. Grant “Modify,”
“Read and Execute,” “List Folder Contents,” “Read,” and “Write” privileges
to the group, and then assign users to the group. The following graphic illustrates the
proper security configuration for a Windows 10 system:
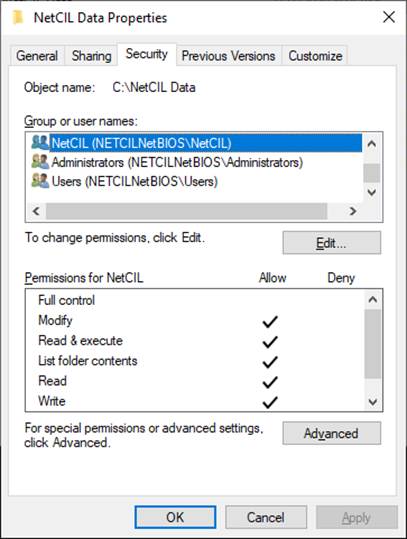
The next
graphic shows the same settings for a Server 2019 system using Active Directory
with a NetCIL group:
- Place your file server, normally
named “NetCIL File Server.accdb”, in the C:\NetCIL Data folder as shown in
Step 2.
- On your server, install NetCIL Manager
from the downloads section of the NetCIL website: https://netcil.com/Downloads.aspx
- If you
intend to run 64-bit MS Office applications, install the MS
Access Version 12 Database Engine, which is also available from the downloads section of
the NetCIL website.
- On your server, run NetCIL
Manager, and ensure that it is properly connected to your file server.
- If you wish to backup an
encrypted copy of your data to NetCIL servers on a regular basis, follow these
instructions.
- If you intend to configure your
system to deliver NetCIL applications remotely, skip to Step
16.
- Download the zip file https://netcil.com/Downloads/netcilmaintenance.zip
from the NetCIL website.
- Extract the batch script that is
contained in the zip file, edit as required, and configure it to run as a
scheduled process. More information can be found in the batch file text.
- On each workstation, install
NetCIL applications as required from the downloads section of the NetCIL
website: https://netcil.com/Downloads.aspx. It’s
recommended that you install NetCIL Client first, as all users will need
this file.
- Run NetCIL Client and, if
prompted, specify the location of the file server. Even if you use drive
mappings, it’s recommended that you use the fully-qualified
URL when you first connect, for example \\Server\Drive\Folder\FileName.
- When first run, NetCIL Client
will issue a security warning message. Once run successfully, this message
shouldn’t reappear.
- The remainder of these
instructions are only needed if you intend to deliver NetCIL applications
via RDWeb and Remote Desktop.
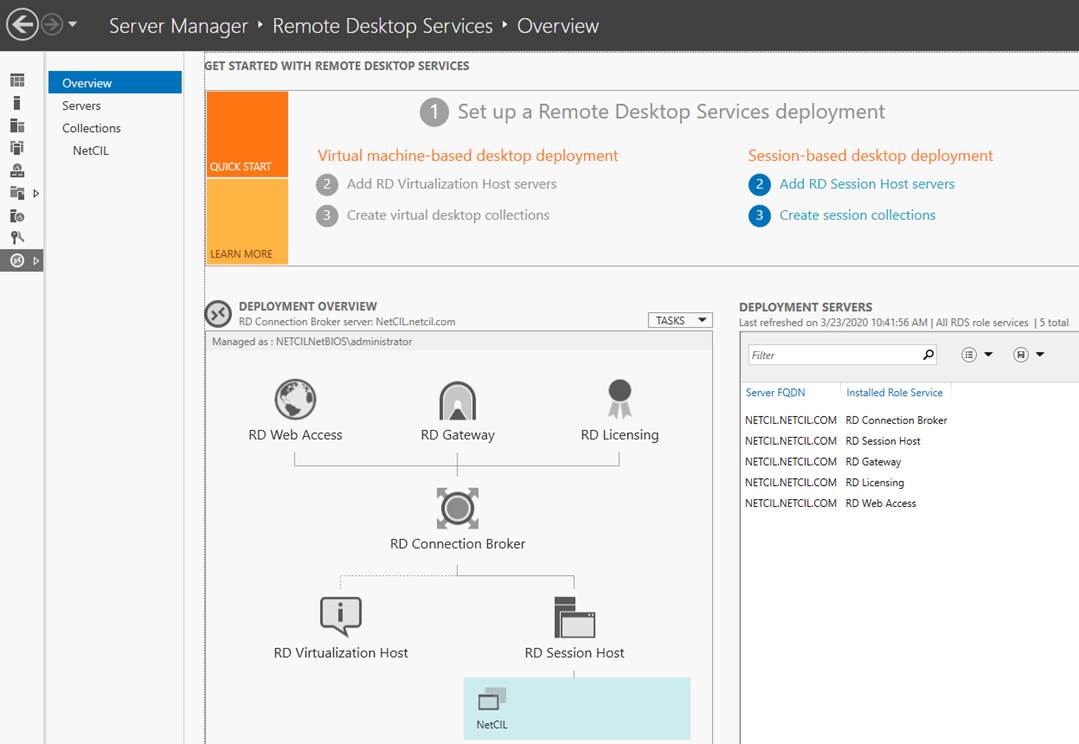
- These
instructions show a Windows Server 2019 instance that is configured to
assume all of the requisite RD roles: Web Access,
Gateway, Licensing, Connection Broker, and Session Host. The demands of
the NetCIL system are such that a single server can easily handle all of these roles with no performance issues. If your
organization has other requirements for server use, you can of course
configure your servers as you wish. The following instructions assume a
single-server configuration as shown in the following graphic:
- Install your own MS Office
applications and RDP licenses on your server as described in the Application Software Requirements section of these
instructions. Note that you’ll need a suitable
set of volume licenses and Remote Desktop licenses for your organization;
These can be obtained at reasonable cost from http://techsoup.org
It isn’t necessary to install the full version of MS Access; You will
however need to install a runtime version of Access 365. Both the 32-bit
and 64-bit versions are available in the downloads section of the NetCIL
website: https://netcil.com/Downloads.aspx
- After server configuration, MS
Office installation, and Remote Desktop licensing configuration, download
the zip file https://www.netcil.com/downloads/NetCILServerPackage.zip
from the NetCIL website.
- Follow the instructions in the
file ReadMe.txt that is contained in the zip file to extract the package
contents to local drives on your server.
- On your server, install NetCIL
Manager and NetCIL IRLog from the downloads section of the NetCIL website:
https://netcil.com/Downloads.aspx
- If you
intend to run 64-bit MS Office applications on your server, install the MS
Access Version 12 Database Engine, which is also available from the downloads section of
the NetCIL website.
- Run the file C:\NetCIL\NetCIL Client.exe and, if
prompted, specify the location of the file server. If your file server
isn’t located on a local drive, and even if you use drive mappings, it’s
recommended that you use the fully-qualified URL
when you first connect, for example \\Server\Drive\Folder\FileName
.
- Run NetCIL Manager,
and ensure that it is properly connected to your file server.
- If you wish to backup an encrypted
copy of your data to NetCIL servers on a regular basis, follow these
instructions
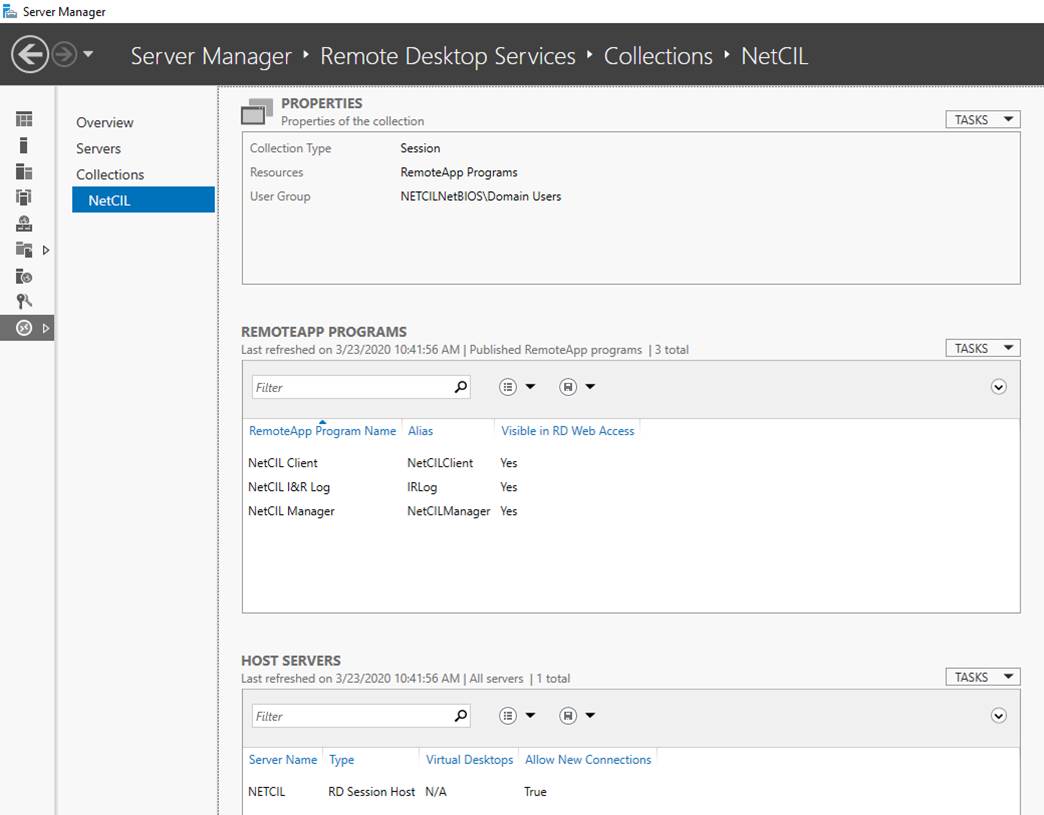
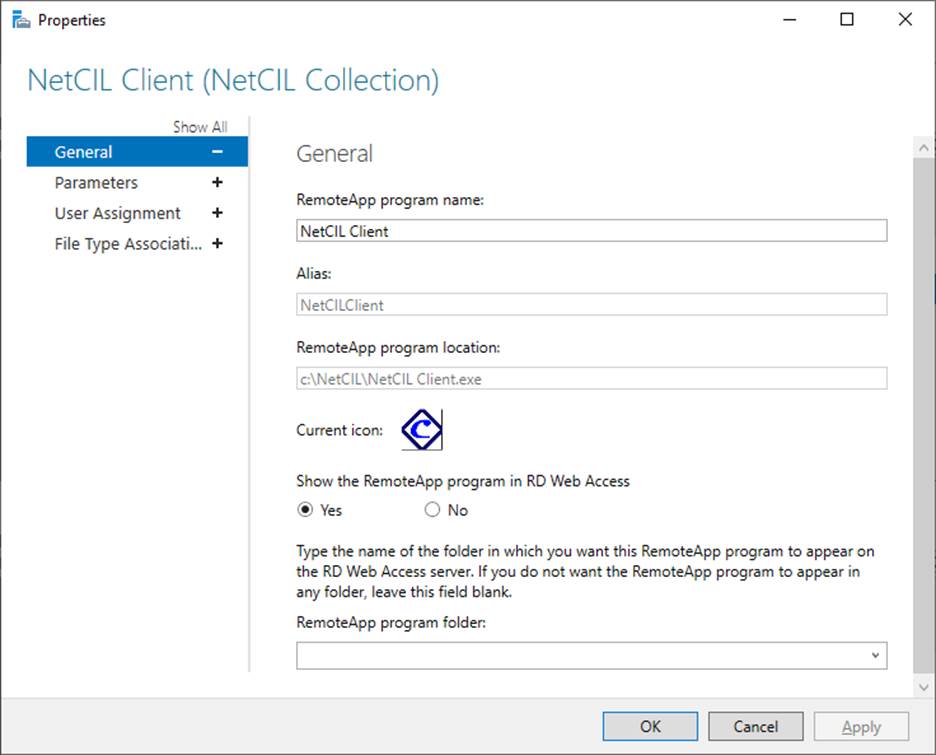
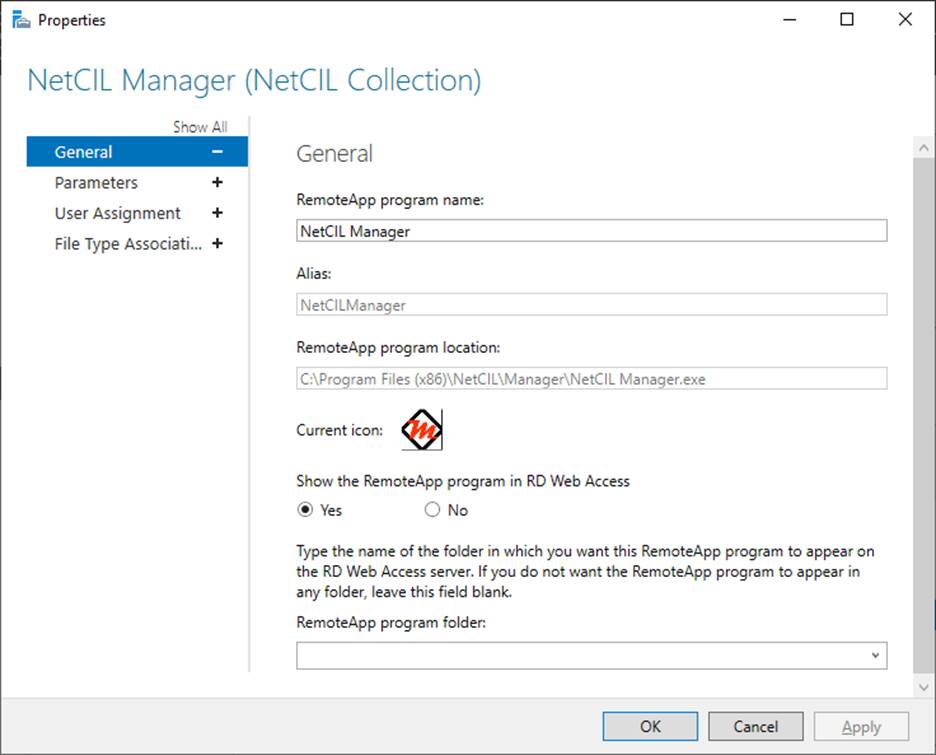
- Create a collection in your RD
Session Host called “NetCIL”. Configure the collection with the following
applications as shown below:
C:\NetCIL\NetCIL Client.exe
C:\Program Files
(x86)\NetCIL\Manager\ NetCIL
Manager.exe
C:\Program Files
(x86)\NetCIL\IRLog\IRLog.exe
- It’s highly recommended that you
install a security certificate on your server. You can then either deliver
NetCIL applications to your users via {Your URL}/RDWeb, or just use RDWeb
to generate the requisite RDP files that you can distribute to users for
operational use.